When visiting sites, you can often find too small or large text, images are illegible or take up too much space on the monitor screen. In all these situations, in order to achieve maximum comfort in the perception of content, improve user experience and efficiently perform work tasks, it is necessary to change the scale of the web page or font sizes. How is this done practically?
The problem with the perception of content arises not only on the Internet, but also when working with graphic and text editors. To see the document in different angles, to ensure maximum convenience and productivity, it is also often necessary to change the scale of the image on the computer screen in one direction or another.
How to change the text scale in the browser
There are many different browsers and the problem of scaling fonts in all is solved by their own means. There is a fundamental difference in the way content is resized on desktop and mobile computers. It is useful to consider at least the most common options.
Below in the screenshot Google browser Chrome. It has a zoom function in the menu. You can make content giant or tiny.
A very good option - few people like to constantly use horizontal scrolling when reading texts, especially large ones. If the font is too small, you need to use the combination Ctrl + Plus. And if the text is too large - Ctrl + Minus. Simple and convenient.
And if you need to change the scale of not the text, but the entire page? It's even easier. The computer mouse is used to scale the entire image. You need to hold down the Ctrl key and rotate the wheel on the mouse. Turning it towards you reduces the page size. And if you rotate the wheel away from you, it increases.
Opera has the greatest convenience for reading text content on sites on the Internet. This is the most popular Internet browser in our country. Using the key combination Ctrl + F11, you can adjust the length of the line to the width of the monitor screen.
These scaling methods work in most types of browsers. Only other browsers do not provide the Word Wrap function - automatic line wrapping to fit the page.
Zooming in test editor
The generic methods above also work in applications such as Microsoft Word, Notepad, Wordpad and others. Those. the same combination Ctrl + Plus works here, and Ctrl + mouse wheel (up or down)
The Word wrap function is present in text editors and professional-level office suites. This option may be called differently.
- Line break.
- word wrap.
- View “like in a browser”.
- Web format.
If the user wants to see how Text Document or a photo, the picture will look like in printed form, you need to change the page view to Print Layout. In this way of displaying a document, you can adjust the viewing scale of one entire page, two pages, or even any desired number of pages at once.
Often in text editors, a special panel with Plus and Minus signs is provided for changing the page scale. Or you can change the scale by dragging the slider with the mouse arrow. The combination of the mouse wheel and the Ctrl key in text editors usually works. Sometimes it is possible to change the scale and size of the font using separately configured hotkeys. The user can choose any convenient combination for scaling.
As mentioned above, many browsers do not have the option to automatically line-wrap to the width of the motor. How to be in such a case? In such browsers, you can change the page scale and font sizes through the Settings menu. Open the Settings menu, go to the Content tab, then Scaling and make settings for your convenience. The names of the settings menu items can be individual for different types browsers.
Scaling in mobile computers
For smartphones and tablets, the task of scaling content is even more important, since the screen sizes are small and there are serious difficulties when reading texts or viewing pictures.
Basically, developers mobile devices are well aware of these issues and are doing their best to improve the experience of smartphone and tablet users. Here the situation also depends on the specific type of browser or text program.
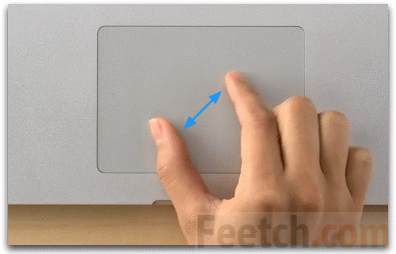
Instead of the combination of the Ctrl key and the wheel computer mouse on the touch screens mobile computers double tap is used. If you simultaneously touch the screen of the tablet and move your fingers apart, the scale of the page will increase. And if the fingers are brought closer to each other, the image will decrease.
And how is the issue of scaling texts solved on tablets? Some types of mobile browsers have an option to fit the text to the width (line break). Mobile browser Opera has such a function. Only now it does not work correctly in all versions of Opera. It also has the Word Wrap feature, one of the best mobile browsers Dolphin.
Mobile Mozilla browsers Firefox and Google Chrome traditionally do not have the function of fitting the page to the width of the screen. But in these two browsers, it is very convenient and quick to change the size of the main text in the Settings. You need to open Settings and find the Text Size. A sample font size will be shown there. By moving the zoom slider with a finger, the user can visually select the most convenient letter size for reading. After returning from the settings to the site, all texts on web pages will be exactly this size. True, there are sites where text scaling is prohibited at the code level. There's nothing you can do about it - you have to arm yourself with a magnifying glass. And it's better to just leave a site that does not care about the health of the users' eyes.
This article discusses the issues of working with document windows, in particular, transitions between windows, working in the comparison mode, and presenting documents in several windows. Described how to change the scale of a document when working with the "Scale" group, and separately with the "Scale" window and the scale slider.
Working with windows
Figure 1. Transition between windows.
Simultaneous work with two document windows
It is often necessary to work with two windows at the same time, for example, when editing documents of the same type.
- Opening two or more documents.
- Tab "View" - "Next". If more than two documents are open, select the required two from the "Compare next to" drop-down list. The synchronous scrolling function will automatically turn on, which is very convenient. But if you do not need it, click on the "Synchronous scrolling" button (yellow highlight will disappear), after that scroll each window individually. When you find the desired section of the document, you can turn this feature back on.
Figure 2. Simultaneous work with two windows.
Use the Restore Window Arrangement button if you want each window to take up exactly half of the screen.
Simultaneous work with one document in two windows
When working with documents containing a large amount of text, it is convenient to split the window in two.
- Tab "View" - "Split". Then choose a convenient position for the dividing line. You can move it vertically or horizontally by holding LMB.
Now you can do standalone operations in each window, such as copying sections of text in one window and then pasting into another.
To remove separation:
- "View" - "Remove division".
Figure 3. Simultaneous work with one document in two windows.
Creating additional windows of the same document
- "View" - "New Window".
Note that numbering appears at the end of the document title (1,2,3, etc. depending on the number of open windows). Each new window can be edited independently without affecting other windows.
Simultaneous viewing of all open document windows
You can simultaneously view all open documents on the monitor screen. Note that the more documents you have open, the smaller their size will be.
- View - Arrange All.
Figure 4. Simultaneous viewing of all open document windows.
Changing the scale of a document
The Zoom tool lets you zoom in or out on text. The file size of the document does not change. Depending on the set parameters, a document can take from one to several pages, and occupy a different amount of space on the monitor screen.
1st way:
- "View" - "Scale".
Choose one of the desired options:
- "One page" - the current page is displayed in full size, which is very convenient for visual control of the text position on the page.
- "Two pages" - similar to the first, only two pages.
- “Fit to page width” - more precisely, to the width of the screen, very convenient for typing. The page "stretches" across the width of the monitor screen, similar to the "Draft" mode (but with the preservation of rulers and scroll bars).
- "100%" - sets the scale of the document almost corresponding to the real one.
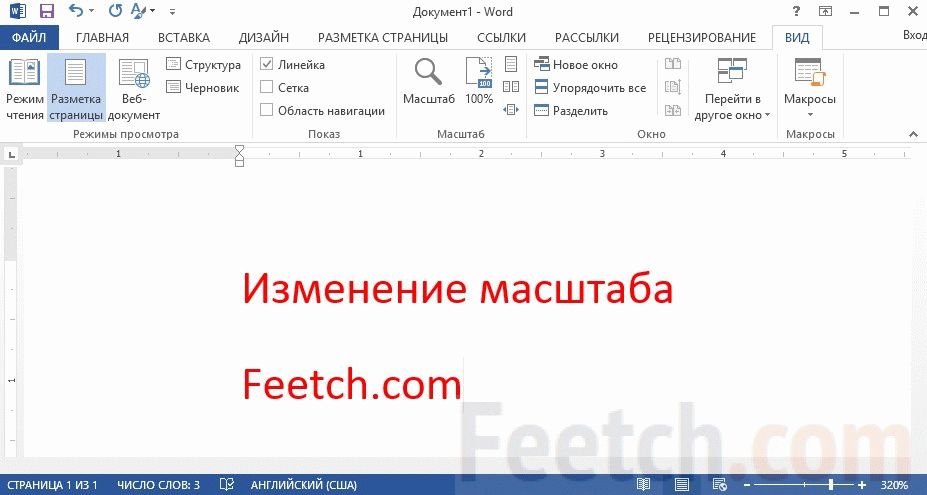
- "Scale" - opens the "Scale" window, which opens up a number of options for adjusting the size of the document:
- "200%" - the size of the document is twice the size of the original.
- "75%" - ¾ of the original size.
- "Fit to Text Width" - almost identical to the "Fit to Page Width" scale, only the edges of the page are missing, the text looks larger, and the text field takes up almost the entire screen (when the ribbon is hidden)
- “Multiple Pages” - allows you to display all or several pages of the document on the screen at once. You can adjust this number using the monitor button. In the Sample window, you can see general form document and all zoom changes that occur with it. It is advisable to use to view the document in general or parts of it.
2nd way:
Hide/show zoom slider.
- Right click on the status bar.
- Check/uncheck the box next to "Scale".
Figure 5. Window "Scale".
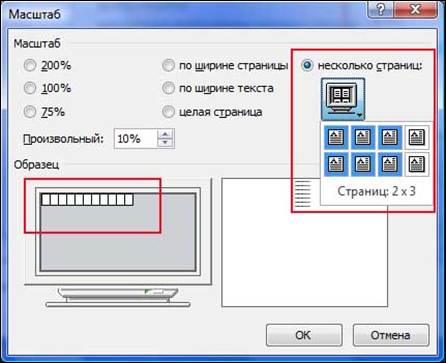
Figure 6. The "Multiple Pages" area of the "Zoom" window.
Figure 7. Document page in the "Multiple Pages" scale.
Conclusion
The article addresses the following questions: how to compare two documents side by side, how to create multiple windows of the same document, how to navigate between windows open documents how to view all at once open windows and how to split the document window in two. With regard to changing the scale of the document, various ways The solution to this issue is to use the "Scale" group and the corresponding command buttons, as well as the "Scale" window and the scale slider.
There are at least five simple ways reduce the number of pages in the layout Word document without affecting the font sizes.
Many users text editor Word often pay attention to the fact that the last page their wonderfully designed document contains only one or two lines of text, which, moreover, increase total pages. When the document is printed, it looks like in the best way. To eliminate this shortcoming, users press the well-known "Page Fitting" button, available when selecting the " Preview". However, often the result of this button does not satisfy the author of the document. The fact is that the "Page Fit" command only reduces the size of all fonts used in the document, which is not always acceptable.
How else can you reduce the number of pages in your document without touching the font sizes? There are at least five easy ways.
Method one
First you need to look at your entire document and determine if it is possible to delete somewhere unnecessary words, spaces, empty lines. If there are pictures in the text, you can try to reduce their size.
Method two
If nothing can be painlessly removed from the text, you can try to hyphenate the text. By default, the editor does not use this mode and changes the spacing between words if justified is used, or wraps entire words on a new line. To turn on the hyphenation mode, select the "Language" command in the "Tools" menu, and then the "Hyphenation" command. A dialog box will open as shown in the screenshot below.
Check the "Auto hyphenate" box and click OK.
Method three
Try resizing the document margins. To do this, go to the "File" menu and select the "Page Setup" command. A dialog box of the same name will open, in which you can slightly reduce the left, right, bottom or top margins. As a rule, even a slight decrease in the size of the fields can give desired result. You just need to carefully review the entire document again so that side effects are not found in the form of merging headers and footers with the main text or something else.
Method four
Changing line spacing or spacing between paragraphs can have a good effect. Most easy way change intervals is to change the corresponding parameters of the styles used. But if your document has style chaos, then in the "Format" menu, select the "Paragraph" command. A dialog box will open, in which on the "Indents and Spacing" tab you should change the desired parameters.
Method five
This method still affects the font size, but not all, but only the headings. If your headings are styled, even if they are standard styles provided by the editor, select all headings of the same kind in your document and reduce their size by at least half a point. Visually, such a change is practically not noticeable, but the result can be quite good.
Method six (bonus)
Decrease the character spacing. From the "Format" menu, select the "Font" command and go to the "Spacing" tab. In the "Interval" field, select the "Condensed" option and set the value to your preference. Yet again, best result may give a specific style change rather than sample text in some paragraph.
Thus, you can choose from the proposed methods the most suitable for you and use in your work. Just do not forget to analyze the resulting result in order to detect in time undesirable consequences and fix them.
How many words fit on a sheet of paper? It depends on the type of document, on the user who creates this document, not to mention who it is intended for...
The standard paper on which most documents are printed is A4. It is her Word that considers standard page, the elements of which (fields, etc.) the user can change at his discretion. But the user can choose another page format. The program allows you to set any page size - from a small sticker to a huge "sheet".
Setting the page size is done using the dialog box Page settings. Next, you'll learn how to change the size settings for the paper you're going to print on.
- Choose a team File>Settings pages. A dialog box will appear Page settings.
- Make sure the tab is enabled Paper size.
Your dialog box should look similar to what it looks like in Fig. 14.1. If the window looks different, click the tab label Paper size.
- Click the dropdown Paper size.
A list of common paper sizes will open.
- Select a new size from the list.
For example, B4 (25x35.4 cm).
Almost all printers can print on multiple paper sizes. However, the list also includes sizes that will not be able to handle your device for printing; not to mention the fact that you will have to rack your brains over the question of where to get paper of this size. Word will not be able to enlarge a sheet of A4 paper by a few centimeters!
- Listed Apply select To the whole document or Until the end of the document.
Selecting the Entire document option means that the new size will be applied to the entire document, from beginning to end. Selecting the Until the end of the document option means that the new size will be set for the current page (that is, the one in which the cursor is located) and all subsequent pages of the document. If your document is divided into sections, you can select the Fit to current section option, and then the new size will be set only for the pages of the current section. (See Chapter 15 for more on sections.)
- Click the button OK. Excellent!
Rice. 14.1. Page Setup dialog box with Paper Size tab
The new paper size is set.
- Note that page settings are set using the File menu, not Format. it common mistake novice users, although there is some truth in their logic. There is a question about the correctness of the logic of the computer ...
- If you are going to print on custom size paper, be sure to load it into the printer. Some "smart" printers even tell you what paper is required. My printer, for example, constantly requires paper of one size, then another. Looks a lot like my wife...
- Possibly on the list Paper size will not be the paper size you are printing on. In this case, select the other option from the list, and then enter the required size manually - in the fields Width and Height.
- Don't Forget About the Area Sample dialog box Page settings. It will show you what the resized sheet looks like.
- To learn how to print envelopes, see
Many text users word editor it is not uncommon to notice that the last page of their wonderfully designed document contains only one or two lines of text, which, moreover, increases the total number of pages. When printing a document, this does not look good.
To eliminate such a drawback, users press the well-known button Page Fitting, available when you select a command Preview. However, often the result of this button does not satisfy the author of the document.
The fact is that the "Page Fitting" command only reduces the size of all fonts used in the document, which is not always acceptable.
How else can you reduce the number of pages in your document without touching the font sizes? There are at least five easy ways.
Method one
First you need to look through your entire document and determine if it is possible to delete extra words, spaces, empty lines somewhere. If there are pictures in the text, you can try to reduce their size.
Method two
If nothing can be painlessly removed from the text, you can try to hyphenate the text. By default, the editor does not use this mode and changes the spacing between words if justified is used, or wraps entire words on a new line. To enable the transfer mode, you need to in the menu Service choose a team Language and then the command . A dialog box will open as shown in the screenshot below:
Check the box on the option Automatic hyphenation and click OK.
Method three
Try resizing the document margins. To do this, go to the menu File and select command Page settings. A dialog box of the same name will open, in which you can slightly reduce the left, right, bottom or top margins. As a rule, even a small reduction in the size of the fields can give the desired result. You just need to carefully review the entire document again so that side effects are not found in the form of merging headers and footers with the main text or something else.
Method four
Changing line spacing or spacing between paragraphs can have a good effect. The easiest way to change spacing is to change the appropriate settings for the styles used. But if there is style chaos in your document, then in the menu Format select a team Paragraph. A dialog box will open in which, on the tab Indents and spacing and change the settings as needed.
Method five
This method still affects the font size, but not all, but only the headings. If your headings are styled, even if they are standard styles provided by the editor, select all headings of the same kind in your document and reduce their size by at least half a point. Visually, such a change is practically not noticeable, but the result can be quite good.
Method six (bonus)
Decrease the character spacing. On the menu Format select a team Font and go to the tab Interval. In the Interval field, select an option compacted and set the value as you wish. Again, changing a particular style may work best, not just selective text in a paragraph.
Thus, you can choose from the proposed methods the most suitable for you and use in your work. Just do not forget to analyze the resulting result in order to detect undesirable consequences in time and correct them.