The time is approaching when it will be necessary to take the course. In many educational institutions, when preparing a term paper, a frame is required, designed according to the standard.
In general, the framework for the design of term papers and theses is a separate headache for students. To understand how important this is, know that the teacher may simply not accept a course project without a frame. Of course, the content is more important than the frame. However, the framework for term paper must be drawn up in accordance with GOST, because if desired, the inspector will be able to find fault with any inaccuracies.
As you can see, the frame adds hassle to the design of the work, and many are interested in the question: how to insert a frame for a term paper or diploma in word document. Let's consider several ways.
Ways to create a frame for a coursework
You can draw a frame by hand using a stencil. This is not a very popular way.
Those who know the AutoCAD program can create a frame in it, print to blank sheets and then print the course text over the sheets with a frame.
This is the old tried and true method, but there are more rational decision. Frame for format drawings A3 and it is no longer advisable to carry out in a special drawing program.
Frame can be drawn for any drawing
But often a frame is required for coursework notes of the format A4. With help Word you can also create a frame for a term paper or diploma, and this greatly simplifies life. How to insert frames in word for coursework? Read the answer below!
Frame for term paper in Word 2007, 2010, 2013, 2016
Let's create a frame according to GOST for a term paper in Word 2010. Open new document and first of all in the tab "Markup pages" set the fields. In our case:
- upper - 1,4 cm;
- lower - 0,43 cm;
- left - 2,9 cm;
- right - 1,3 cm.
Please note that your university may have its own requirements for registration.
Important: The document must be divided into sections or insert breaks.
This is done so that the frame is on the right pages. For example, the title page does not need a frame, unlike the main part of the work. Moreover, it happens that different pages need different frames.
Choose a tab "Page layout", then "Tears", click on the button "Next page". Let's leave the first page for the title page and create a border on the second page in the second section of the document.
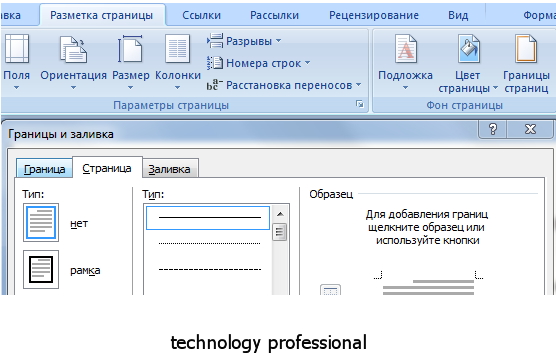
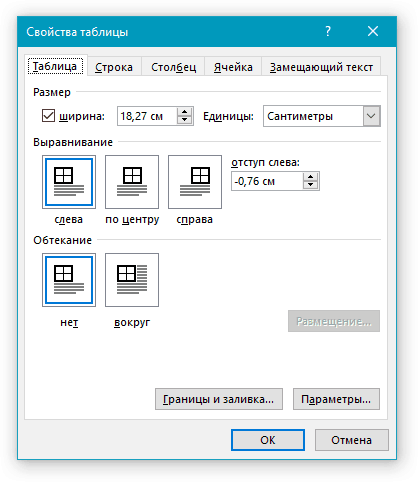
- In the Page Layout tab, select "Page Borders". Specify the border type - frame. In the parameters, specify the margins of the frame. Upper - 21 fri, bottom - fri, left - 21 Fri, right - 19 Fri. Also, do not forget to specify the fields relative to the text and check the box next to the parameter "All Ahead". The border is applied to the current section.
- Click OK and we see that a frame has appeared on the page.
- Now you need to insert a table at the bottom of the sheet. To do this, first in the tab "Insert" choose "Footer", then "change footer", turn off the function "as in the previous section".
- We insert the table of the desired configuration. We insert a table into 8 lines and 9 columns. In the tab "Layout" to work with tables, specify the cell sizes. Height - 0,5 see. We set the width of the cells from left to right: 0,7 cm, 1 cm, 2,3 cm, 1,5 cm, 6,77 cm, 1,5 cm, 1,5 cm, 2 cm.
Ready. Now you can combine the cells and enter the necessary information about the university, department, teacher, and work into them. Here we will enter arbitrary text, and leave the cell for page numbers empty. We received one sheet with a frame for the term paper. When switching to next page the current section of the document, the same frame with a table will automatically appear on it, and you can safely write a work without thinking about the frame.
By the way! For our readers there is now a 10% discount on
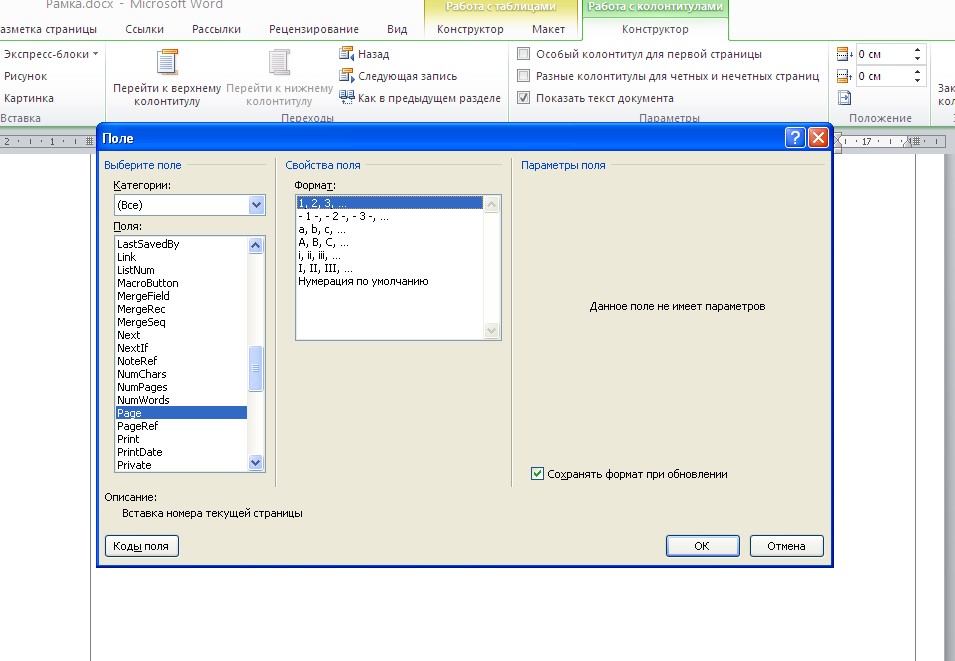
How to make automatic pagination in a frame
Select the table cell that will display the page number and click on it. Then click on the footer, and in the tab "Constructor" select button "Express blocks", Further - "Field". In the window that opens, select the field Page and specify the desired number format. Voila - page numbers are displayed automatically in the selected cell.
Download a ready-made frame for a term paper for free
How else can you create a frame? Get ready! Millions of students have framed their papers and there are many templates and templates for coursework frames. If you do not have time to master all the intricacies of working with frames, you can download a ready-made one for free.
Now you know how to make frames in Word for coursework or thesis. To make everything as clear as possible, watch the video on creating frames with a stamp for coursework in accordance with GOST. It remains only to remind you that we are always ready to help you with tasks - from creating a frame to writing an essay or a whole diploma. You can count on us.
Do you need the most big collection framework in Runet? Then you have come to the right place!
There are text boxes. They are also used to frame paintings, photos, and what is especially interesting for us, electronic documents word. Agree, dry text, made in black and white not very pleasing to the eye. Of course, if we are talking about business documentation, then you need to adhere to the appropriate style. You don't really have to experiment here. But even here you can make a stylish page frame.
note . At the end of the article, there are frame sets available for download for you -.
Another thing is if we create a letter, a children's book, or any other document of an entertaining nature. Here we can safely turn on the imagination, and make a beautiful and bright design of the document, thanks to the use of all kinds of frame variations available in Word.
. Do not forget that the finished document should be designed with the highest quality. Do not forget to put down numbers for each page (see).If you need to frame a piece of text in any document that is published on your site, you can use HTML tools for this (see).
Adding frames in different versions of the editor
This section is suitable for those who want to understand how to make a frame in word. The process is pretty similar across all editor options, but there are still slight differences. Let's start with the oldest version.
Frames in Word 2003
Open the document where you want to insert the border. Next, you need to do the following:
Frames in word 2007
Frames in Word 2010
Here the process is similar to that discussed above. Therefore, let's try to slightly expand the standard set of the editor. There is a large set of frames for Word: pictures, all kinds of lines, and even framing in the form of GOST frames. We suggest you download three sets (see):
- Some interesting pictures for frames
The archives have a pretty good set of frames. Run, see which suits you, and use.note. If you need a border in a document to have Additional Information, you can add it using footnotes (see )
Small tutorial video:
update. Added a set of patterned frames. Jun 5, 2015
Conclusion
Using frames will allow you to design your document, add the necessary technical fields, and make it more original and readable.
Can be used in any Word document. Thus, you can make the desired orientation for the entire document, or a separate sheet.
Allows you to create convenient navigation within the document. Use them to add a table of contents.
Why look for information on other sites, if everything is collected from us?
The academic year has just begun, but soon students will begin to perform settlement, graphic, coursework, scientific work. For such documents, of course, extremely high requirements for registration are put forward. These include the presence of a title page, explanatory note and, of course, frames with stamps created in accordance with GOST.
Each student has his own approach to paperwork, but in this article we will talk about how to properly make stamps for an A4 page in MS Word.
The first thing to do is to break the document into several sections. Why is this needed? To split the table of contents, title page and main part. In addition, this is how you can place the frame (stamp) only where it is really needed (the main part of the document), without allowing it to “climb” and move to other parts of the document.
1. Open the document in which you want to make a stamp, and go to the tab "Layout".
Note: If you are using Word 2010 or earlier, necessary tools to create breaks you will find in the tab "Page layout".
2. Press the button “Page breaks” and select from the dropdown menu "Next page".
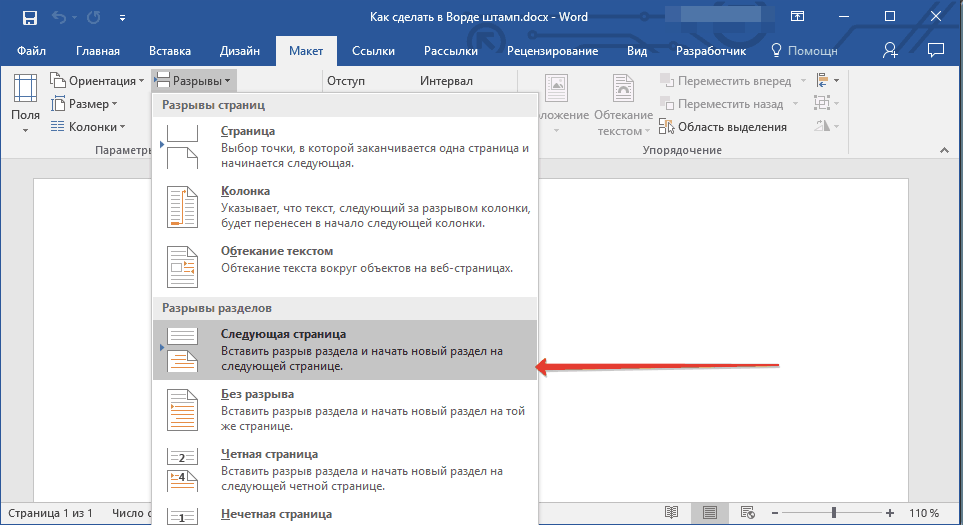
3. Go to the next page and create another gap.
Note: If your document has more than three sections, create required amount breaks (in our example, it took two breaks to create three sections).
4. The required number of sections will be created in the document.

Eliminate links between sections
After we have divided the document into sections, it is necessary to prevent the repetition of the future stamp on those pages where it should not be.
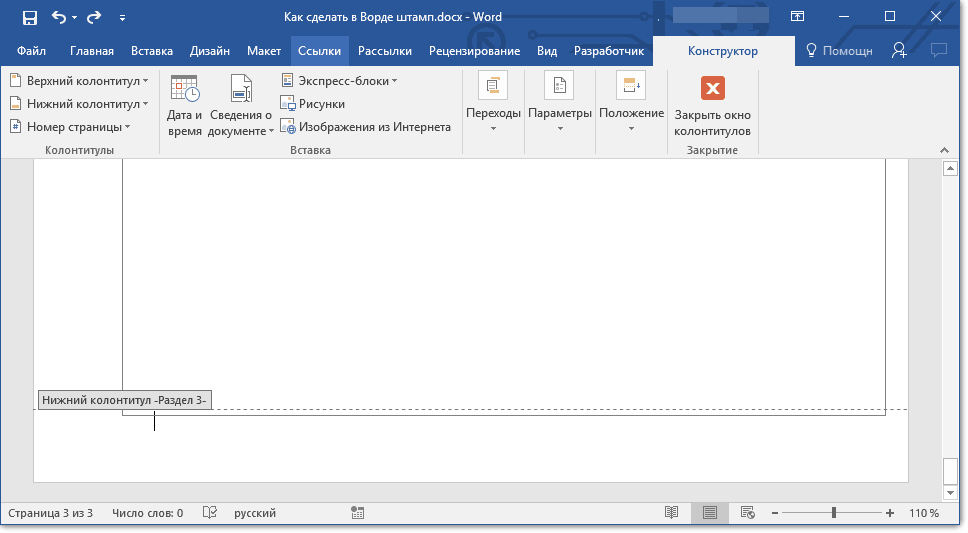
1. Go to the tab "Insert" and expand the button menu "Footer"(group “Headers and footers”).
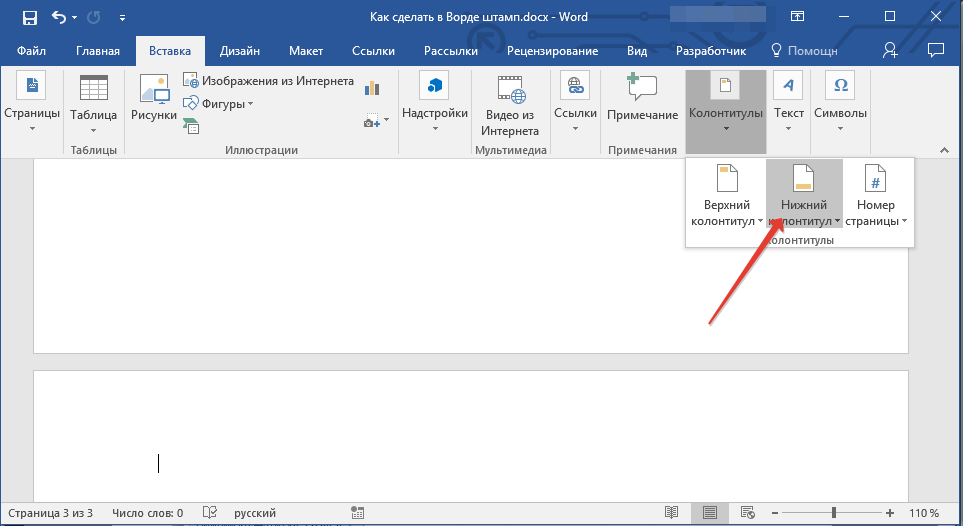
2. Select an item “Change Footer”.

3. In the second, as well as in all subsequent sections, click the button “As in the previous section”(group “Transitions”) - this will break the link between the sections. The headers and footers, in which our future stamp will be located, will not be repeated.
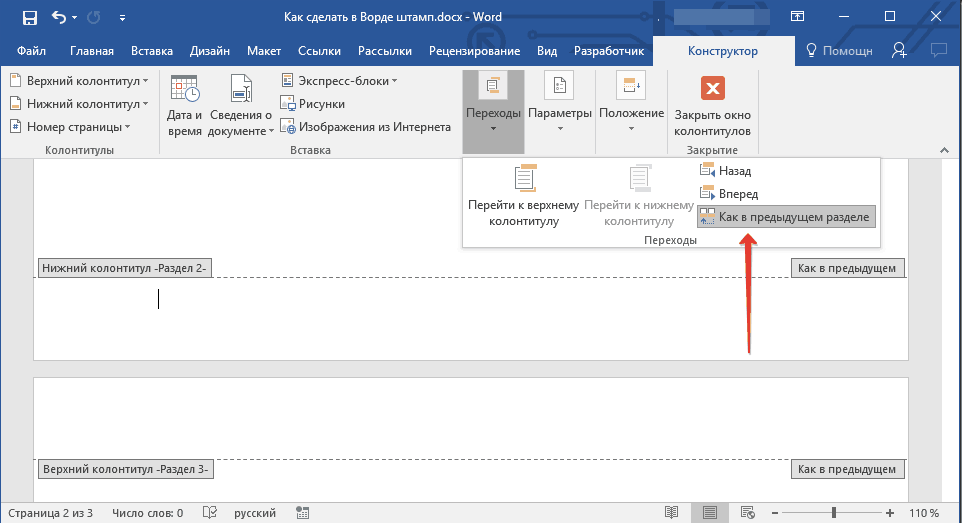
4. Close the header and footer mode by clicking the button “Close Header Window” on the control panel.

Creating a Stamp Frame
Now, in fact, you can proceed to the creation of a frame, the dimensions of which, of course, must comply with GOST. So, the indents from the edges of the page for the frame should have the following values:
20 x 5 x 5 x 5 mm
1. Open a tab "Layout" and press the button "Fields".
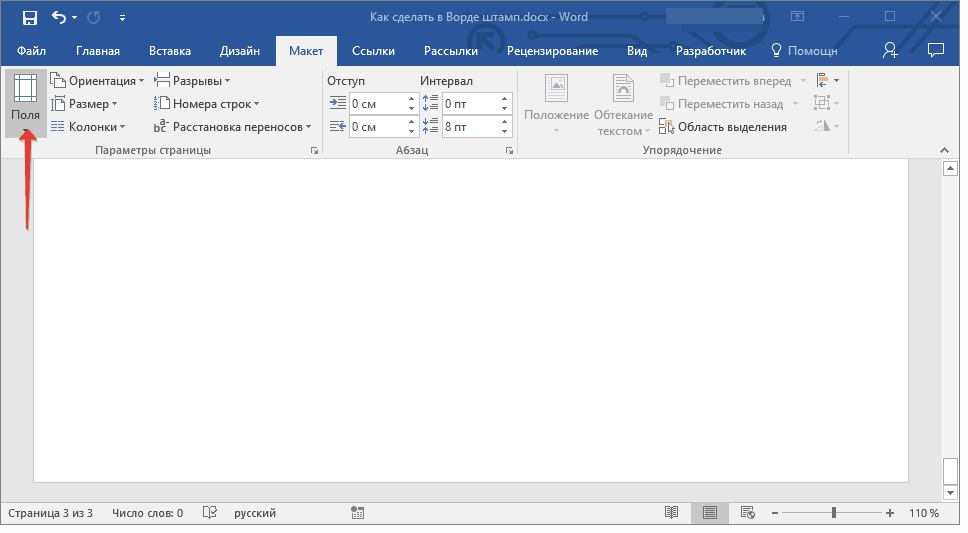
2. In the drop-down menu, select the item “Custom fields”.

3. In the window that appears in front of you, set the following values in centimeters:
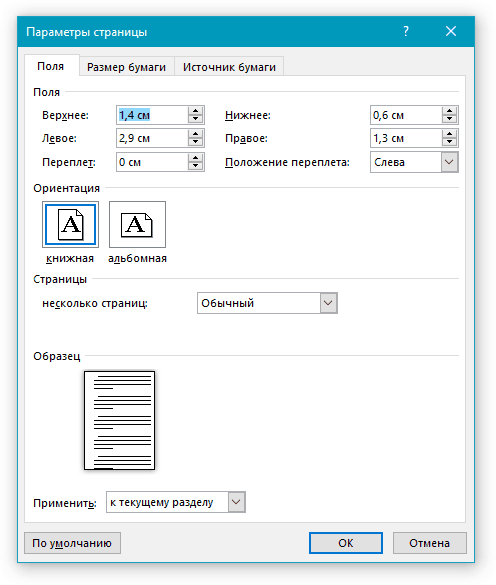
4. Click "OK" to close the window.
Now we need to set the page borders.
1. Tab "Design"(or "Page layout") click on the button with the appropriate name.
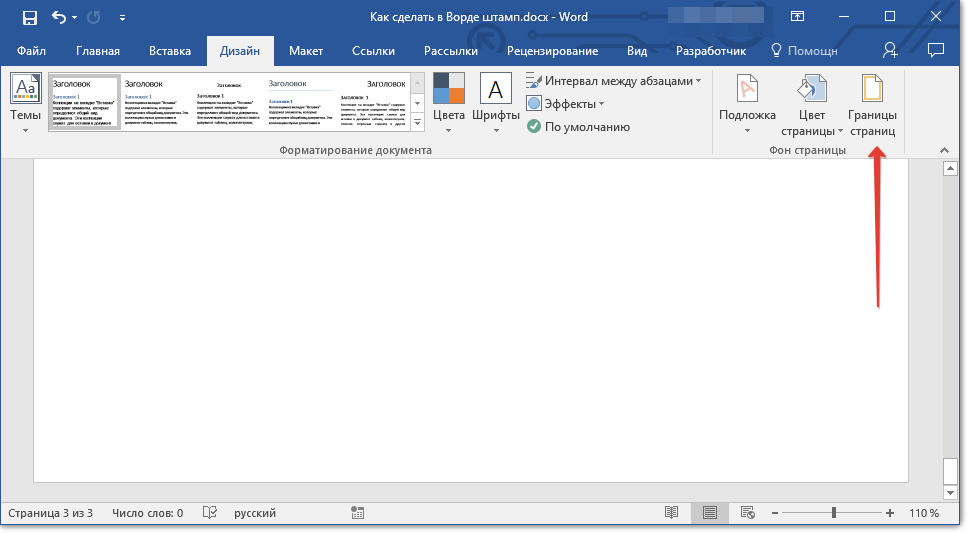
2. In the window “Borders and Shading”, which will open in front of you, select the type "Frame", and in the section “Apply to” specify "this section".
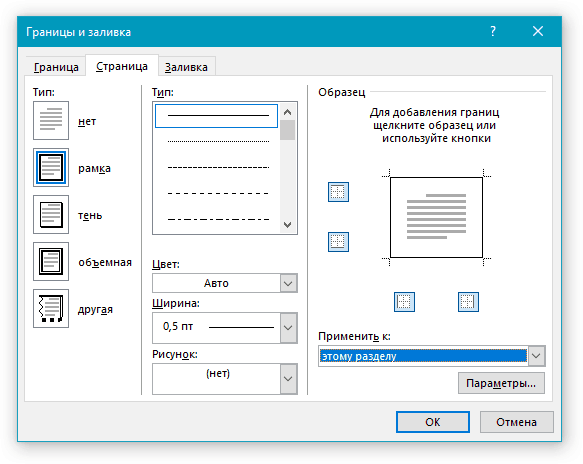
3. Press the button "Options" located under the section “Apply to”.
4. In the window that appears, set the following field values in “Fri”:
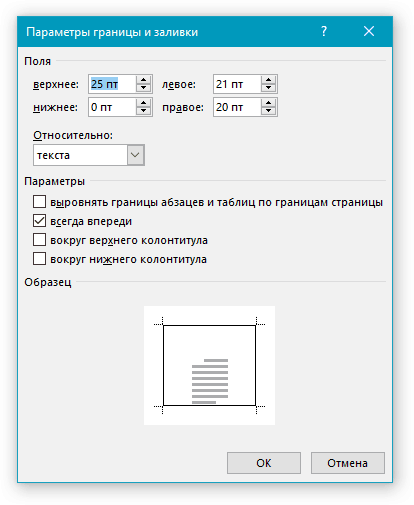
5. After you press the button "OK" in two open windows, a frame of the specified size will appear in the desired section.
Create a stamp
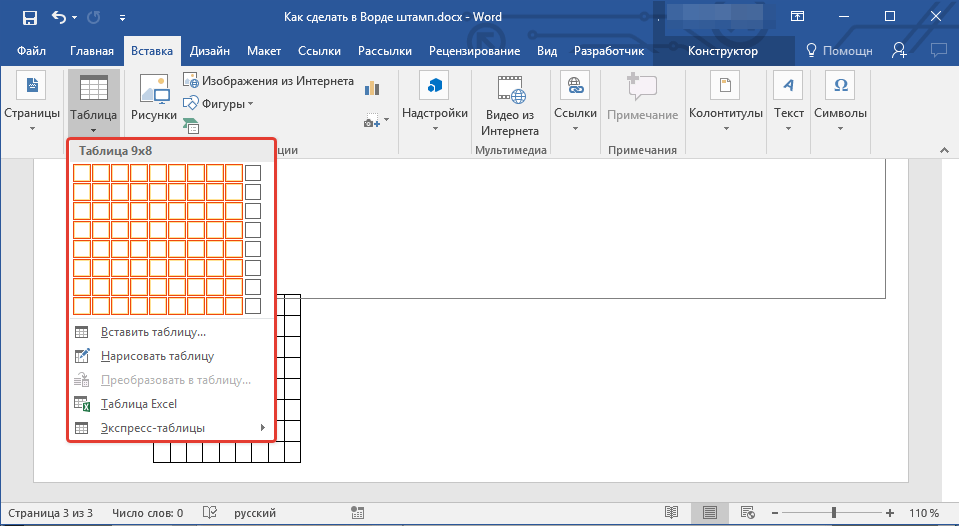
It's time to create a stamp or title block, for which we will need to insert a table in the footer of the page.
1. Double click on the bottom of the page where you want to add a stamp.
2. The editor will open footer, and a tab will appear with it. "Constructor".
3. In a group "Position" change the value of the footer in both lines from the standard 1,25 on 0 .

4. Go to the tab "Insert" and insert a table with dimensions of 8 rows and 9 columns.
5. Left-click on the left side of the table and drag it to the left margin of the document. You can do the same for the right margin (although it will still change in the future).
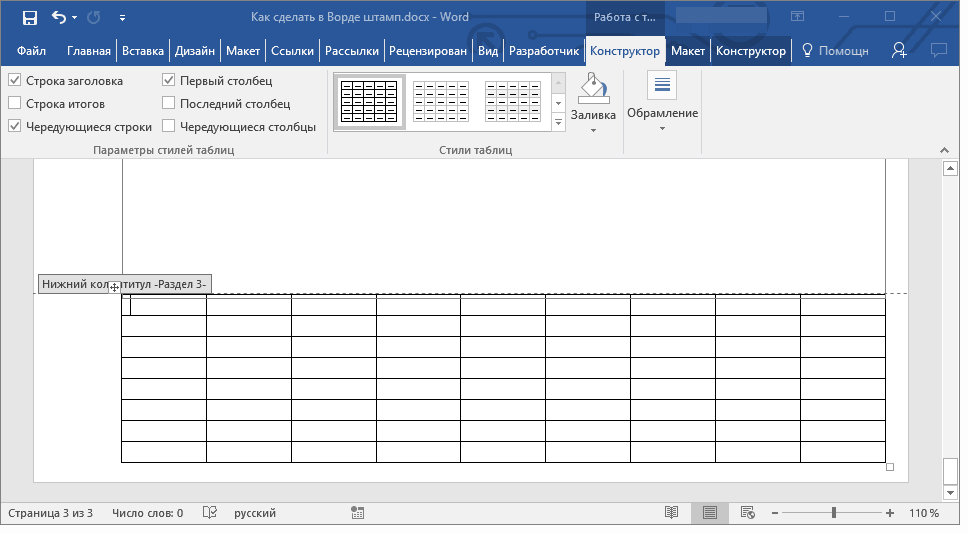
6. Select all cells of the added table and go to the tab "Layout" located in the main section “Working with tables”.
7. Change cell height to 0,5 cm.
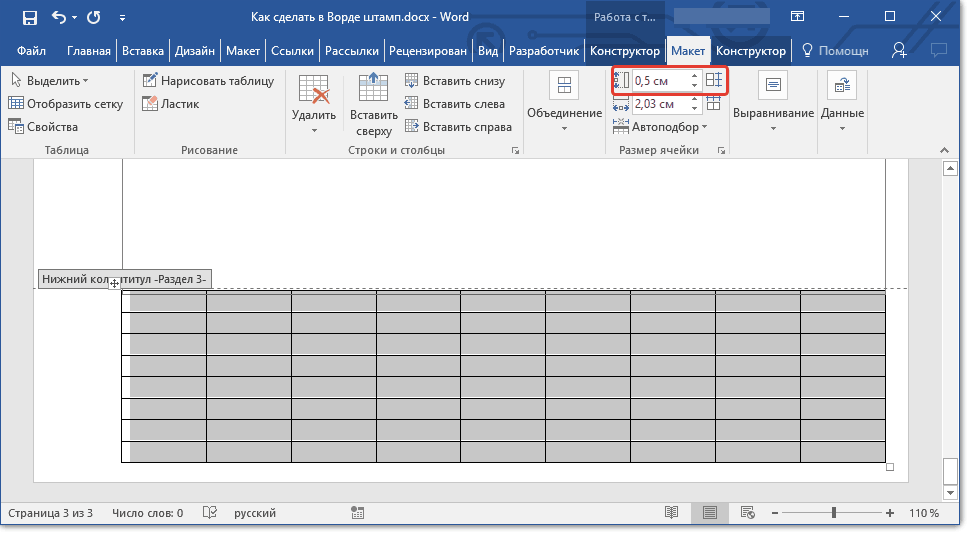
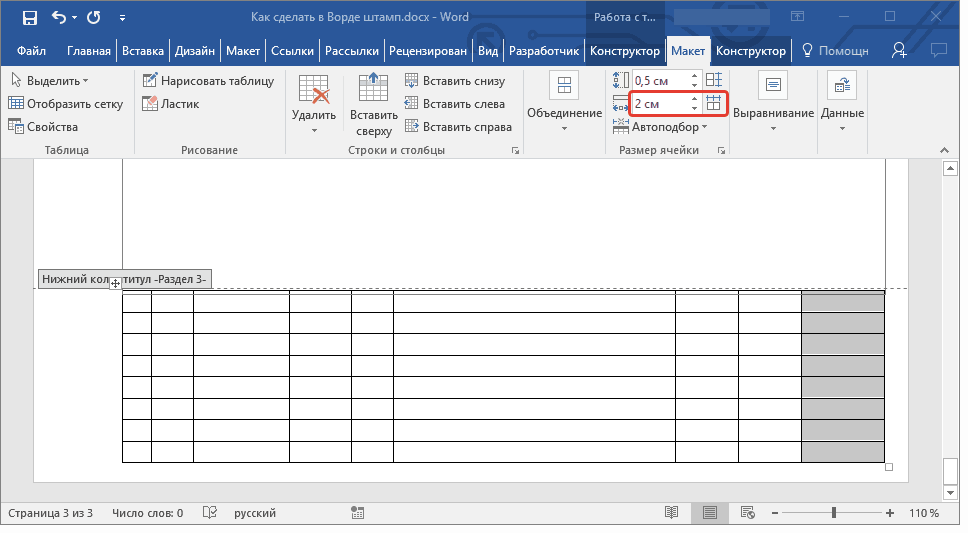
8. Now you need to change the width of each of the columns one by one. To do this, select the columns in the direction from left to right and change their width in the control panel to the following values (in order):
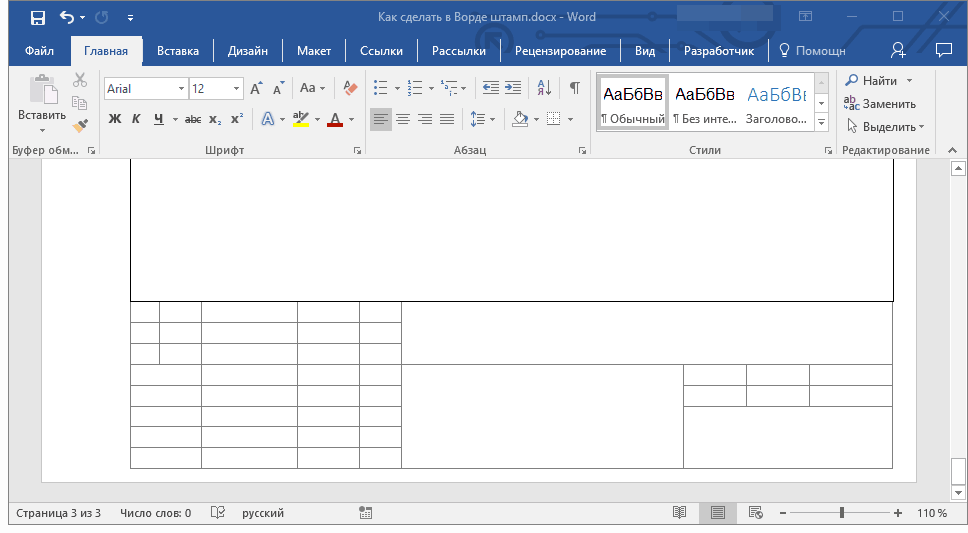
9. Merge the cells as shown in the screenshot. To do this, use our instructions.
10. A stamp that meets the requirements of GOST has been created. It remains only to fill it. Of course, everything must be done in strict accordance with the requirements put forward by the teacher, educational institution and generally accepted standards.
If necessary, use our articles to change the font and its alignment.
How to make cells fixed height
To ensure that the height of the table cells does not change as you enter text into it, use a small font size (for narrow cells), and also follow these steps:
1. Select all the cells of the table-stamp and right-click and select the item “Table Properties”.
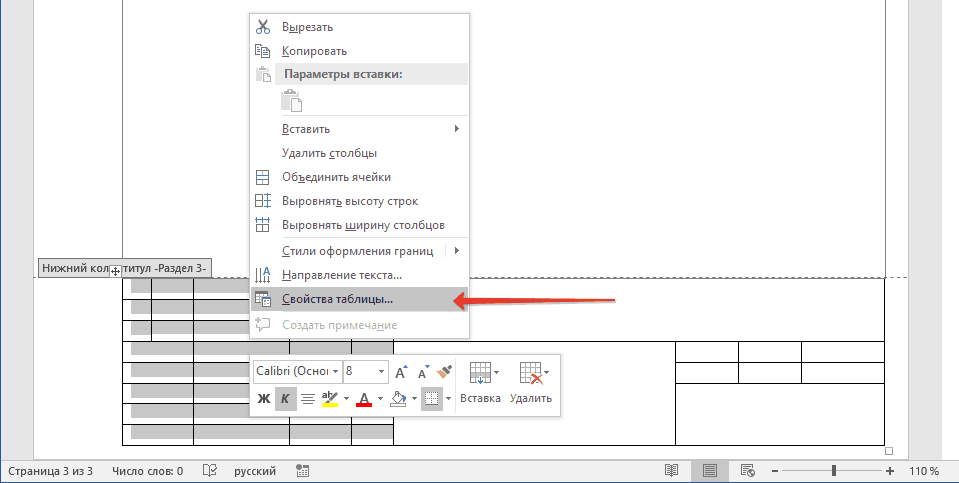
Note: Since the stamp table is in the header, selecting all its cells (especially after merging them) can be problematic. If you also encounter such a problem, select them in parts and follow the described steps for each section of the selected cells separately.
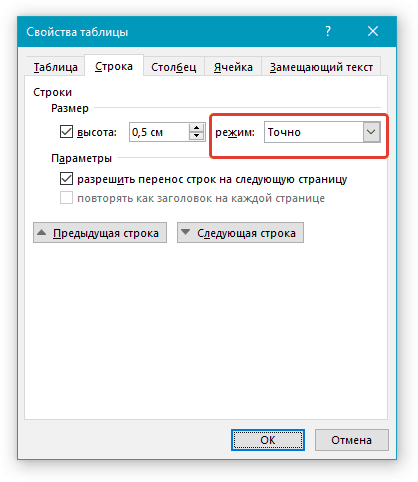
2. Go to the tab in the opened window "Line" and in the section "Size" in field "Mode" select “exactly”.
3. Click "OK" to close the window.
Here is a modest example of what you can get after partially filling the stamp and aligning the text in it:

That's all, now you know exactly how to make a stamp in Word correctly and definitely earn respect from the teacher. It remains only to earn a good grade by making the work meaningful and informative.