Outline plan
computer science lesson
« Information Technology
work with text.
Document Editing»
Compiled by: Chudutova Elena Byurchievna,
Informatics teacher MBOU "Elistinsky Lyceum"
Elista, 2015
Lesson topic: “Information technologies for working with text. Document Editing.
Lesson type: learning new material.
The purpose of the lesson:
Educational:
formation of students' knowledge about the purpose and main features of a text editorMicrosoft Word, familiarization with the structure of the MS Word window, familiarization with text editing operations;
Developing:
development of attention, memory, logical thinking, independence;
Educational:
upbringing information culture, discipline, perseverance, self-confidence.
Requirements for knowledge and skills of students:
Students should
know:
purpose and main features of a text editorMS Word, MS Word window structure.
Students should be able to:
run a programMS Word, close work, save the created document, use text editing operations.
Teaching and methodological support and lesson software:
"Informatics. Basic course. Grade 8 "Semakin I.G. - Moscow, Laboratory of Basic Knowledge, 2008;
Methodological guide for teachers Semakin I.G. "Teaching basic course informatics in high school”, M.: BINOM. Knowledge Laboratory, 2006;
Informatics and ICT. Task book-workshop: in 2 volumes. V.2 / L.A. Zalogova and others; ed. I.G. Semakin, E.K. Henner. M.: BINOM. Knowledge Lab, 2011
Lesson equipment:multimedia projector, testing system,MSWord.
Lesson plan:
Org. moment (3 min)
Setting lesson goals. Knowledge update (4 min)
Learning new material (13 min)
Fixing the new material (10 min)
Reflection (7 min)
Summing up the lesson and homework (3 min)
Technological map of the lesson.
Lesson stages
Teacher activity
Techniques and methods
Student activities
Formation of UUD
Organizing time(3 min)
Greeting students, checking students' readiness for the lesson, announcing the topic of the lesson,
announcement of the stages of the lesson
Verbal
Visual and demonstration
Write down the date and topic of the lesson.
Personal: creation of a comfortable health-saving environment, creation of conditions for obtaining knowledge and skills.
Setting lesson goals.
Knowledge update (4 min)
Declaring the objectives of the lesson.
Consolidation of the studied material
(Attachment 1)
Verbal
Visual and demonstration
Listen to teachers
Answer questions
Communicative: mastery of forms oral speech
Learning new material (13 min)
Explanation of new material
(appendix 2)
Verbal
Visual and demonstration
Listen to teachers
Working with a text editor
Personal: creating conditions for self-knowledge
Regulatory: ability to formulate own learning goals
Cognitive: ability to follow instructions
Communicative: understanding of the principles of building an interface, working with dialog boxes, mastering the style of text design
Consolidation of new material (10 min)
Announcement of Exercise Numbers for Practicing Editing Skills
(Appendix 3)
Problem-search
Do exercises in a text editor
Personal: creation of conditions for self-realization, the ability to organize one's own working time
Regulatory:
Cognitive: the ability to carry out planning, analysis, reflection, self-assessment of their activities, the ability to evaluate the initial data and the planned result, the ability to formalize the results of their activities
Communicative: mastering the style of text design
Reflection. (7 min)
Organization of work with the test system
(Annex 4)
Problem-search
Answer questions
Personal: creating conditions for self-realization, creating conditions for acquiring knowledge and skills that go beyond the scope of the topic being taught
Regulatory: ability to make decisions and take responsibility
Cognitive: the ability to carry out self-assessment of their activities, possession of skills in the use of technology
Communicative: conducting a dialogue "man" - " technical system", possession of telecommunications for organizing communication with remote interlocutors, the ability to work in a group, tolerance, the ability to build communication with representatives of other views
Summing up the lesson. Homework(3 min)
Analysis of students' activities, summing up the lesson, commenting on homework
(Annex 5)
Verbal
Listen to the teacher, ask questions, write down homework
Regulatory: the ability to set personal goals, understand and realize the meaning of their activities
cognitive: creation complete picture the world based on my own experience
Attachment 1
How is text stored on external media? (Text on external media is saved as files)
How many bytes of memory does the binary code of each character occupy in computer text? (The binary code of each character in computer text occupies 1 byte of memory)
How is each character encoded in the text? (Each character in the text is encoded with an eight-bit binary code)
How powerful is the alphabet used to represent texts in a computer? (To represent texts in a computer, an alphabet with a capacity of 256 characters is used)
What is an encoding table? (A table in which all characters of the computer alphabet are assigned serial numbers is called an encoding table).
What code is the international standard? (The international standard is ASCII - American Standard Code for Information Interchange)
What rule is followed in the encoding table? (Principle of consecutive coding of alphabets)
What is this principle? ( Letters(lowercase and uppercase) are located in alphabetical order, and the digits are arranged in ascending order)
Annex 2
Teacher: Let's talk about the time when there were no printed books. Is that possible? – you will be surprised. Maybe!
Long ago, books were written by hand. The ancient chronicler sat over the books for a very long time, drawing intricate letters. Writing a whole book by hand is incredibly difficult, so in ancient times books were considered the greatest value. Sometimes the chronicler worked for many months and years.
Why did ancient people work for a long time to create a book?
Student: wrote by hand
Teacher: Later people books began to be published. In Russia, the pioneer of printing was Ivan Fedorov. On April 19, 1563, Fedorov opened in Moscow the first "printing house" in Russia, that is, a printing house. The first book was printed almost whole year. Tell me, if Ivan Fedorov lived in our time, what would help him create a book faster?
Student: Of course the computer.
Teacher: Yes, the computer is the main tool for preparing texts.
What kind of information does the book contain?
Student : text, graphic, numeric.
Teacher: Text editor - an application program that allows you to create text documents, edit them, view the contents of a document, print a document, change the format, etc.
A text document is a file created with a text editor. It consists only of the codes of the character encoding table. A text document must have a certain structure. It should be divided into lines, paragraphs, pages, sections. Each line ends with special "Carriage Return" control codes (codeASCII- 13) and "New line" (codeASCII- ten). Often in names text files use the extension.txt- text. There are simple text editors like Notepad and powerful word processors likeMSWORD.
Students are seated at computers. Perform actions as instructed by the teacher.
In order to start MS Word, you must do the following:
Start - All Programs -Microsoftoffice- MS Word or launch MS Word shortcut on the desktop.
Let's take a look at the window word processor. It looks like this:
After launch, the main window of the MS Word editor opens. Let's get acquainted with its elements. On the screen you see the main window of the program.
The main window can be divided into five main areas:
Title bar
Main menu bar
Toolbar
Workspace
Status bar
Title bar
The window title contains the name of the program (Microsoft Word) and the name of the document (Document 1 by default). After the document is saved, the title bar will display the file name. Files created in Word program, is automatically assigned the extension .doc or .docx. On the right side of the title bar are the usual window control buttons (Minimize, Maximize, Close). On the left side of the line is a panel quick access, to which you can add frequently used tools.
Main menu bar
As in others Windows applications, the Word menu bar is a control that provides access to all the functionality of the program. Each menu item has its own toolbar.
Toolbar
In MS Word 2010, the toolbar opens when you select certain item main menu. The toolbar of each menu item is divided into sections.
Status bar
The status bar is located at the bottom of the main window. The left side of the status bar displays information about the current document:
In addition, the status bar contains operation mode indicators that inform which mode you are working in. this moment. The black color of the indicator corresponds to the on state, the gray color corresponds to the off state. The Zoom tool is also located on the right side.
Workspace
The working area of the Word window is the area of the document. In an empty work area, the text cursor, indicating the character input position, is located at the first position of the first line. The size of the text on the screen depends on the selected scale. You can set the desired scale using the menu (View -> Scale) or the Scale button on the status bar. In the drop-down list of the Scale button, select desired value. If the desired scale is not in the list (for example, 90%), the value is entered directly into the text field (the "%" sign can be omitted, it is enough to enter numbers) and the Enter key is pressed.
Rulers
Rulers (horizontal and vertical) allow you to visually assess the current position of the cursor in the text. However, in MS Word, rulers perform additional, perhaps more important, functions.
horizontal rulerallows you to visually change:
Paragraph indents
Fields per page
Width of columns and columns of tables
Set tab stops with mouse
As you move the cursor, the indent markers and tab stops on the horizontal ruler reflect the settings for the paragraph in which the cursor is located.
vertical rulerdisplayed along the left margin of the page.
With it, you can quickly adjust the top and bottom margins of the page, as well as the height of the rows in the table.
You can display the rulers on the screen as you wish, or remove them, thereby freeing more space for the document.
Exit MS Word
After the end of the current session, you must exit MS Word. To do this, you can use one of the following ways(slide 14):
Select menu File –> Exit.
Select the Close item in the system menu of the main MS Word window.
Place the mouse pointer on the system menu icon in the main MS Word window and double-click the left mouse button.
Click the Close button on the title bar of the main window.
Press Alt+F4 on the keyboard.
If in any of open windows contains unsaved information, MS Word prompts you to choose what to do with it. To do this, a dialog box similar to the following will appear on the screen.

To continue the operation, select one of the options
Yes - Saves the document and exits MS Word.
If the file has not yet been named, MS Word will open the Save Document dialog box
No - Exits MS Word without saving the document
Cancel - Closes current window dialog and returns to MS Word
Working with text editor. Editing.
Text input and editing skills are needed by the user not only to work with a text editor. These skills are basic when working with any kind of software where interactive mode is used. With any variant of character input, the user is given the opportunity to correct errors, that is, edit the text. There is the concept of a basic editing standard. This is a set of operations that are performed in the same way for all variants of character input.
Techniques of the main editing standard:
Appendix 3
Performing exercises No. 1, 6, 7, 9, 10 pp. 9 - 10, p. 5.1 Working with text from v.2 of the practical task book.
Appendix 4
Test "Text editor" created in the test systemSmartnotebook
Appendix 5
Homework: §14 - 15, questions at the end of paragraphs, ex. 2, 3, 11, 12
Lesson outline using the project method.
Topic: " Graphics editor».
Class: Grade 5
Lesson Objectives:
- reproduces the concepts of multimedia technology and multimedia presentations, computer graphics.
Defines views computer graphics.
- works in a group
Lesson objectives:
Educational: generalize knowledge on the topic "Graphic editor» .
Developing: develop the ability to analyze, highlight the main thing, develop the creative activity of students, cognitive interest, develop information and communication competence.
Educational: develop the ability to work in groups and interact with classmates in a quality manner.
Lesson type: Lesson of practical application of knowledge.
Type of lesson: lesson using the project method.
Equipment: computers, multimedia projector, cards with key phrases for compiling a mini-report.
Lesson plan:
1. Organizational moment.
2. Preparing students for the assimilation of the material (active targeting).
3.Practical part (project creation.):
The students are divided into groups.
Roles are distributed in each team: historian, editor, artist.
Project creation.
Project protection.
4. Reflection.
5. Summing up the lesson.
During the classes.
Organizing time:
Good afternoon guys! Today we will devote our lesson to repeating the topic "Graphic Editor". At the end of this session, you guys will create projects that you will then present to the audience. You will present projects in the form of presentations that will contain information about the types of computer graphics.
The whole group will be divided into three teams. Each team will create a project dedicated to their own type of computer graphics. You will search for information on the Internet, but using only certain web resources.
Preparing students for mastering the material:
You will create your project within your means multimedia presentation, so you need to remember, what is multimedia technology and in particular multimedia presentations?
multimedia technologies is the interaction of visual and audio effects under the control of interactive software using modern technical and software tools, they combine text, sound, graphics, photos, videos in one digital representation.
Multimedia presentations - this is electronic presentations, which consist of separate parts, slides, and may contain texts, video, audio, images, photographs, diagrams, etc. in their structure. Typically, multimedia presentations are used to visually present information to a certain circle of people using hardware and software. Multimedia presentations are created using MS PowerPoint, in our case we will use MS PowerPoint 2007.
Since the topic of the project is computer graphics, it means you need to remember what it is and what types of computer graphicsexist.
Computer graphics is an area of activity in which used as a tool, how to create , and for processing obtained from the real world.
Types of computer graphics: bitmap - images consistingfrom pixels;vector - images that consist of the simplest geometric shapes;fractal – images created using programming languages. It is based on the principle of repetition of individual parts that add up to a single whole;three-dimensional - images that have a visual volume and can be written in three-dimensional space.
Practical part of the lesson (creating projects):
Now that we have remembered what computer graphics are, types of computer graphics, multimedia technologies and presentations, it's time to start creating projects. To do this, you split into three teams. Each team creates a project according to its own type of computer graphics:
1 team completes the project according to raster graphics;
2 team carries out the project on vector graphics;
Team 3 is working on a 3D project.
Assign roles to each team member. You must havehistorian , which will search for information on the network using certain web resources;editor , who, receiving information from the historian, by her company draws up a finished presentation;painter , which creates a sample view of its team's graphics view.
During the creation process, you will use the project creation guide ( ). In the guideit is spelled out in detail what issues need to be disclosed within the framework of the topic of your project.
Now that we've discussed everything, let's get down to direct implementation projects. I ask the teams to go to the computers (students sit down at the computers). On the desktops of your computers, find Text Document under the nameLink to manual.txt . Open this document and copy the link from it. Then close the document and open Mozilla browser Firefox, which is located on the desktop. Paste the link to the manual into the address bar of your browser and press the "Enter" key. You are now on the main page of the manual. Carefully read the task for each team member, with the questions that need to be disclosed in the project, with the requirements for the design of the project, with a list information resources, which you can use when creating projects.
After your projects are ready, each team writes a mini-report on their project. As a template, you have a list of key phrases that can be used in the report (students get acquainted with the manual, ask the teacher questions, start projects).
Project protection:
Team projects are ready. Now your task, using key phrases, is to make a mini-report on your projects, in other words, to defend them in front of an audience. You have printouts with these key phrases on your tables. You have 7 minutes to write a report (students start writing reports).
Key phrases for compiling a mini-reportOur team carried out a project on the topic ____________________________________________.
In the group, the HISTORIAN was _____________________, the EDITOR was ______________________________ and the ARTIST was _________________________.
Within the framework of this topic, we considered the following questions:
________________________________________________________________
________________________________________________________________
________________________________________________________________
________________________________________________________________
________________________________________________________________
________________________________________________________________
After processing the information we found, we found out that ____________________________
________________________________________________________________________________________________________________________________________________________________________________________________________________________________________________________________________________________________________________.
Working on a project within the framework of the topic ____________________________________________, we discovered new facts that were not known to us until now: ________________________________________________________________________________
________________________________________________________________________________________________________________________________________________________________________________________________________________________.
In the process of creating the project, we used following methods work with information(Underline whatever applicable) : search, analysis, synthesis, highlighting the main thing, generalization, analogy, comparison, classification, systematization.
The ARTIST of our team created the following image in _________________ editor _____________________. This editor is designed for ________________________________________________________________ images.
We thank you for your attention!
The reports have been drawn up. It's time to present your projects to the public. We invite the first team to present their project (the teams take turns showing the created projects to the audience and reading reports on them).
Reflection:
All teams did a very good job and prepared wonderful projects on their topics. And at the end of our lesson, I would like to hear from each team their opinion about the projects of their opponents (what they liked, what they didn’t like, what should be improved, etc.) (students express their opinion about the projects of each team).
Summary of the lesson. Final word teachers:
Our work has come to an end. I hope you enjoyed working in groups, creating projects and interacting with each other. I think that this experience will not be in vain for you. Thank you all for your active work, our lesson is over. Goodbye!
Pavlodar College of Education them. B. Akhmetova
I approve
Deputy Director for SD
_________ E.A. Poberezhnikova
"___" __________ 20__
on the topic: " Work withMS excel»
subject: computer technology
Group: DV-22
teacher: Saganaeva R.S.
The date: 14.02.2015
Lesson topic: Working with MS Excel
Lesson Objectives:
educational - introduce spreadsheets in the application environment Microsoft Excel; form the initial skill of entering text, numbers, formulas into a cell; give an idea of built-in functions; practical use studied material; consolidation of knowledge general principles the work of the MS EXCEL spreadsheet processor and the ability to create a table for solving a specific problem; the formation of an idea of \u200b\u200bcalculations in spreadsheets as an important, useful and widely used structure in practice.
developing - contribute to the development of logical thinking, memory, attention, creative imagination, developing the ability to apply educational information in non-standard situations, development cognitive interest; development of individual and group skills practical work; development of skills to apply knowledge to solve problems of various kinds using spreadsheets.
educational - upbringing creativity to work, desire to experiment; development of cognitive interest, education of information culture; professional orientation and preparation for further self-education for the future labor activity; education of communicative qualities for rational and productive work.
Lesson type: combined.
Lesson format: conversation, group work, individual work.
Interdisciplinary connections: informatics and mathematics.
Equipmentlesson:
personal computers With operating system Windows 7;
multimedia projector, screen;
Microsoft Excel program;
electronic version of the lesson - a presentation prepared in PowerPoint;
handout (for each student) - workbook, laboratory work.
During the classes:
organizational stage.
Hello! As you can see, we have many guests today. I want to tell you that I am very worried. I think you're a little worried too. So I reach out to you and ask you to reach out to me. I hope you can help me today.
Look at the screen and try to formulate the theme of our lesson.
Slide 1-5. Variety of tables.
slide 6. The topic of our today's lesson is "Working with Microsoft Excel". Today in the lesson we will get acquainted with the Microsoft Excel application environment and learn how to enter text, formulas and numbers into a cell, perform simple arithmetic calculations.
Look at your desk. Each of you received this leaflet. (Demonthe workbook is being stripped). This is a workbook page. Here we will take notes during the lesson. At the end of the lesson, I will give you marks. Sign your workbooks.
2. Learning new material.
Terms and concepts. Slide 7
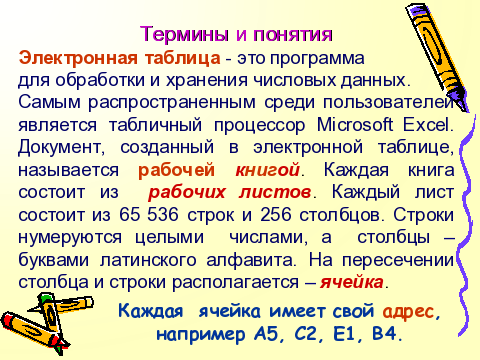
Spreadsheet is a program for processing and storing numerical data.
The most common spreadsheet among users is the Microsoft Excel spreadsheet. The document created in the spreadsheet is called working book . Each book is made up of worksheets . Each sheet has 65,536 rows and 256 columns. Rows are numbered with whole numbers and columns with letters. Latin alphabet. At the intersection of a column and a row is located - cell .
A cell is the smallest worksheet object at the intersection of a column and a row. Cell name is the column name and row number. Range are consecutive cells in a row, column, or rectangular area.
Follow in workbook №1.
window structureMicrosoftexcel. Slide #9
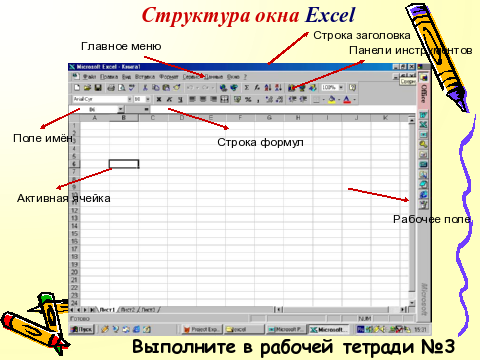
Complete in notebook No. 3
Slide number 10.
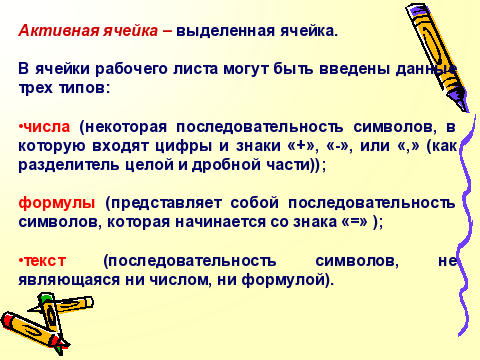
Active cell - highlighted cell.
Three types of data can be entered into worksheet cells:
numbers (some sequence of characters, which includes numbers and signs "+", "-", or "," (as a separator of the integer and fractional parts));
formulas (represents a sequence of characters that begins with the sign "=");
text (a sequence of characters that is neither a number nor a formula).
Complete in workbook No. 5B.
Create formulas.Slide #11
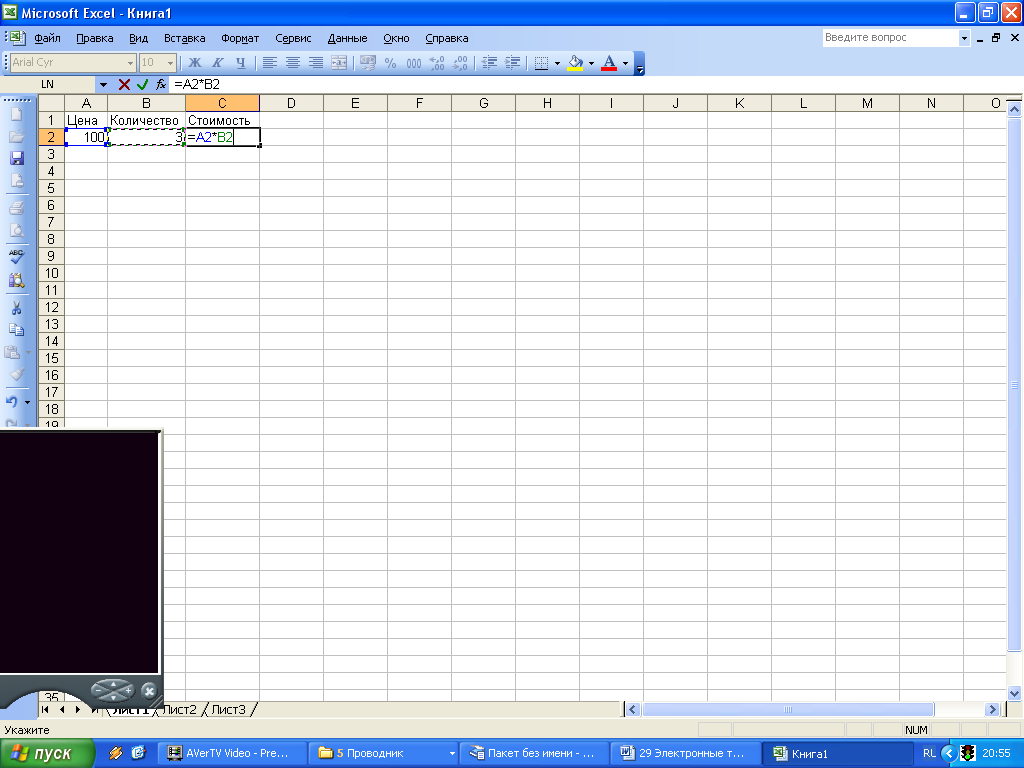
To determine the cost of goods in cell C2, go to this cell,
Enter the sign "=",
Click on cell address A2
Put the multiplication sign (*).
Click on the address of cell B2
Entering the formula is completed by pressing the key, after which the result of the calculation appears in the cell.
Complete in workbook No. 5A.
Built-in MS Excel functions are functions that are calculated according to certain algorithms contained in the application
MS Excel. Slide 14
A built-in function is called when a formula containing the function is evaluated. slide 15
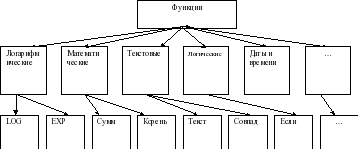
The whole set of built-in functions of the spreadsheet processor is divided into several groups: mathematical, statistical, date and time functions, etc.
In different spreadsheet processors built-in function sets vary. slide 16
Excel contains over 400 built-in functions. The function has a name and a list of arguments in parentheses. Slide 17
Example: =SUM (A4:A7)
Let's take a look at the most commonly used functions.
| Record type | Purpose |
|
| Mathematical Slide 18 | ROOT(...) | calculation square root |
| Calculation of the absolute value (modulus) of a number |
||
| Rounding a number or the result of an expression in parentheses to the nearest smaller (!) integer |
||
| The value of the mathematical constant "PI" (3.1415926...) |
||
| Statistical Slide 19 | Determining the minimum of the specified numbers |
|
| Determining the maximum of the specified numbers |
||
| AVERAGE(...) | Determination of the average value of the specified numbers |
|
| Determining the sum of the specified numbers |
||
| date and time Slide 20 | TODAY () * | The value of today's date as a date in numeric format |
| MONTH(date) | calculation serial number months of the year by specified date |
|
| DAY(date) | Calculation of the ordinal number of the day in the month for the specified date |
|
| YEAR(date) | Calculating a year from a given date |
Some frequently used statistical functions can be applied using the menu icon ∑. Complete in workbook No. 6.
Fixing new material
3 tasks on the board:
1 task: MS Excel window structure (see Appendix 1)
2 task: Find the right answers
A special program used to automate the processing of data presented in tabular form, this is (spreadsheet).
The minimum worksheet object at the intersection of a column and a row is (cell)
The cell name is... (column name and row number).
Consecutive cells in a row, column, or rectangular area, this is (range)
The table cell that this moment occupies the cursor, called (active cell)
A cell can contain (text, number, formula).
3 task: Find the correct formula entries
Performing laboratory work:
laboratory work No. 1 "Creation spreadsheet»,
laboratory work No. 2 "Building a spreadsheet",
laboratory work No. 3 " Built-in Functions excel»
The spreadsheet is...
a) a program used to create, edit, save and print various texts.
b) an application that stores and processes data in rectangular tables.
c) an application used to perform calculations and solve mathematical problems.
d) all answers are correct
2. Active cell in Excel is:
a) cell with address A1; b) a cell marked with a frame; c) the cell in which the data is entered; d) there is no correct answer
3. Entering a formula in Excel starts:
a) with an equal sign; b) from the bracket sign; c) with a number; d) with a letter.
4. Cell address in Excel consists of:
a) filename
b) a given set of characters;
c) the name of the column and the number of the row at the intersection of which the cell is located;
d) the row number and column name at the intersection of which the cell is located.
5. The SUM() function in Excel refers to the functions:
a) mathematical; b) statistical; c) logical; d) financial.
6. The Function Wizard in Excel is required for:
a) editing the table; b) to quickly launch the program;
c) saving information; d) input of necessary functions.
7. If you make a cell active in Excel and press the Delete key, then:
a) the contents of the cell will be deleted; b) the cell format will be cleared;
c) the cell will be deleted; d) the name of the cell will be deleted.
8. The information in the table is presented as:
a) files b) records; c) text, numbers, formulas; d) all answers are correct
Enter the correct cell address:
10. The smallest element of a spreadsheet is...
a) cell; b) a symbol; c) column; d) string
11. A range of spreadsheet cells is called ...
a) the set of all filled cells of the table;
b) the set of all empty cells;
c) a set of cells forming a rectangular area;
d) a set of cells that form an area freeform.
12.Specify invalid formula for cell F1
a) =A1+B1*D1; b) =A1+B1/F1; c) =C1; d) all formulas are allowed
13.Specify an invalid formula to write to cell D1
a) =2A1+B2; b) =A1+B2+C3; c) =A1-C3; d) all formulas are admissible.
14. A group of cells A1:B3 is selected in the spreadsheet. How many cells are in this group?
a) 2; b) 3; at 5; d) 6.
15. Cannot be deleted in a spreadsheet
a) a line b) column; c) cell name; d) the contents of the cell.
5. Reflective-evaluative stage.
I hope that the work started today will be useful in your future profession.
What did we do today? What did you do? What new things have you learned for yourself?
The main advantages of a spreadsheet compared to a regular spreadsheet are:
that when the source data changes, the results are automatically recalculated.
Where can we use ET?
in economic and accounting calculations;
in mathematics;
in physics;
in the study information models from courses of chemistry, history, biology.
6. Homework: Slide 28
Notebook entries. Think up and draw in a notebook the table structure for solving the problem using the AVERAGE function.
Today at the lesson you discovered new possibilities of ET, learned how to enter text, a formula and a number into a cell.
Today, each of you has risen to a new stage in the development of your thinking. I congratulate you on this event! Thanks to all! The lesson is over.