When opening a file for the first time in text editor Microsoft Word, the attention of absolutely any user is focused on the title page. Beautiful start- a presentable cover is an impetus to action, a desire to familiarize yourself with the content. Sometimes well-designed title page will say much more than the text below it. The multifunctional Word application, which is one of the best products of Microsoft, is able to provide the user with several very attractive modern "titles" "embedded" in the program's capabilities. Using ready-made layouts, the user only needs to fill in the empty columns. In the article below, we will consider a method that helps to insert into a document not only a standard title page, but also create a unique first page design.
Using ready-made "titles"
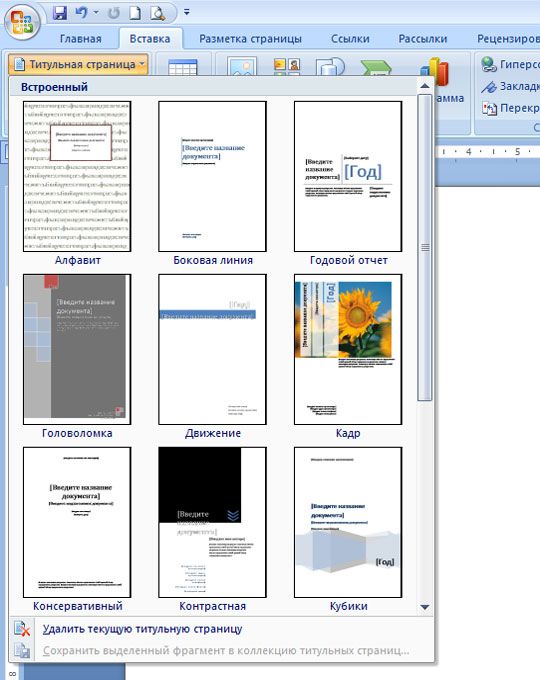
To make a title page in Word, the user, among other commands of the main menu, must find the subsection responsible for inserting various elements. After switching to the "Insert" command, you should click on the "Pages" subsection, which contains a link that opens "Cover Sheets". As a result, several possible options will appear on the screen, which are templates. After the user decides on the best option, you can confirm your decision by clicking on the layout with the mouse button.
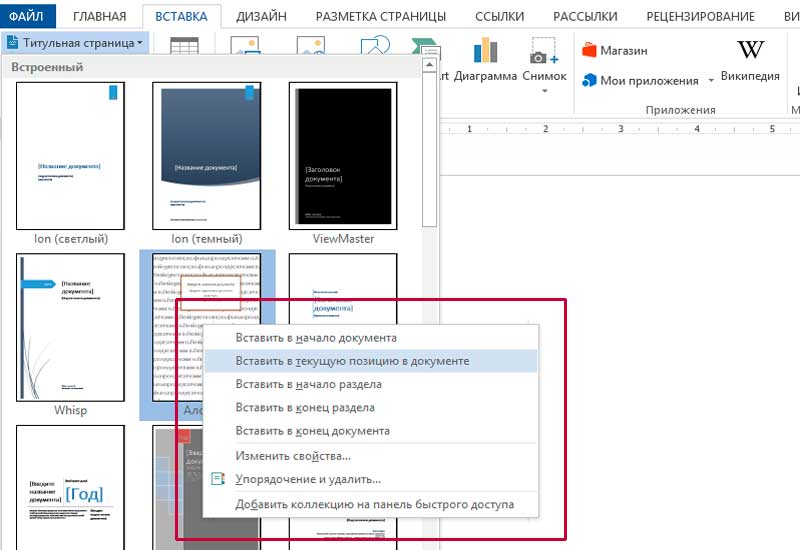
It is important to know that you can insert a title page not only at the beginning of the document. At first glance, the ability to create a "title" in any place that only pleases the user may seem like a very dubious action. However, as practice shows, this kind of manipulation perfectly complements huge documents that have many separate chapters or sections. If necessary, the user can make his own title page for each of them.
Creating an original cover in a text editor Word
Although in order to insert into Word Standard A template that complements a document as a presentable cover takes only a few seconds, simple layouts created by application developers may not always meet the requirements of a potential user. The user can, using a huge toolkit of the software product, create his own unique "title book".
To do this, you need only a few minutes of free time. Initially, you need to use a combination of function buttons, Ctrl + N will allow you to create new document. Next, you have to decide on a more acceptable colors and drawings (pictures), if they are in the cover. If desired, the title page can be made white. The decision to paint the background with a certain color is made by adding a color. To do this, you need to place clean slate autoshapes you like and fill them with the desired color.
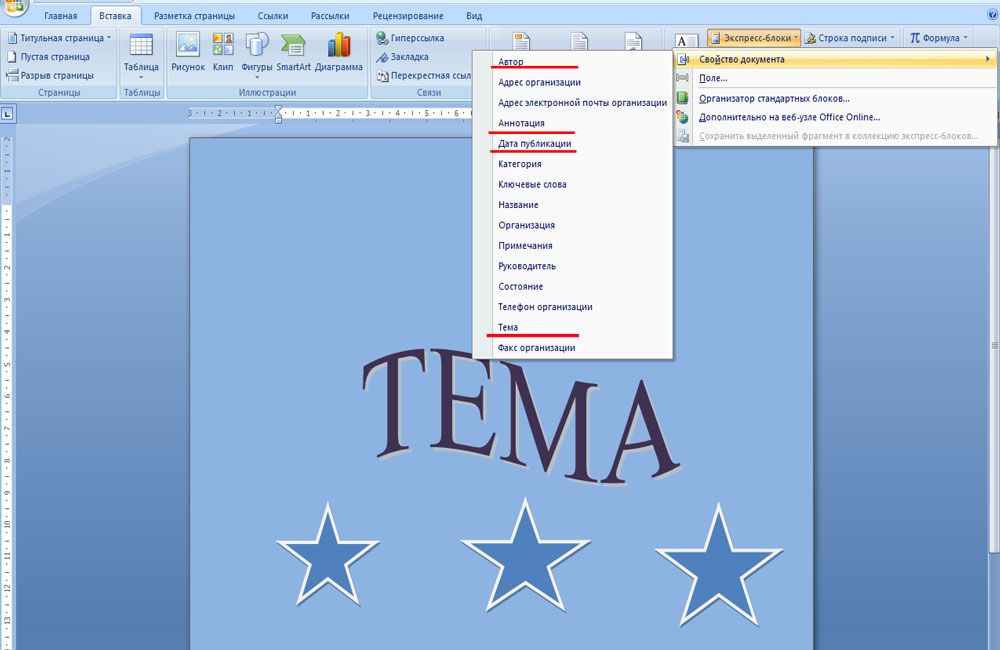
The next step helps to place several text blocks on the cover, all this together will create a ready-made base, which can later be inserted into any part of the document and filled with suitable words. To do this, the software product is equipped with "express blocks" located in the main menu of the program in the "Insert" category (section "Text"). After clicking on the command, a wide variety of blocks will appear on the screen; ready-made software solutions can be inserted anywhere in the template being created. Among other elements, most users word editor place "Date", "Subject" and "Summary" on their covers.
After successfully inserting all the necessary blocks with text, the user can change the color, size and font in the same way as when working with plain text. The color of the letters is also important, since when creating a dark background, black characters by default will simply be lost.
On this, the work on creating a unique title page can be considered completed, now you just need to save the template page. By the way, the new "title" will be located in the same place as the standard layouts. You can find it by browsing to the end of all software cover options. To save, you need to select everything that contains the cover page, then in the "Insert" category go to the "Pages" section, open "Cover Pages" and select the "Save selection to cover page collection" item in the list of actions presented.
The user will only have to insert the name of the new “title title” and a specific description (if necessary) in the appropriate columns of the dialog box that opens. Confirm your decision by clicking on the "OK" button.
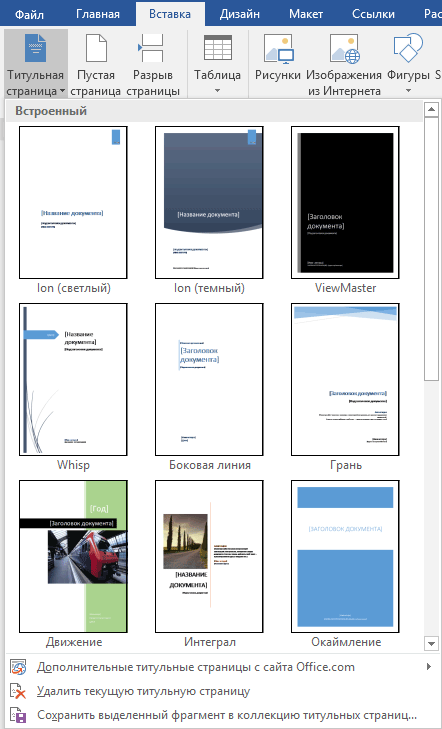
Microsoft Word 2016 has a collection of handy standard cover pages. You can select a page and replace the sample text own version.
To open the cover page gallery, on the tab Insert in a group Pages select item Title page.
Choose a layout title page from the title page collection.
Once you've made your choice, Word 2016 will insert a title page at the very beginning of the document. You will only have to replace the sample text with your own version. To fill in the field, you need to click on it with the mouse. Word will highlight the contents of the field, and you can enter the information you want in its place. To delete a field, select it and press the key Delete.
IMPORTANT:
If you add another cover page to your document, it will replace the one you inserted earlier.
Title pages also often feature an Annotation field for placing an annotation to the document.
To remove a cover page from a document, select Delete Current Cover Page from the Cover Page drop-down menu.
In Word 2016, you can create your own template for a selected page and save it so that it also appears in the cover page drop-down list. To do this, create your template from scratch or based on an existing one, and in the menu Title page select menu item Save selection to cover page collection. A dialog box will appear on the screen.
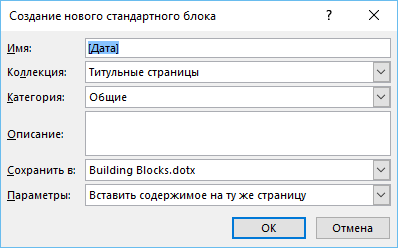
You can add a description and click OK.
When writing a large number text may need to be inserted Additional information right in the middle of the current document. Or at registration - add a title page. To carry out these actions, use the insert a new sheet function.
You will need
- - Word program (Microsoft Office package);
- - original document.
Instruction
Type in the required text.
28 July 2015
Any Text Document starts with the cover. The MS Word editor from the MS Office package offers for this a whole set of ready-made "titles", in which you will only have to fill in the required fields. However, what if you want to create your own cover page, and even make it always ready for use by adding it to the list of standard ones? We will talk about this today.
In the Insert panel, in the Pages group, click the Cover Page link. By clicking, a window will open with suggested options for ready-made, pre-installed cover sheet templates. Choose the one you like and click on it with the left mouse button.
Insert a title page in Word
Right-clicking on a sheet will open an additional menu. Although the title page should logically be the first page of the document, MS Word allows you to insert it anywhere, which allows you, for example, to break a large document into chapters and sections, each of which has its own cover.
How to create your own cover page in Word?
If none of the proposed standard options suits you, you can create your own. This is not difficult at all - to start, just create an empty word document(Ctrl+N) and decide on its background color or pattern. If you decide to leave the background white, go ahead, if you decide to add some color, then just add autoshapes and fill them with color. In this example, I filled the entire surface of the leaf with a solid dark blue color.
It’s a good idea to provide the title page with text blocks - in order to have a ready-made frame that you just need to fill out after inserting. You can do this with the help of "quick blocks", which can be found in the "Insert" panel in the "Text" group. Here, in the drop-down list, you will find ready-made elements for any occasion - you just need to insert them into the document and place them as your heart desires. Elements Date, Subject, Annotation, I believe - the necessary minimum.
In this lesson, we will learn how to make a title page in Word and how to remove a title page in Word.
How to make a title page in Word
Instead of manually typing the document's cover text, you can create a cover page that readers will see first when they read the document.
To make a title page in Word, follow a series of steps.
- Go to the "Insert" tab.
- Click the Cover Page button in the Pages section. Microsoft Word will display the cover page thumbnail palette.
- Click on the title page of the view you like. Microsoft Word adds the specified cover page to the beginning of the document.
Remember! A document cannot contain multiple title pages at the same time. If you select a different cover page, then Microsoft Word replaces the current cover page with it.
How to remove the title page in Word
You can always remove the title page in the Word if it is no longer necessary. To do this, follow the instructions below.
- Click on the "Insert" tab.
- Use the "Cover Page" button in the "Pages" section. A drop-down menu will appear on the screen.
- Select Delete Current Cover Page. Microsoft Word will obediently remove the title page from the document.
Now you know how to make a title page in Word.
We wish you good luck in your endeavors!!!