When working with a document in Word, it can sometimes be useful to view several pages on the screen at once, especially if you have a fairly wide monitor. Viewing multiple pages at the same time allows you to see more complete picture document layout.
Note: The illustrations for this article are from Word 2013.
You can open multiple pages at the same time in view mode Page layout(Print layout). If another view mode is enabled or you are not sure which mode is enabled in this moment, open the tab View(View).
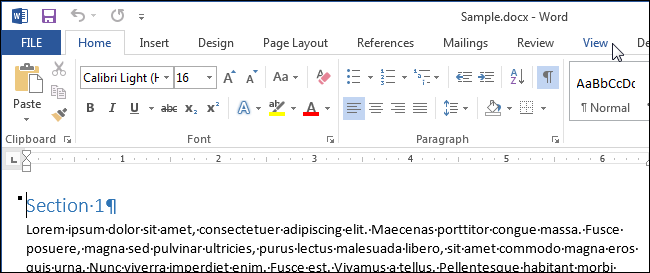
In chapter View modes(Views) click Page layout(Print layout).

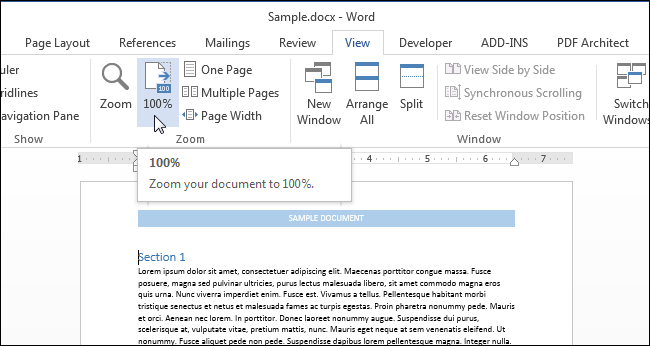
To enable simultaneous viewing of several pages at once, place the cursor in the text of the first page (of those that should be displayed on the screen). In a group Scale(Zoom) tabs View(View) click Multiple pages(Multiple Pages).
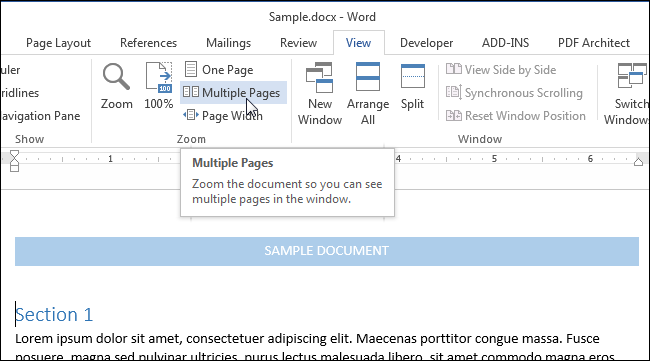
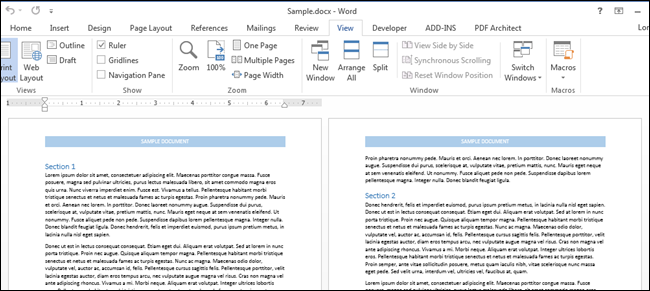
By default, two pages will be shown. They will be scaled down enough to fit entirely on the screen. Multi-page browsing is good for seeing the layout of a document, but not always good for reading.
To return to single page view, click View > Scale > One page(View > Zoom > One Page).
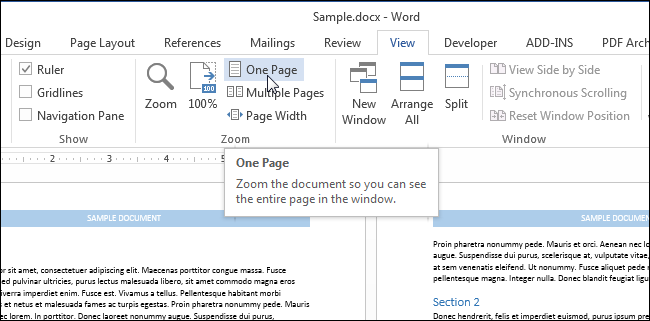
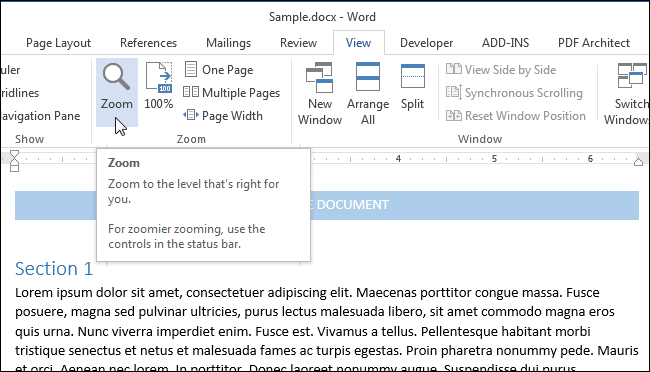
Most likely, this page will have scale less than 100%. To return to the real scale, click on the button 100% in command group Scale(Zoom).
You can view more than two pages at the same time. For this, in the section Scale(Zoom) tabs View(View) click the button Scale(Zoom).
A dialog box of the same name will open. In it, you can set the desired scale as a percentage (including arbitrary), enlarge the page to full screen in width, or display it in full. To view multiple pages, check the box next to Multiple pages(Many pages). Then click on the button with the image of the monitor and select from the drop-down menu the number of pages that you want to display at the same time.
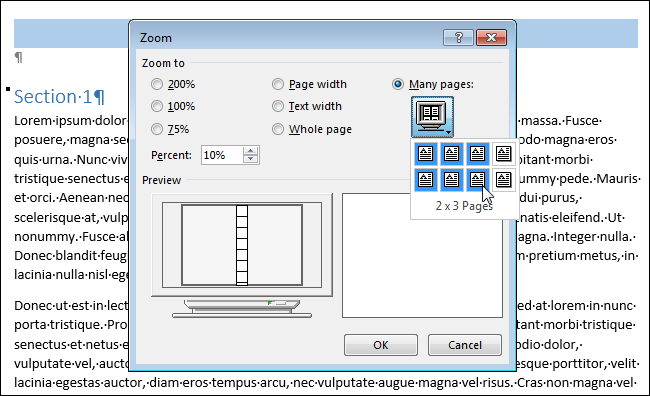
In field Sample(Preview) you can see how the pages will be displayed on the screen. Click OK to apply the changes and close the dialog Scale(Zoom).

The view mode will change to show as many pages as you have specified at the same time.
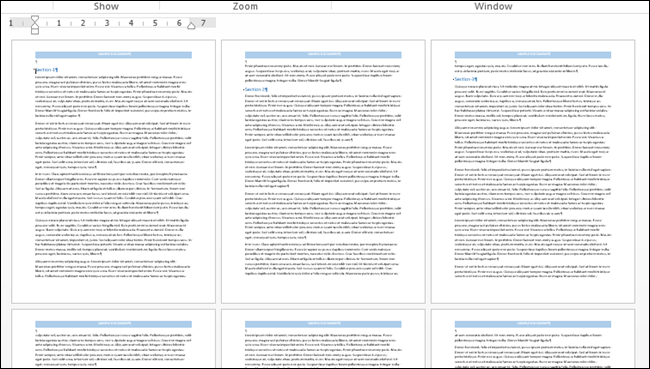
Remember, to return to the normal view, you need to click on One page(one page). To return to 100% zoom, click the button 100% .
When over a document in a text editor Microsoft Word several people work (one wrote, the second checks, the third supplements the material), then in the process of work it is very convenient to indicate what needs to be changed or corrected. As a result, one corrected file is obtained, in which all comments are taken into account. But now what to do with these remarks, which have remained in the margins of the text?
Let's figure out in this article how to delete them, whether it is possible to simply hide this area, and how to get rid of such remarks in Word made by a specific user.
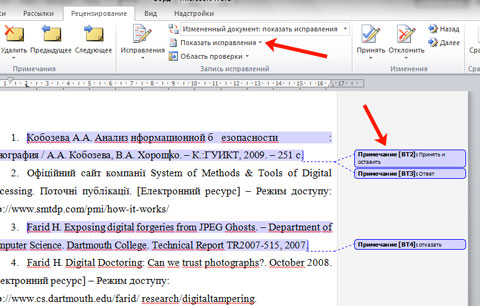
If you want to view the file without corrections, then you can simply hide the callouts. To do this, go to the tab "Review" and click on the button "Show Fixes". Then, in the drop-down list, uncheck the box next to "Notes".
After that, all blocks with them on the fields will disappear.
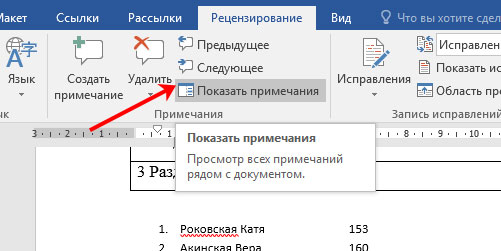
If you have Word 2013 or 2016, then you can do as described above to remove the field, you can simply on the tab "Review" use button "Show Notes".
When it's highlighted in gray, marginal notes are shown when the button is not selected, they will not be displayed in the document.
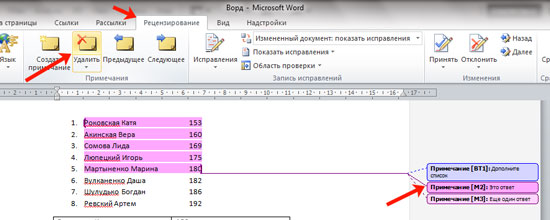
If you need to not just hide, but rather remove the remarks that are displayed on the side of the document page in Word, then click on the unnecessary one to select it. Then on the tab "Review" click "Delete" and it will disappear from the document.
You can immediately select the one you want to get rid of, right-click on it and select from the context menu "Delete note".
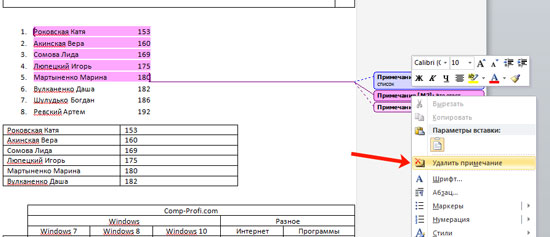
Another way to delete is the check area. It is displayed either at the bottom or side of the page. There you can view all the made callouts. Find the one you don't need, click on it so that the cursor appears there, and right-click on it. In the context menu that appears, select "Delete note".
![]()
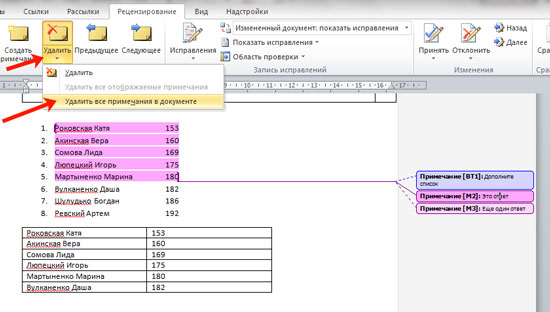
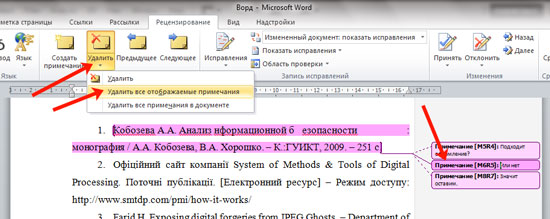
If you no longer need all the comments made by any users at all, then on the tab "Review" click on the arrow on the "Delete" button. A small list will open from which you need to select "Remove all comments in the document". Now all of them will be removed from the document.
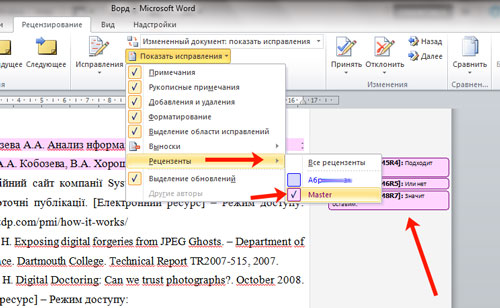
If all such remarks were added to the document not by one, but by several different users, then you can remove those made by a certain person. Each comment on the pages from certain person highlighted in a specific color. Let's remove the ones marked in pink in the example.
To do this, go to the tab "Review" and in the group "Recording Fixes" use button "Show Fixes".
![]()
In the drop-down list, select "Reviewers", and then uncheck the boxes next to the users who left comments. The checkbox should only be in front of the one whose remarks you want to delete.
Only our experimental subjects, highlighted in pink, remained in the document. Click on any, then click on the arrow on the "Delete" button and select from the list "Delete all displayed notes".
Click again "Show Fixes" and turn on visibility from other users. As you can see, what is needed is left, and the unnecessary ones are gone.
That's all. You and I have learned how to remove the notes area in Word, or delete those in the document that are no longer needed. As you can see, there is nothing difficult in this.
Many users have text editor MS Word it may be necessary to delete an empty (or, conversely, filled with text) page. At the same time, for various reasons, the page does not want to be deleted, and quite often it does not display any text. In this article, I will talk about how to delete a page in Word, introduce the reader to various methods, which will help with this, as well as a visual demonstration of the tips below.
So how do you remove extra page in Microsoft document Word Online? There are several basic ways to do this.
Method number 1. Removing hidden format characters
Most often, the user cannot delete a blank page due to the fact that it contains hidden characters page markup(newline, spaces, paragraphs, page break, etc.). Visually, they are not visible until you enable them to be displayed, and they can be a major factor preventing the removal of a blank page.
In order to enable the display of such signs in the Word, go to the "Home" tab, where click on the "¶" button. You will see a number of different (previously hidden) page formatting characters.
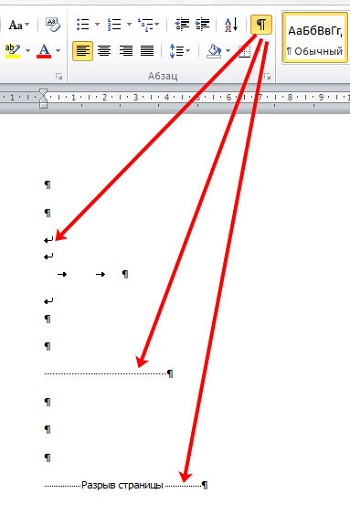
The functionality of this button is enabled (or disabled) by pressing Ctrl+Shift+8.
To delete these symbols, mark them with the mouse (by holding down the left mouse button and dragging them from top to bottom), and then press the "Delete" (or "Backspace") key.
They can also be marked by clicking the cursor at the very top of an empty page, then holding down the key Shift and, without pressing the last one, use the cursor arrows to mark all the available lines on the page. After you have marked given text, delete it by pressing the " Delete».
After deleting extra formatting characters, press the "¶" button again to turn it off.
Method number 2. More simple
To delete a blank page in Word, you can not even turn on the display of formatting characters, but simply click on the bottom of the blank page (the lowest possible right point), and by pressing the " backspace”, remove all empty characters on such a page (respectively, the text following such an empty page will rise up).
If such a blank page is the last in the text, then just press the Ctrl + End key combination (this will move the courses to the very end of the text), and by pressing the Backspace key, delete hidden formatting characters.
Method number 3. We use the "Structure" mode
On the question of how to get rid of a blank page in Word, it can also help to use the "Structure" mode, which can help in displaying complete structure pages.
To do this, go to the "View" tab, and click on the "Structure" button.
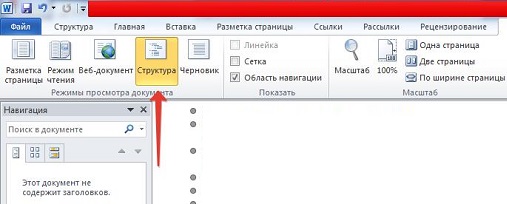
After displaying the page structure, it will be possible to delete extra characters by marking them with the mouse, and then pressing the “Backspace” (Delete) key.
Method number 4. Removing a blank page at the end of a table
If there is a table at the end of the document, then Word can store an empty paragraph after it, thereby creating a blank page, and this can cause the “page in Word is not deleted” problem.
- In order to get rid of this paragraph go to the page with the table, and click on the "¶" button in the "Home" tab of MS Word (or click on Ctrl+Shift+8).
- Mark with the mouse the symbols " ¶ » under the table (usually a paragraph mark).
- Now click on Ctrl+D, check the box next to the "Hidden" modification and click on " OK».
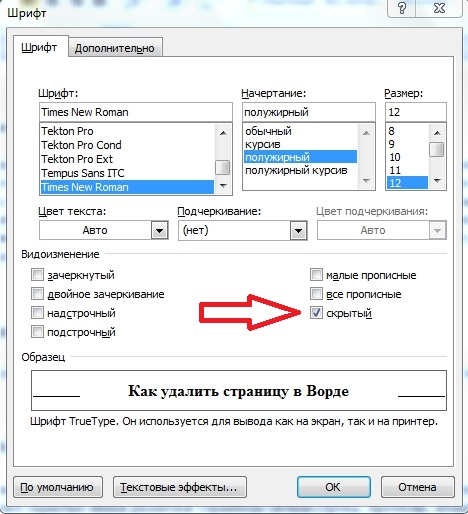
An alternative to the method described in the paragraph above is to change the font size of the bottom paragraph. Reactivate the display of hidden characters by clicking on "¶", and then mark with the mouse the characters "¶" of the paragraph below the table. Click on the font size option of the "Home" tab (or press Ctrl + D), instead of the font size (usually 12 or 14), put the number 1 and press enter. The hidden paragraph after the table will shrink to minimum size, and the blank page behind it should disappear.
Now it remains to turn off the signs hidden formatting by clicking on the "¶" button, and continue working with the document further.
Method number 5. Checking printer settings
If the text looks normal when you send it to print, but when you print, a blank page constantly appears (usually at the end of the text), then the settings for the printer may be incorrect (a separator page between existing jobs is set).
- Check the printer settings through Control Panel - Hardware and Sound - Devices and Printers.
- Double-click the right mouse button on your printer display, and select "Printer Properties" from the menu that appears.
- Go to the "Advanced" tab, and check the "Separator Page" option.
How to remove an extra page in Word
You may also need to remove an extra page in the Word with text already typed (or edited by you). There are two main ways to do this:
Method number 1. Marking text for deletion
 Marked text
 - We set the mouse cursor to the upper leftmost place on the page, hold down the left mouse button, and moving the mouse down, mark all the text on the page.
- Then click on "Delete" and delete unnecessary text.
- You can also delete not only the text of one page, but also several pages.
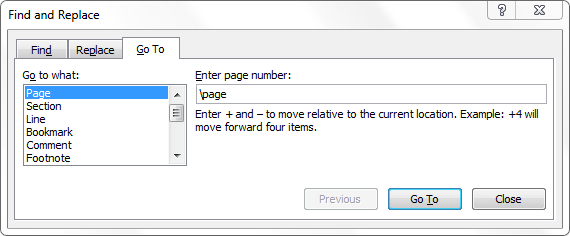
Method number 2. Using the Go To feature
- Set the cursor to any place on the page you want to delete, press the combination Ctrl + G (the "Go" function).
- In the "Enter page number" field, type \page, and then click on the "Go" button.
- The entire page will be marked, now it will be enough to click on "Close", and then on the "Delete" key so that the text of the page is deleted.
Method number 3. Changing the title page
In the question "how to remove an extra page in Word" you may need to replace the title page of the text. To do this, just go to the "Insert" menu, click on the arrow to the right of " Title page”, and then to “Delete current cover page”. Then, by clicking on the "Cover Page" button, insert a new one.
Conclusion
To delete a page in Word 2007 and 2010, you must use almost the same tools described above. The minimum difference may relate to the specifics of calling the search menu and the location of a number of buttons on the toolbar, while the removal tools blank pages will be identical to earlier versions of Microsoft Word.
Above, I gave several options for solving the question of how to remove an extra page in Word. Almost each of them is easy to perform, helping to remove an empty (or simply unnecessary) page in a couple of clicks. If you need to delete a page in Word, then use the options described - they will help solve the problem in question, bringing the text to the form you need.
In contact with