In this article you will learn:
Good afternoon Dear friends. In this lesson, we will figure out what this function is - displaying formatting marks, and how it is useful. Me honestly it's a feature for a long time repelled. I tried my best to work without it. But time passed, and when typing, I began to use it to its fullest.
What are hidden symbols
When typing in MS Word, we use a large number of characters, some of which are indistinguishable to us. A hidden symbol is a symbol that is not rendered during normal program operation. An example would be an alternative to a space - a tab.
How to add/remove invisible signs to Word
Everything is very simple. You just need to go to the "Home" tab → in the "Paragraph" group, click on the "Show all characters" icon
Or is there another way with keyboard shortcut CTRL+*(* - is a string of digits, a number 8
). After that, the entire text will be streaked with small black icons, and you will be able to determine where errors were made during formatting. For example, two spaces in a row, which you won’t notice in normal mode, or instead of the configured red line, an indent was tapped with spaces.
Display hidden characters(setting)
With the "Show all characters" function turned off, the text looks like in normal mode. And when the function is on, typing is inconvenient, because. these symbols clutter up the sheet, and the author, not used to this function, is disorienting. But you can in the default settings Microsoft Word set the default characters to always be displayed. Go to tab "File"→ "Options"→
chapter "Screen" 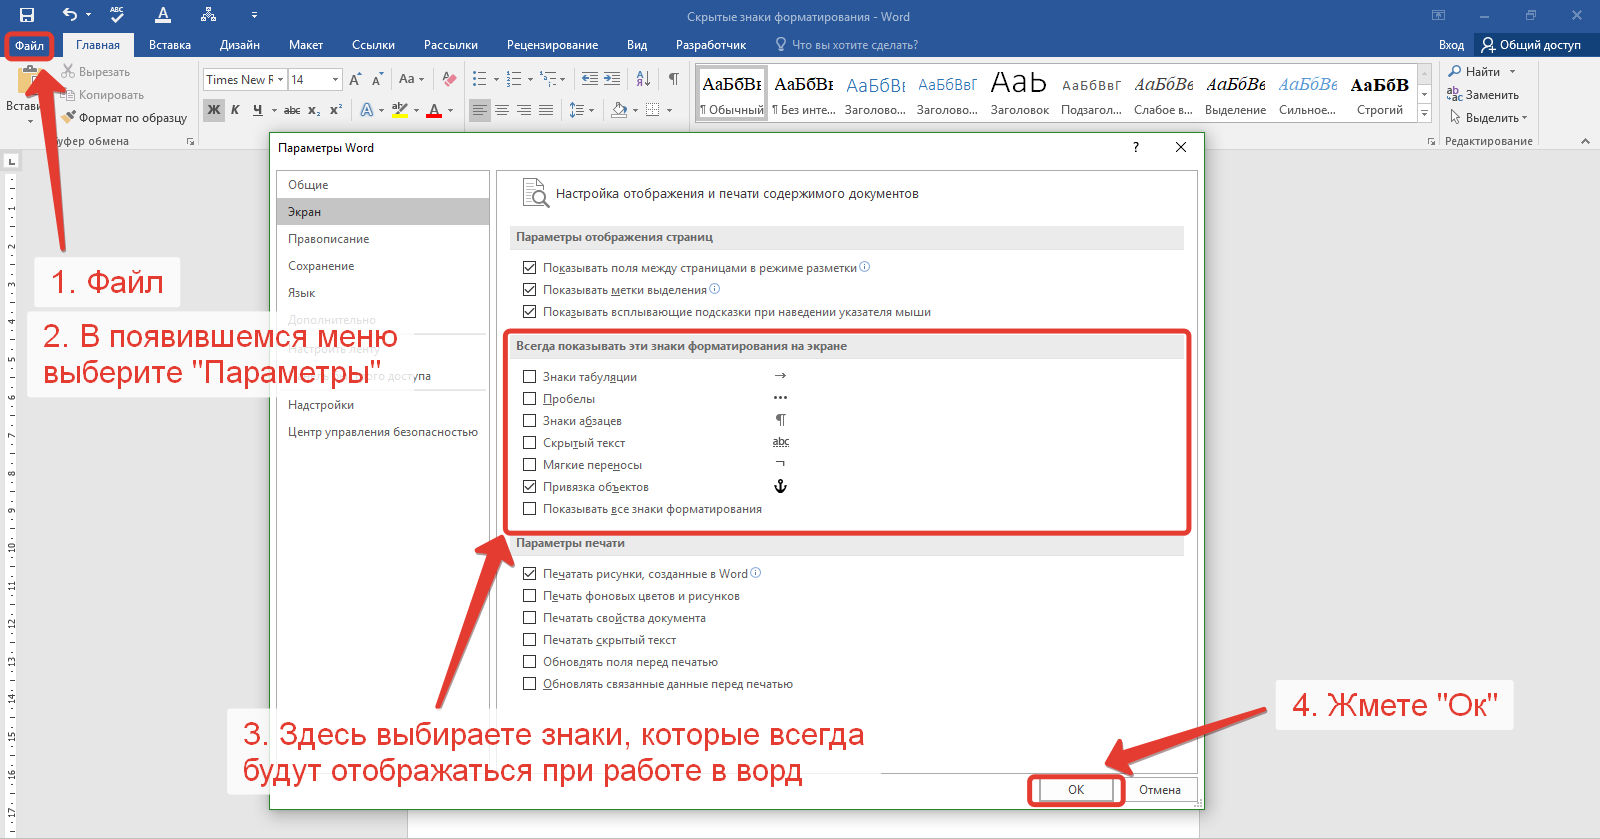
Hidden formatting characters
If you have tried to customize the display of hidden formatting characters, then you may have noticed that these characters have different graphic images. This is done so that when formatting the text, we can distinguish which formatting mark is appropriate in one place or another, and which one is not. You can see their differences in the same place where you set up the display of hidden characters "File"→ "Options"→
chapter "Screen" in Group "Always show these formatting marks on the screen"(see above). 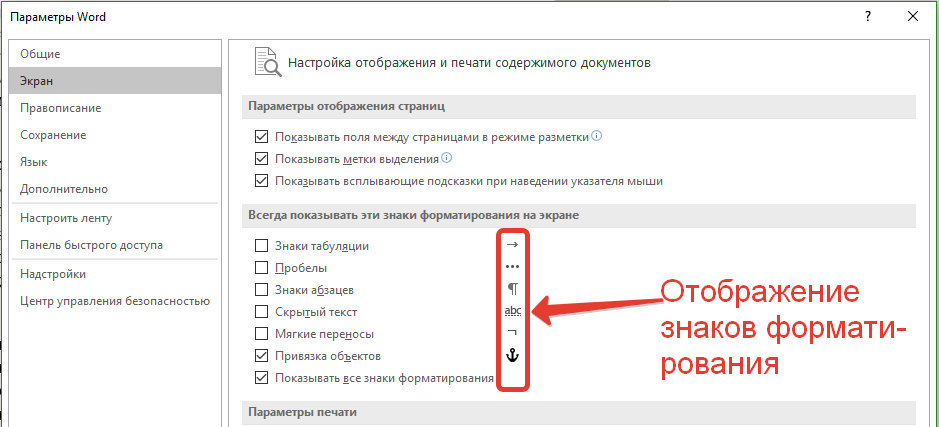
When formatting and editing work, it is useful to learn how to view text in nonprinting character mode to correct incorrect or unwanted text formatting.
Nonprinting characters (non-printable characters) - characters entered into the computer as a result of certain actions, allowing for formatting or fixing a certain structure of the document.
Working in the display mode of non-printing characters allows you to improve formatting or correct errors (remove extra spaces, paragraphs, tabs, etc.), and also save you from "unpleasant surprises", for example, when opening a document file on another computer with different formatting options set.
Nonprinting characters are not output when the document is printed on paper.
Turn on (turn off) display all non-printable characters :
・Button Nonprinting Bar Characters Standard.
· or Ctrl+Shift+*.
The most common are the following non-printable characters(shown in quotes " " their representation on the screen when the button is turned on):
¾ « · " - sign spaces, inserted with the key Space. After pressing the key, the mouse cursor moves to the next position; when the button is turned off, the characters do not appear on the screen.
¾ "¶" - sign paragraph, inserted with the key Enter. After pressing the key, the mouse cursor moves to the next line at the beginning of a new paragraph. When the button is off, the characters do not appear on the screen.
¾ « → " - sign tabs, inserted with the key Tab. As a result, the mouse cursor moves to the next tab stop. When the button is off, no characters appear on the screen.
¾ "º" - sign non-breaking space, inserted ctrl+shift+(space). As a result of pressing the key combination, the mouse cursor moves to the next position. When the button is off, no characters appear on the screen. Can also be inserted: Insert - Symbol - Special characters - Character: non-breaking space - Insert.
¾ "-" - sign non-breaking hyphen, inserted ctrl+shift+-. As a result of entering a character, a normal-looking hyphen is inserted into the text. Can also be inserted: Insert - Symbol - Special symbols , select Symbol: non-breaking hyphen - Insert.
¾ "" - sign soft transfer, inserted Ctrl+-. After pressing the keys with the button turned off, there are no visible changes in the text. Can also be inserted: Insert - Symbol - Special characters, select Character: soft hyphenation - Insert.
¾ "¤" - symbol cell end table, that is, a sign that limits the information in a table cell to the right, or the symbol end of line tables. Entered automatically when creating a table and is visible only when the button is enabled. This sign cannot be removed.
¾ " " - sign line break, inserted Shift+Enter. As a result, the cursor moves to the beginning next line the same paragraph.
¾ " " - sign page break, inserted ctrl+Enter. As a result, the cursor moves to the beginning next page. Can also be inserted: Insert - Break - Begin: new page - OK or Enter.
¾ « ![]() " or " " - sign section break, inserted Insert - Break - Start: new section, specify options - OK or Enter. As a result, the cursor moves to the beginning of the next section according to the options selected for it.
" or " " - sign section break, inserted Insert - Break - Start: new section, specify options - OK or Enter. As a result, the cursor moves to the beginning of the next section according to the options selected for it.
¾ "…….." - dotted underline means that the given text - hidden. The hidden text is set: Format − Font− Font: modification þ hidden − OK. Displayed when turned on non-printable characters or - separately, if you check the box Tools - Options - Appearance: Formatting marks þ hidden text - OK.