Lesson designed:
Lesson Objectives:
- Educational :
- Developing:
- Educational:
- posing and solving problems;
- formulate conclusions;
- work in a group;
- speak in public;
- evaluate the result;
Equipment:
- Media projector;
- Interactive board;
- Computers.
Lesson plan
- . (2 minutes)
During the classes.
- Organizing time.
- On the board you see the rear ones :(slide 1)
Answer: Slide 2
Questions . slide 3
Lesson objectives:
- Learning new material:
- Creating tables. slide 11
- First way. slide 12
- The second way. Slides 13-14
- The third way. slide 15
- Homework. Slide 20
- Reflection. Slides 21-23
Preview:
Practical work "Stars"
Build a table with the following data.
The North Star is in the constellation Ursa Minor. Betelgeuse is located in the constellation Orion. The distance to Spica is 260 light years. Deneb is in the constellation Cygnus. Akrus is 2200 times brighter than the Sun. The distance to Betelgeuse is 650 light years. Rigel is 55,000 times brighter than the sun. Canopus is in the constellation Dragonfly. The distance to the Chapel is 46 light years. Spica is in the constellation Virgo. Antares is in the constellation Scorpio. The distance to Arcturus is 36 light years. Aldebaran is 165 times brighter than the Sun. Betelgeuse is 22,000 times brighter than the sun. The distance to Akrus is 260 light years. Deneb is 725,000 times brighter than the Sun. The distance to Antares is 425 light years. Aldebaran is in the constellation Taurus. Antares is 6600 times brighter than the Sun. The distance to Canopus is 181 light years. Arcturus is in the constellation Bootes. The chapel is 150 times brighter than the sun. The distance to the North Star is 780 light years. Rigel is in the constellation Orion. Spica is 2200 times brighter than the Sun. Akrus is in the constellation of the Southern Cross. The distance to Aldebaran is 70 light years. Arcturus is 105 times brighter than the Sun. The distance to Deneb is 1600 light years. Canopus is 6600 times brighter than the Sun. The chapel is in the constellation Auriga. The Polar Star is 6000 times brighter than the Sun. The distance to Rigel is 820 light years.
- What objects are we talking about?
- Determine which properties of the stars should be reflected in the table, that is, which fields are entered in the columns.
Preview:
https://accounts.google.com
Slides captions:
Practical work Everyone is given the text "Stars" You need to provide this information in tabular form. When doing work, be sure to use design styles. Save the finished document in your folder with the name "Practical work: Stars"
This is how you should have done it
Homework Create a detailed weekly schedule (School, clubs, house cleaning, doing homework etc.) in tabular form. Submit your assignment before class starts. (Save to your folder on your computer)
Was the hypothesis confirmed that it is more convenient to arrange data in a computer in the form of tables? Do you think the knowledge gained today will help you? If you liked the lesson, please stand up.
Preview:
To enjoy preview presentations create an account ( account) Google and sign in: https://accounts.google.com
Slides captions:
Task: In the text given to you, find information about those stars that are more than 300 light years away from the earth, and also brighter than the sun by more than 7000 times One minute for you to think Answer: Betelgeuse - the distance from the earth is 650 light years years, brighter than the sun 22,000 times Rigel - the distance from the earth is 820 sv. years, brighter than the sun 55,000 times Deneb - the distance from the earth is 1600 sv. years, brighter than the sun 725,000 times
Questions What were the difficulties in completing the task? Can you suggest how you can simplify the solution of this type of problem? What topic are we going to study today?
Creating and Formatting Tables at Microsoft Office Word Material prepared by: teacher of computer science and ict Gruzdev Nikolay Andreevich Municipal Autonomous educational institution"Average comprehensive school No. 43 "of the Petropavlovsk-Kamchatsky urban district
Lesson Objective: To review various ways creation of tables, methods of their editing and formatting; teach how to compile, fill out and edit tables Lesson objective: Continue learning the Microsoft Office Word word processor Continue developing practical skills in working with spreadsheet Microsoft Office Word
Table elements cell row column
Creating a table On the toolbar, select the “INSERT” tab and find the “Table” button there. By clicking on it, a window appears with several options for creating tables:
First way: Select the required number of rows and columns on the minitable
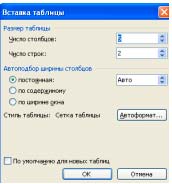
The second way: By pressing the "TABLE" button, select "Insert table"
In the window that appears, enter the required number of columns and rows, as well as determine the width of the columns from the proposed options
The third way: To build complex tables, use the "Draw Table" function. For the convenience of editing a drawn table, use the "Eraser" function
Formatting tables Performed on the "DESIGNER" tab, which appears only when you click on a table in a document. In it you can change: Table style Shading Border style Pen thickness, color and type
Editing a table It is done on the "LAYOUT" tab, which appears when a table is selected
Preview:
Physical education is hung on the walls
Preview:
Summary of the lesson in grade 9 on the topic:
"Creating and Formatting Tables in Microsoft Office Word"
Lesson designed:
Gruzdev Nikolai Andreevich, teacher of Informatics and ICT (young specialist) MAOU secondary school No. 43 of the city of Petropavlovsk-Kamchatsky.
On this lesson develop the following competencies:
- Informational - the ability to competently perform actions with information;
- Communicative - the ability to enter into communication in order to be understood;
- Subject - the ability to apply the acquired knowledge in practice.
Lesson Objectives:
- Educational :
- Give an idea of the purpose of tables, consider various ways to create tables, methods for editing and formatting them; teach how to make, fill in and edit tables.
- Developing:
- Develop techniques mental activity, form and develop the functional thinking of students, develop the cognitive needs of students, create conditions for acquiring the experience of students in the ICT environment;
- Develop research skills, partial search activities, self-esteem, independence;
- Create conditions for the manifestation of self-expression and creative activity;
- Development of the ability to select the necessary information.
- Educational:
- Learn to overcome difficulties, tune in to success in any business;
- Build collaboration skills.
During the lesson, students will be able to:
- posing and solving problems;
– analyze data and results;
- formulate conclusions;
- work in a group;
- speak in public;
- to express own opinion;
- evaluate the result;
Equipment:
- Media projector;
- Interactive board;
- Presentation made up of slides for the lesson;
- Cards - tasks for work in the lesson;
- Computers.
Lesson plan
- Organizing time. (2 minutes)
- Setting goals and objectives of the lesson. (10 minute)
- Learning new material. (10 minutes)
- Practical part. (18 minutes)
- health saving, physical culture minute . (2 minutes)
- Reflection. Grading. (3 minutes)
During the classes.
- Organizing time.
Hello guys! Let's mark those who are absent from the lesson today.
- On the board you see the rear ones :(slide 1 )
In the text given to you, find information about those stars that are more than 300 light years away from the earth, and also brighter than the sun by more than 7000 times
You have one minute to find an answer.
Answer: Slide 2
- Betelgeuse - distance from earth 650 sv. years, brighter than the sun 22,000 times
- Rigel - distance from the ground 820 St. years, brighter than the sun 55,000 times
- Deneb - distance from the earth 1600 sv. years, brighter than the sun 725,000 times
Questions . slide 3
What were the difficulties in completing the task? (Children are expected to answer: lack of time or inconvenient presentation of information in solid text) Slide 4
Can you suggest how you can simplify the solution of this type of problem? (Children are expected to answer: this case information is more convenient to arrange in the form of a table) Slide 5
The next slide shows an example of presenting this text in the form of a table. slide 6
Guys! What topic are we going to study today? Slide 7
Right! Our today's topic: Creating and formatting tables in Microsoft Office Word. Slide 8
The purpose of our lesson (Slide 9) is to consider various ways to create tables, methods for editing and formatting them; teach how to create, fill in and edit spreadsheets
Lesson objectives:
- Continue learning Microsoft Office Word
- Continue developing practical skills in working with spreadsheet Microsoft Office Word
- Learning new material:
- Table elements (cell, row, column) Slide 10
- Creating tables. slide 11
- First way. slide 12
- The second way. Slides 13-14
- The third way. slide 15
- Table Formatting Slide 16
- Editing tables Slide 17
- Practical work. Slides 18-19
Before execution practical work, let's remember the safety rules in the computer science office.
- Health saving, physical culture minute. On the back wall of the office, numbers are scattered in a chaotic manner. Read them aloud, in ascending order.
- Homework. Slide 20
- Reflection. Slides 21-23
Was the hypothesis confirmed that it is more convenient to present data in a computer in the form of tables? YES
Do you think the knowledge gained today will help you? YES
If you liked the lesson, please stand up
Thanks everyone for the lesson! See you on Wednesday!
Published on 09.11.2017 05:26
Of course, the ideal tool for working with tables in "Microsoft Excel", but the "parish" has tools for creating and editing them. If you prefer "word" in terms of working with tables, you need to explore all the possibilities of a text editor to work with them to be more productive.

In this article, we will talk about how to make a gap table in a "word", by the way, there are plenty of ways to achieve this goal, but here are four main exploded views. Method one: easy gap
Before I talk about how to make a table break, it's worth noting that the application will run the sample program in 2016, but it's perfect for earlier versions. It may be possible to have different icons for some tools and their location, but the basic idea remains the same.
Let's go directly to How to make a table fall apart in the program. You need to: Select the first row. This is done by simply holding the left mouse button (LMB) to stretch the cursor all the cells in the row. Now we need to go to the "layout" tab. It's in the "Table Tools" tab group. There you have to click "Split Table", which is in the "Merge" tool group.
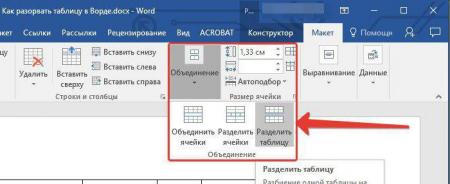
After everything is done, you can see a gap in the table, which means that everything was done correctly. This was only the first method of four, so without wasting time, move on. Method two: how to do it in "Word 2003"
Unfortunately, if you are using 2003 to work with text and tables, the previous instructions will not work for you. But now we will tell you in detail how to make a gap table in this version.
Everything is simple here. You only need to make the first lines of the future table, and then in the "Table" tab, click on the "paginate" button. After that, it will break. Method three: hotkeys
If you do not want each version software you should choose your own way, how to make a table clearance, you will be presented universal way.
To split a table using hotkeys, you need: As in the previous cases, you must select the first row of the table for the future. Press the key combination Ctrl + enter.
That's all. As you can see, this method is much faster than the previous one, and most importantly, it is suitable for all versions of the program. But someone may note that after the manipulations, the second Table is transferred to another page. If you are this result, and wanted to leave everything as it is, if not, then just place the cursor immediately after the first page and press the backspace key, then the table will be placed on one sheet with an indent of one paragraph. Fourth method: page break
In addition to the previous one, there is one universal way. Now we'll talk.
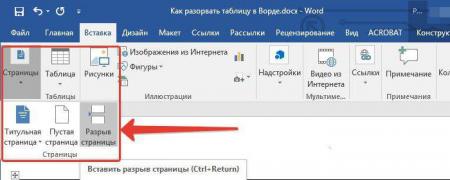
In one table two with a page break, you need to do the following: Place the mouse on the line that will be the first in the second table. Please note that you do not need to select the line. Go to the "Insert" tab. In the "Page Tools" group, click on the "page break" icon.
Once everyone is done, the table will be split. However, in this case, it will fit onto the new sheet permanently, meaning you won't be able to place both halves on the same sheet. Tables that join back
If you're wondering how to join tables after a break, you should follow these steps: Go to the second part completely. Press Ctrl+X. Place the cursor just after the first part. Press Ctrl+v.
In this case, the tables can be merged into one. Of course, there are algorithms for combining them, but this is the most common.
Tables are a very powerful formatting tool. With the help of tables, a page of a document can be given any look. Often, to solve the problem, the use of tables is the most acceptable (and sometimes the only possible option).

Creating a table in Word 2007 Any table consists of rows and columns. Their intersection form the cells of the table. To insert a table, use the "Tables" button located on the "Tables" panel of the "Insert" ribbon. Clicking this button allows you to interactively select required amount rows and columns for future table.
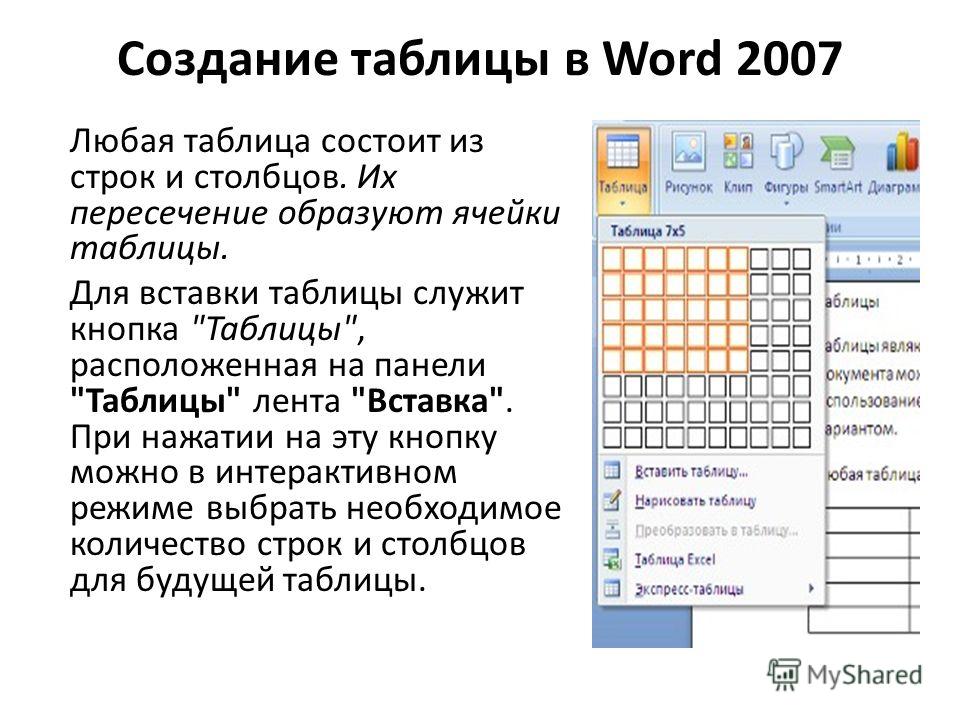
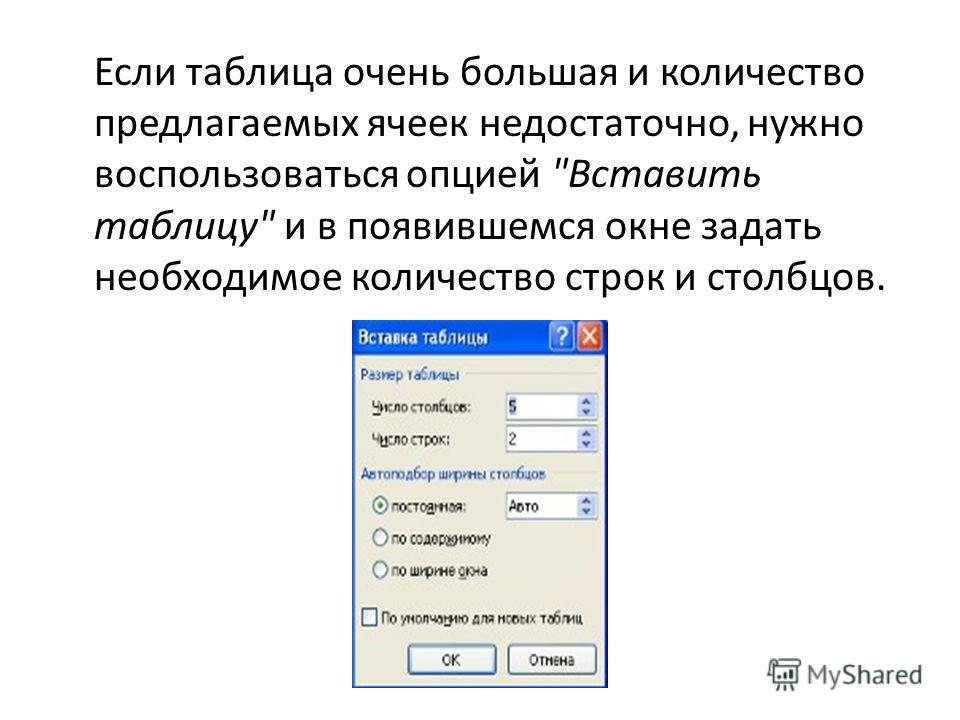
If the table is very large and the number of proposed cells is not enough, you need to use the "Insert table" option and in the window that appears, set the required number of rows and columns.
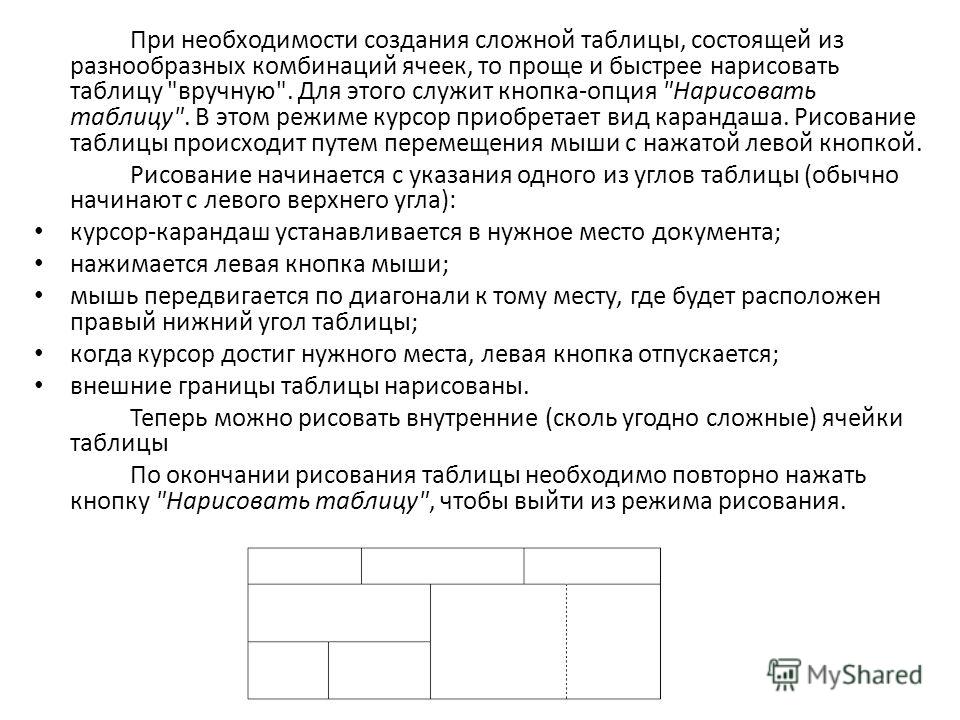
If you need to create a complex table consisting of various combinations of cells, it is easier and faster to draw a table "manually". To do this, use the option button "Draw table". In this mode, the cursor takes the form of a pencil. The table is drawn by moving the mouse with the left button pressed. Drawing begins with specifying one of the corners of the table (usually starting from the upper left corner): the pencil cursor is placed in the desired place in the document; the left mouse button is pressed; the mouse moves diagonally to the place where the lower right corner of the table will be located; when the cursor has reached the desired location, the left button is released; outer borders tables are drawn. Now you can draw internal (arbitrarily complex) cells of the table When you finish drawing the table, you must click the "Draw Table" button again to exit the drawing mode.
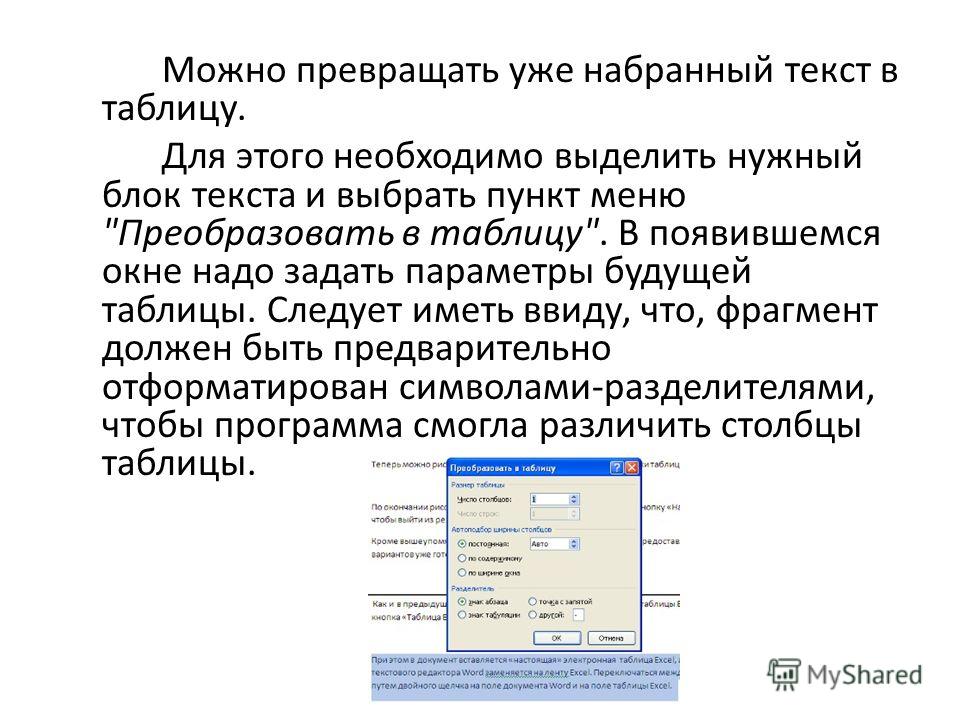
You can turn already typed text into a table. To do this, select the desired block of text and select the "Convert to Table" menu item. In the window that appears, you need to set the parameters of the future table. It should be borne in mind that the fragment must be pre-formatted with separator characters so that the program can distinguish between the columns of the table.
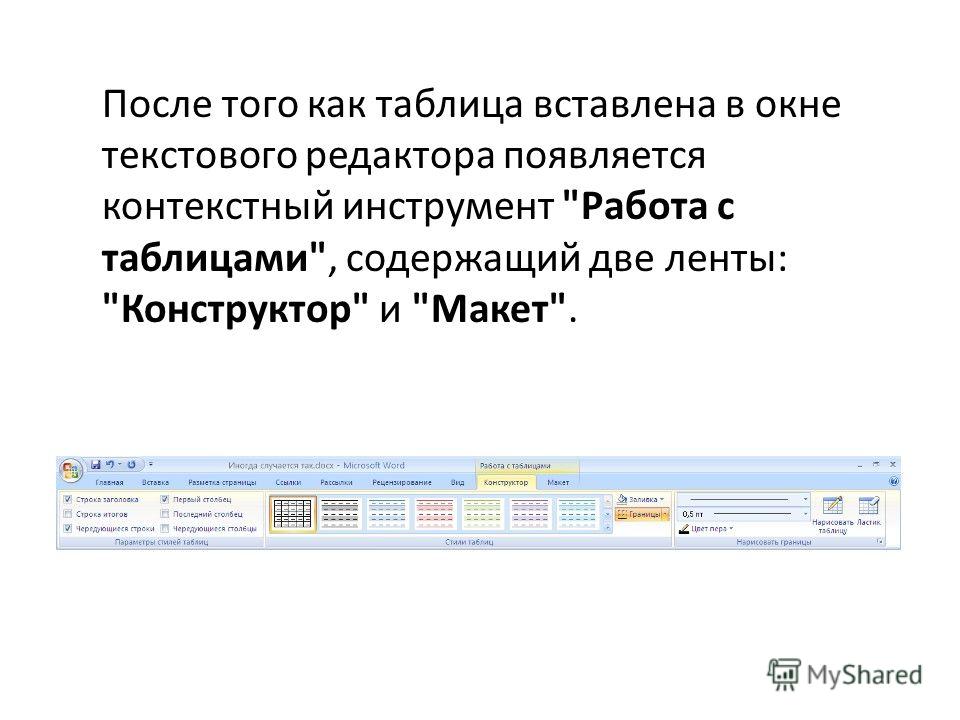
After the table is inserted in the text editor window, the context tool "Working with tables" appears, containing two ribbons: "Designer" and "Layout".
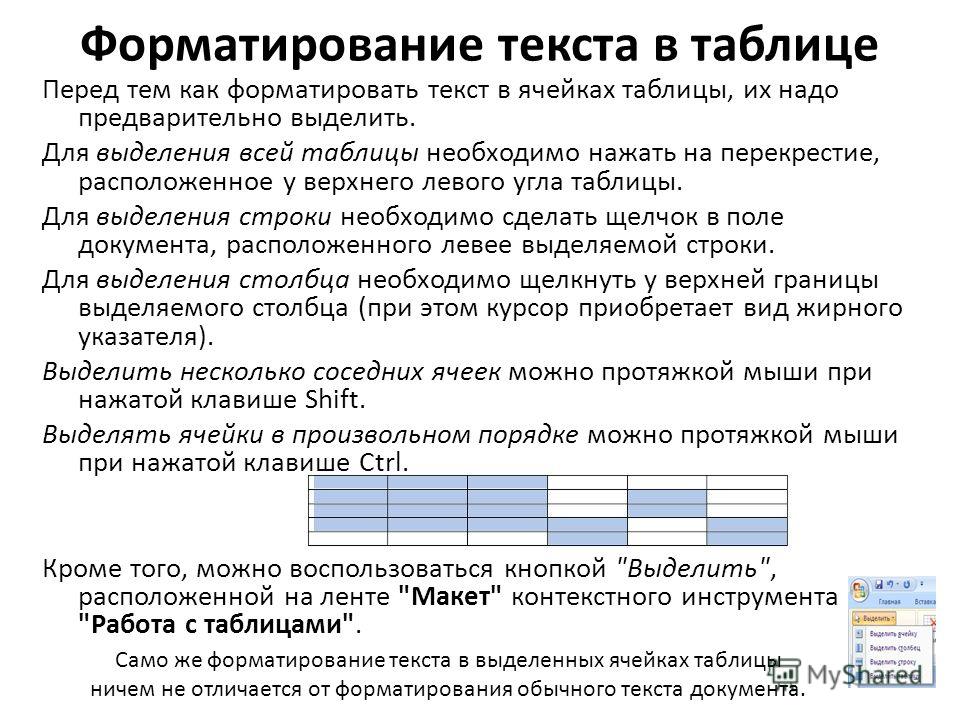
Formatting text in a table Before formatting text in table cells, they must first be selected. To select the entire table, click on the crosshair located at the upper left corner of the table. To select a line, click in the field of the document located to the left of the selected line. To select a column, click at the top border of the selected column (in this case, the cursor becomes a bold pointer). You can select several adjacent cells by dragging the mouse while holding down the Shift key. You can select cells in random order by dragging the mouse while holding down the Ctrl key. You can also use the Select button on the Layout ribbon of the Table Tools context tool. The formatting of the text in the selected cells of the table is no different from the formatting of the regular text of the document.
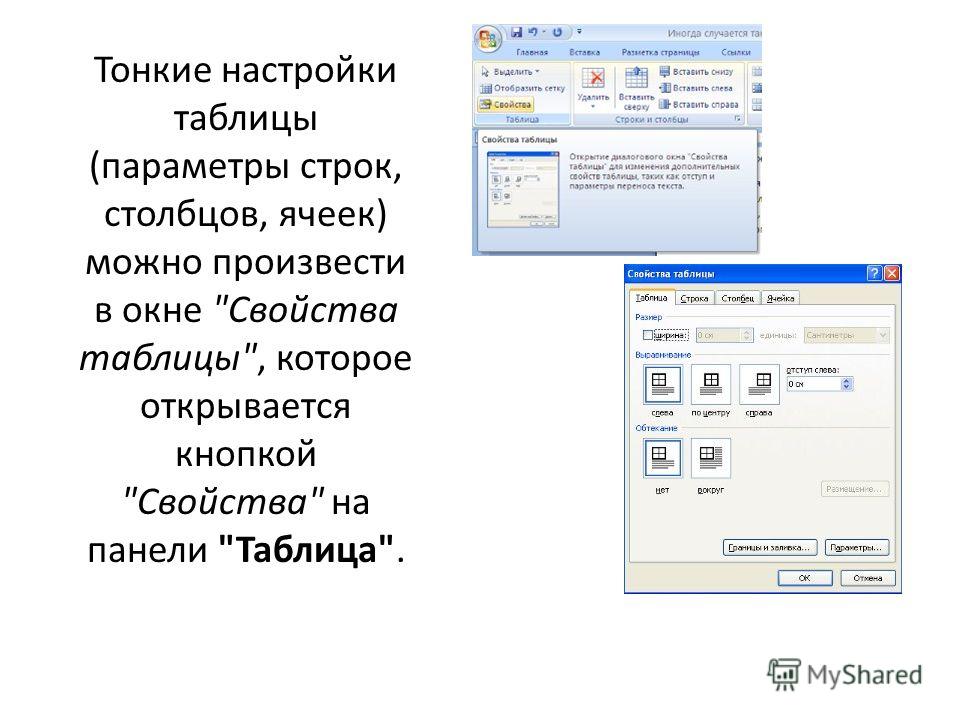
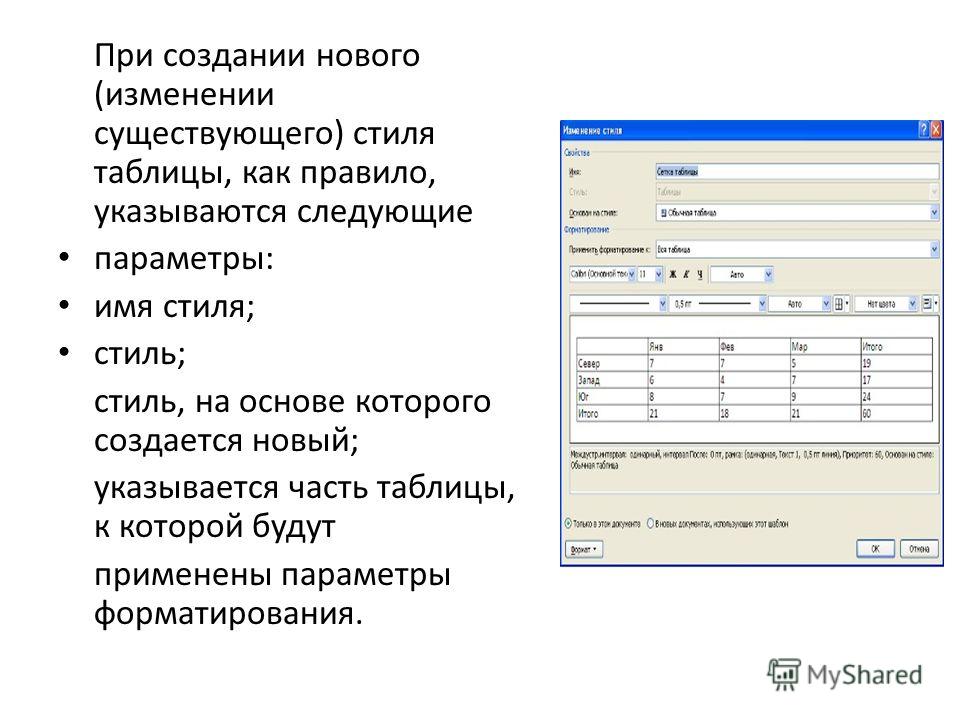
Fine-tuning the table (parameters for rows, columns, cells) can be made in the "Table Properties" window, which is opened by the "Properties" button on the "Table" panel.
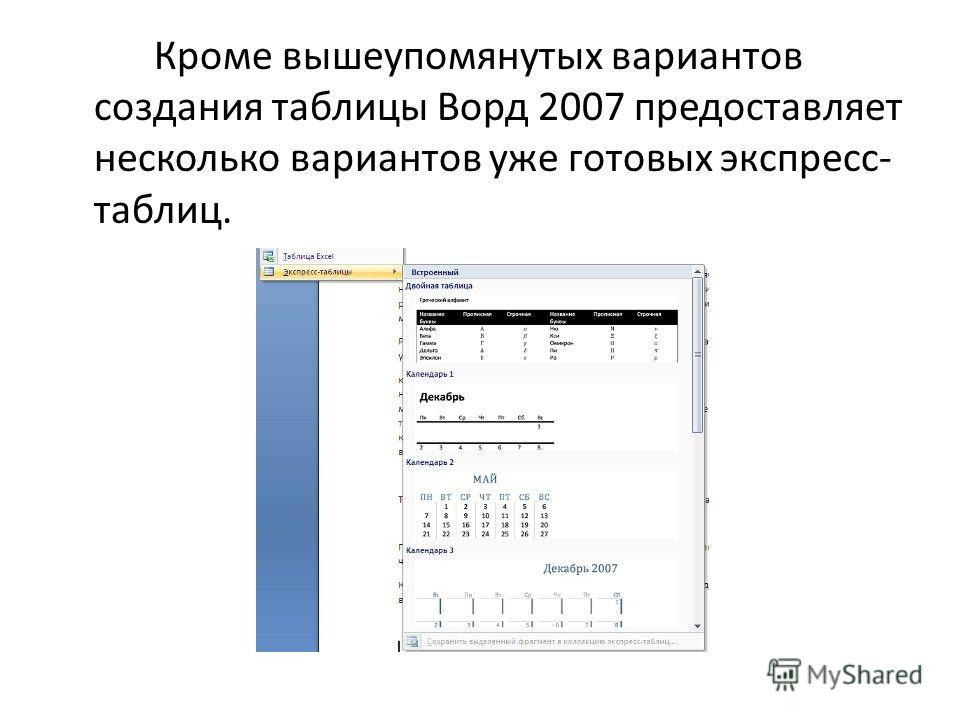
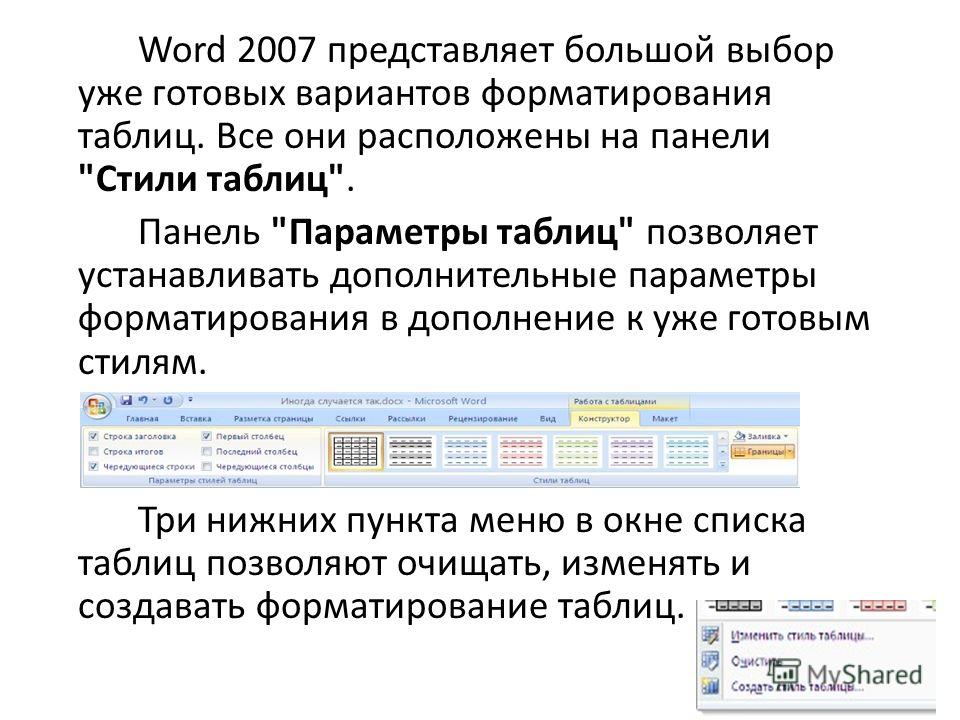
Word 2007 introduces big choice ready-made options for formatting tables. All of them are located on the "Table Styles" panel. The Table Options panel allows you to set additional formatting options in addition to the predefined styles. The bottom three menu items in the Table List window allow you to clear, modify, and create table formatting.
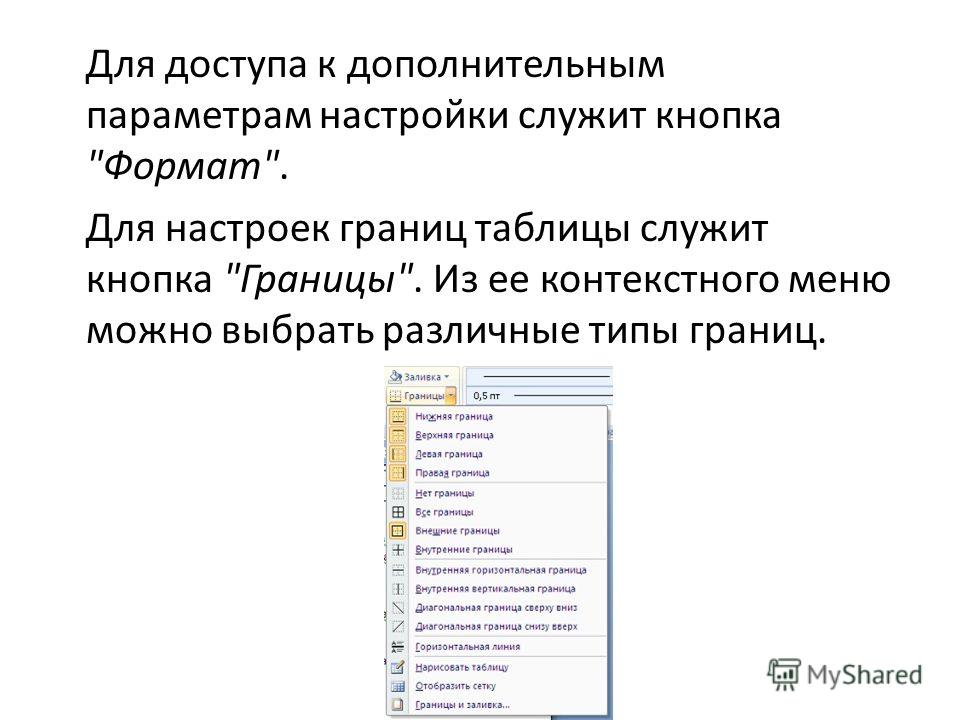
Use the "Format" button to access additional settings. To set the borders of the table, use the "Borders" button. From its context menu, you can select Various types borders.
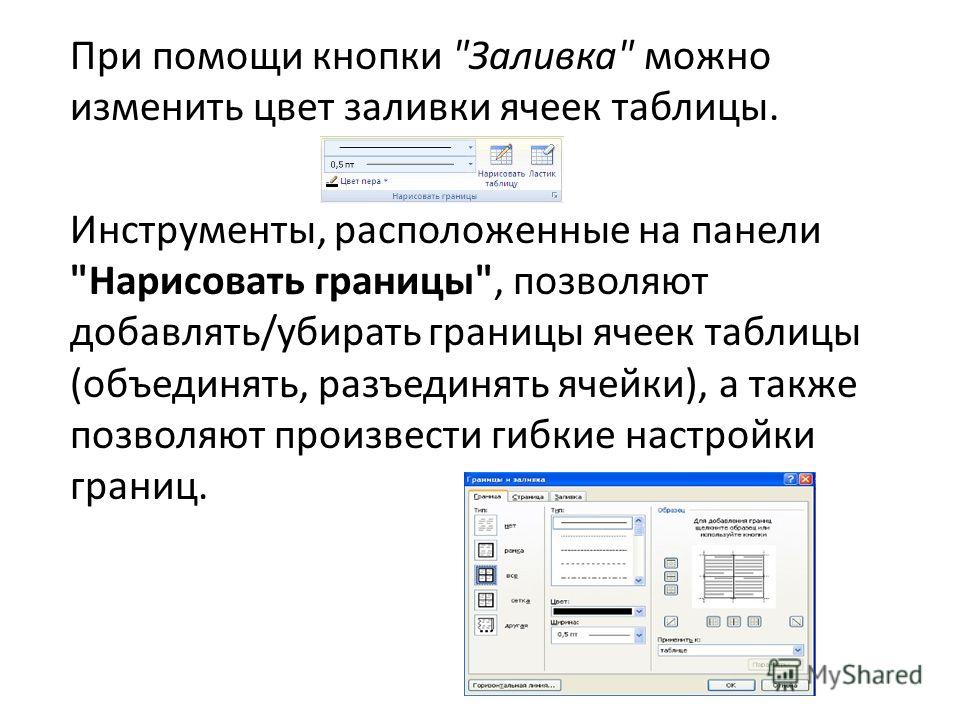
Using the "Fill" button, you can change the fill color of the table cells. The tools located on the "Draw Borders" panel allow you to add/remove the borders of table cells (merge, separate cells), and also allow you to make flexible border settings.
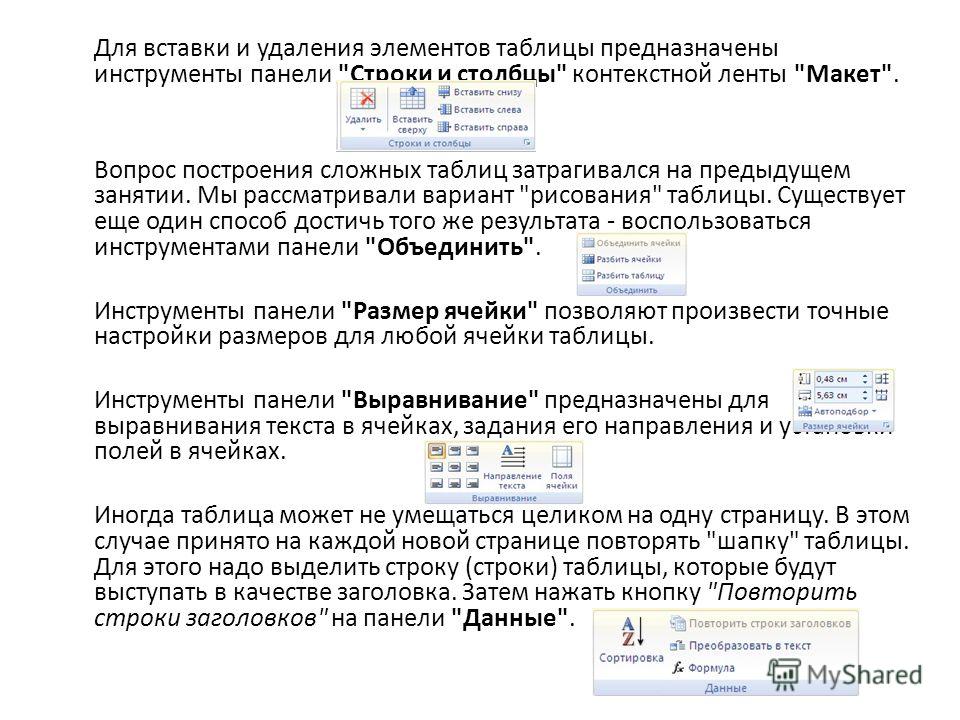
Use the tools on the Rows and Columns panel of the Layout contextual ribbon to insert and remove table elements. The issue of building complex tables was discussed at previous lesson. We considered the option of "drawing" a table. There is another way to achieve the same result - use the tools of the "Merge" panel. The Cell Size toolbar allows you to fine-tune the size of any table cell. The Alignment panel tools are designed to align text in cells, set its direction, and set cell margins. Sometimes a table may not fit entirely on one page. In this case, it is accepted on each new page repeat the header of the table. To do this, select the line (lines) of the table, which will act as a header. Then click the Repeat Header Rows button on the Data panel.
Lesson Objectives:
- create conditions for students to perceive the insertion of tables in the MS Word text editor;
- to consolidate and summarize students' knowledge on the topics of the “Dashboard”
- to form the skills and abilities of working with a text editor, with tables;
- develop interest in the subject at the lesson.
Material support:
- prepared board;
- cards for checking homework;
- workbook;
- projector;
- computers;
- cards with individual assignments (3 difficulty levels).
I. Org. moment (checking the state of the workplace, the health of the computer, workbooks)
II. Knowledge update
Let's start our lesson. Let's remember what topic we covered in the last lesson? (“Toolbars”). Let's check the house. exercise. Students are given a card where they need to choose the correct answer and connect it with a line from the selected option).
Card 1.
Card 2. Students are given a card where they will need to find:
a) Formatting toolbar;
b) Standard toolbar
c) a ruler
III. Learning new material. (Message of the topic and objectives of the lesson. The teacher informs students of the topic and objectives of the lesson, formulates the problem, provides a normal external environment for working on training session) (slide 1)
A table can be inserted in several ways:
- Using the text menu command Table -> Insert -> Table (slide 3)
- Using the "Add Table" button (slide 4)
- Using the "Draw Table" button (slide 5)
To create a table using the dialog box Inserting a table Select Table>Insert>Table. Menu appears Insert a table.
You need to enter the number of columns and the number of rows. AutoFit Column Width Constant.
If you go to AutoFormat, a large number of table design options will appear using various frames, fills, fonts, and colors.
Text is entered into the table by clicking on any cell. To move to the next cell, press the Tab key or the > key.
To add a row to the table, place the cursor at the end of the last row and press the Tab key.
Table border formatting options are set using lists Line type, Line thickness, A See also Border color. (slide 5)
Work on new material: (using a projector, show the finished table). (slide 6)
Working at a computer (hand out table blanks to students on their desktops for clarity).
We will learn how to insert tables into a text document, format tables, change the line type, line thickness, border color and fill color.
IV. Physical minute
Close your eyes, strongly straining the eye muscles, at the expense of 1-4, then open your eyes, relax the muscles of the eyes, look into the distance at the expense of 1-6. Repeat 4-5 times. Look at the bridge of your nose and hold your gaze at the expense of 1-4. Do not bring your eyes to fatigue. Then open your eyes, look into the distance at the expense of 1-6. Repeat 4-5 times. Without turning your head, look to the right and fix your eyes on the score 1-4. Then look into the distance directly at the score 1-6. Exercises are carried out similarly, but with fixation of the gaze to the left, up, down. Repeat 3-4 times. Move your eyes quickly diagonally: up to the right - down to the left, then straight into the distance at the expense of 1-6; then left up - right down and look into the distance at the expense of 1-6. Repeat 4-5 times.
V. Consolidation of the studied material.
Each student is given a card with individual tasks (3 levels of difficulty).
Lesson Summary: Control questions on the topic “Creating tables in MS Word” (slide 7)
- What needs to be done to create a table using the dialog box? (Table>Insert>Table)
- What did you do in the "Insert Table" menu? (Changed the number of columns and the number of rows)
- What is the key to add a row to the table? (Tab)
VI. Rating reasoning (rating and commenting on ratings)
VII. House. Exercise:
- Select data for the table and fill it out yourself
- For the student to write a mini-message “What are tables for and where they are used”.
Create a table with 5 columns and 4 rows
- fill it up
- 1 line fill yellow
- Line thickness - 1.5, border color - blue
Create a table with 7 columns and 5 rows
- fill it up
- 3 Fill in the line in green
- Select line type arbitrarily.
- Line thickness - 3.5, border color - red
| № | Surname | Name | Surname | Date of Birth | Home address | Telephone |
5. Add 1 extra line and fill it in yourself
Create a table with 9 columns and 6 rows
- fill it up
- Fill row 2 with green color, fill column 3 with red color
- Select line type arbitrarily.
- Line thickness - 2.5, border color - yellow
| № | Surname | Name | Surname | Date of Birth | Home address | Telephone | Class | School |
5. Add an additional 1 line and fill it with blue.
VIII. Reflection “Target”
(Put a dot in the place where the student who was in the lesson considers it necessary).