Hi all! We continue to give interesting ideas for educators, parents and teachers. And today we will talk about non-traditional drawing techniques. These ideas are suitable for kindergarten and school. Unconventional drawing does not mean something difficult. On the contrary, exactly unconventional technique turns art lessons into simple and fun fun. No need to draw complex elements, no need to masterfully master the brush. Non-traditional techniques are therefore CREATED, because they SIMPLIFY the work of the child, EASIER the task of the teacher in methodological plan and give the child a terrific creative experience with an excellent end result. You will see what beautiful paintings and drawings you can make with simple non-traditional drawing techniques. The child will love your activities - he will be drawn to art when he feels that he can create beauty with his own hands.
I have sorted all the non-traditional drawing techniques into SEPARATE GROUPS - and I will explain and show everything in order.
unconventional drawing
PALM PRINTS
IN kindergarten in the classroom for fine arts, it is important to choose a job that will be feasible for children younger age. In the second younger group, children do not control the brush well, it is difficult for them to make the brush draw a line, an oval, a circle ... Therefore, at this age, quick and beautiful drawings using the technique of painting with palms are interesting.
You can draw such a cute family of chickens and chickens with children's hands.

Green paint will give you a print that can be played with a frog. The eyes can be drawn separately on white circles of paper (by the teacher themselves) and the children simply stick the eyes on the drawing with PVA glue.

Here is another example of an appliqué drawing in this non-traditional do-it-yourself painting technique. If we add lateral wings and sharp tips of the ears to the palm print, then we will get the silhouette of an owl. The background for such crafts can be chosen from black cardboard, stick a large circle of yellow paper (moon) on it. And already against the background of the lunar disk, make an imprint of an owl-palm. And then when the print dries, add a long branch on which this owl sits.

The palm acts as a template - first a sketch, circle the palm on a piece of paper, and then try to draw an eye here or there. And look closely, you will see which character is looking at you.
Same for crafts in non-traditional technique "Palm + paint" you need to prepare the background in advance. Or create a green lawn and a pond for ducks from colored paper. Or draw in advance - toned the sheet in blue and green paint, dry and prepare for class (hold under heavy pressure from books).

As you can see in the photo below, overhead parts can be added to the palm element of the picture - applications made of paper and other materials. Below is an example of how ordinary gray paper from a box can become a prototype for crafts. To make it easier for a small child to draw circle-face of a lion- Give him a jar lid template. Let the children trace the round cap around the center of the “cardboard mane” with a pencil and then carefully paint over the circle with paint - first stroke with a slow brush along the edge of the line, and then paint over the middle. We finish the black details of the mustache, nose and ears with a marker (the teacher himself when the craft dries).

In non-traditional palm painting, images of birds are often used. There you are simple idea drawing a sparrow in kindergarten. Easy and quick to draw with your own hands for children in the middle group.

But the ideas of non-traditional palm painting for children of middle and senior group. Craft MONKEY. Here you need to already correctly position the palm - so that the fingers are turned towards the vine, on which the monkey will hang. Then with a brush draw a beautiful curl of the tail. And already lay out the head from the paper application.

But the lesson on non-traditional drawing of the older group - here you first need to draw a tree (trunk, branches, leaves). The leaves are just brush marks (they pressed the brush sideways. They lifted it sharply up so that the mark does not smear). While the children are busy drawing the leaves, the trunk will dry out well and on it, as against a dry background, the imprint of a koala bear cub will already lie perfectly. A beautiful craft for both kindergarten and school (grades 1-4).

And here is a beautiful bright craft-drawing GIRAFFE. Here we also see the base of the handprint. But a long neck element with a head is added to the drawing. Before applying the spots and strokes of the mane, you must wait until the red base is completely dry. The mane is placed with the imprint of the brush - we put the brush on the side and sharply lift it up, we get a trace-imprint like a patch of mane hairs - we still give a lot of prints along the entire cervical spine of the giraffe. .Round spots are easier to draw cotton swab(the circles will not turn out even with a brush - not all children know how to draw a circle with a brush - this is a complex technique that they will master after they learn how to write letters).

For the older group of kindergarten, a palm drawing in the form of a rainbow magical unicorn is suitable. Great craft for girls. The horn will be drawn by the teacher.

And the boys will like the drawing in the form of a dragon - also in this technique.

Also, small children are very fond of collective crafts. Where the whole kindergarten group participates in one common artistic work. For example on big sheet paper to carve the outlines of the future body of the peacock - and build around it the prints of the feathers of its magnificent tail. And then when the tail dries, you can stick the body itself along the center.

Drawing with FORKS.
non-traditional technique in kindergarten.
Disposable plastic forks- the tool that can create for you an interesting non-traditional drawing technique. All drawings where needed characteristic shaggy smear, it will become easy and fast to draw even a small child.
Here is an example of such work for children in kindergarten. On a sheet of paper, the teacher draws a stump. From the stump comes up line is the AXIS of the future Christmas tree. We scoop up thick paint with a fork and apply prints in the direction from the side of the axis down. First we process right side from the axis, then to the left from the central rod of the Christmas tree.
And already the third stage - we put another layer of CENTRAL STROKE on top of these strokes - already more vertically down from the center, slightly diverging to the sides.

For comfort pour paint into bowls - jar lids are perfect.
AND to reduce paint consumption , gouache can be diluted with PVA glue - one to one, or in a different proportion. Valuable advice- do not buy SCHOOL PVA in small tubes - go to a hardware store and buy a liter (or half-liter) bucket of PVA glue there. It will be called universal PVA, or construction PVA - don't let that bother you. By chemical composition it is exactly the same as school PVA glue. But at a price of 5 or 10 times cheaper. And in a bucket, the glue does not lose its freshness, as in a tube. And a liter bucket is enough for a kindergarten group for 3-4 months of active classes.
In such an unconventional technique, you can draw any SPIKED elements of the picture - for example, a Hedgehog or a CACTUS.

Also, a fork will help draw furry characters. For example, a yellow fluffy CHICKEN, or a kitten, or a bear cub.
Since the paint already contains PVA glue, it is not wet yet. dried paint you can glue any paper parts (beak, eyes, ears, tails, etc.).


Also, the fork smear is similar to the plumage of birds. Therefore, you can draw any bird using this technique. This is how it happens you can see in the photo of the craft below - COCK..

METHODOLOGY OF TRAINING - classical.
On two sample drawings.
What is the best way to TEACH DRAWING in kindergarten. Here is a technique that has been working great in kindergarten for several years now. This technique allows you to get the CORRECT children's drawing the first time. Let's analyze it using the example of the same COCK from the picture above.
STAGE 1
We seat the children on a high chair (in 2 rows) in front of one table. On it, the teacher will make a show. On a piece of paper there is already the outline of a rooster, drawn in pencil. In three bowls different paint is poured - yellow, red, blue. Each color has its own fork.
In front of the children, we begin our work - we draw feathers with a fork, freely mixing paints. We show what is wrong and what is right. Let the children make sure in your example that it is better to draw lines ALONG the neck, and ALONG the lines of the tail, and not across.
STAGE 2
They drew plumage for one rooster in front of the children. Now we make him a friend - we take another sheet with a pencil rooster, and ask the children, “What should be done?”. Children prompt, you "mow", children correct you, prompt as it is necessary - you are corrected and continue to make mistakes, then correct. Now already children act as a “knowledgeable teacher”. After this game on drawing the second rooster. The children themselves sit down at the tables, where the same pencil rooster is waiting for them and, already with knowledge of the matter, each perform their craft.
As you can see, the demonstration technique always works better on 2-way training drawings by the teacher's hand.
- The first drawing, where the teacher does everything himself (teaching and explaining to children)
- The teacher performs the second drawing at the prompts of the children (“mistaking” and correcting).
- The third drawing is already done by each child himself, at his desk, with an intelligent, learned look.
Unconventional DRAWING
FOOT PRINTS
The imprint of a child's foot, like the palms, can be turned into an interesting drawing. A variety of characters can hide in a child's footprint.

These paintings can be created using the technique of unconventional drawing from the usual print of a child's foot.


I will say right away that in the realities of a kindergarten (where there are 30 children in a group) such foot painting is difficult to arrange. In the case of drawings with palms, everything is simple: children wipe their palms with a wet cloth (remove the main layer of paint), and then go to the washbasin and wash their hands with soap. When drawing with his feet, the child cannot go and wash his feet in the washbasin. A gentle man with soap and several basins to wash his feet. You can't do this kind of work with a whole kindergarten group. But…
Such drawing can be done as a specially organized individual lesson. Children are divided into groups of 4 people. One child gives his legs for a print, the second draws eyes, ears, tails, the third child draws grass, the sun, the fourth a tree, a bird, and so on ... (depending on the theme and plot of the picture).


You can try this option for organizing the whole process. Before going to bed when the children are barefoot. Let the child step on a piece of foam rubber soaked in paint. And then immediately onto a piece of paper. And then immediately not a thick wet soapy terry towel, then into a basin of water ... and sleep in a crib.
That is, you need to buy a sheet of foam rubber(it is cheap in the construction department, sold by the meter). Wet the foam rubber, dilute the paint lightly with water so that it is well absorbed into the foam rubber (like ink in printing), put the foam rubber sheet on a plastic tray. Nearby, on the second plastic tray, there is a wet soapy towel (for wiping the paint), then there is a bowl of water, and a dry towel. There is a chair next to each tray and basin. Three chairs + three elements (coloring, soapy, rinsing, wiping).
It turns out the conveyor- the child sits on the first chair (steps on foam rubber with paint, hop - raises his leg), move the tray with foam rubber, put a sheet of paper in its place (hop - printed). The child moves his ass to the second chair, next to which is a tray with a soapy towel (hop-soaped his leg, wiped off the paint). The child moves his ass to the third chair, next to which is a basin of water, a rag floats in it (hop - we wash off the soapy foot, where we need three rags). And wipe with a dry towel.
Everyone is happy. Except for the sanitation station. It does not allow collective rinsing in one basin. The sanitary station requires 20 basins for 20 children, and 20 soapy towels ... 20 dry towels)))

unconventional drawing
HATCH method
And here is another beautiful technique for kindergarten. Where the drawing elements are created by hatching. It turns out an interesting texture of the image. This method is convenient to draw everything fluffy and furry.
The technique is well shown by the example of such a craft-HARE.
The drawing of a hare is divided into SERIES-SECTORS, each of which is shaded. We get even rows of hatching.

Here is a life size template for this craft.

You can modify this craft and present it as an appliqué. Where each element is cut out separately (ears, forehead, cheeks, nose, neck). Then each element is shaded. And then everything is assembled into a single whole application.

The ZONE HATCH method can be used to create any other furry characters. For example, a fluffy ostrich.

That is, the teacher gives the child a sheet of paper - on which the eyes and beak of an ostrich are drawn. The task of the child around the eyes is to draw a fluffy cloud of strokes with a pencil or wax crayons. And then under the resulting fluffy ball, draw the neck, too, in rows of strokes. The teacher can help the children by drawing the circumference of the ball of the head and the lines of the future neck, and dividing the neck into sectors for striped multi-colored shading.

You can come up with any character and arrange it in the form of SECTORS for hatching - a cat, a parrot, a dog, and so on.
DRAWING in kindergarten
COTTON STUD
(unconventional technique).
All of us in kindergarten drew a FLUFFY DANDELION craft - using cotton swabs. Here it is (photo below). Let's think about what other pictures you can draw with a cotton swab.

Although even from a simple theme DANDELIONS you can create unconventional pattern- BRIGHT JUICY, as in the photo below.

For young children, it is best to use the technique of PUMPING WITH COTTON STICKS, to offer to draw only SOME ELEMENTS of the characters - only the tail of the fox, only the needles of the hedgehog.
That is, a teacher in a kindergarten combines the work of drawing a wadded stick with an application. First, on a piece of paper, the child makes an applique of a hedgehog muzzle (made of brown paper) and a hedgehog back skin (made of white paper). And then this skin-back needs to be completely stuck with multi-colored prints of a cotton swab. Merry children's activity for drawing and gluing.

You can use cotton swab drawing using the ZONE FILLING technique. On a sheet of paper, the outlines (silhouette) of a character are drawn with a pencil - for example, a seahorse. The child must fill this entire area without leaving empty seats and without getting out of the pencil border. This is difficult, the child does not always see where it is thick and where it is empty. The teacher needs to repeat all the time looking for empty holes, filling holes different colors dots rather than dots of the same color.
Here the brain works, and mindfulness, and fine motor skills hands, and a sense of color. After all, you need to feel how you distribute the color over the zone - evenly or everything is yellow at the top, and everything is blue at the bottom.
Such a task can begin to be given in the younger group and then in the older one - and even an adult will learn something in such training for a sense of color and composition.

You can also make CHAIN PATTERNS with a cotton swab. Like the rows of rings on the cacti below.

And also with dots you can draw whole pictures. This technique of non-traditional drawing can be called POINT-GRAPHY.

The most interesting thing is to select dots of different shades and place them in different ways on the objects of the image.

You can start this kind of drawing with small tasks. Pieces of landscape, elements of architecture.

There is an artist Angelo Franco who paints pictures using the POINT TO POINT technique. Here are large dots, contain smaller ones inside.

With a cotton swab and paints, you can draw beautiful MANDALA (photo below). Mandalas are circular patterns, symmetrical and multicolored. The birthplace of mandalas is the East. There are still laid out patterns of colored pebbles, colored sand, or flower petals.

For children, we must give ready-made graphic mandala templates with a given pattern. And the child's task is to REPEAT EXACTLY EXACTLY in each of the symmetrical zones of the mandala with a stick. That is ... if in one zone you made 2 yellow poke on a petal, then in the remaining zones you need to make 2 yellow poke, on the same petal, in the same place on the petal.

You can find many round mandalas for painting on the Internet. Choose the ones that are simple and easy to make for children of a certain age.

You can draw dotted mandalas and on plastic plates. As in the photo below.
You need to start drawing mandalas when the child has already mastered the elementary count up to 5. And he can count the number of TYKOVs in each ray or in each row of the mandala (if it is a row-ray mandala, as in the photo below).

Agree, this beautiful and unconventional drawing technique perfectly develops the child's mind, his mathematical abilities, constructive thinking, the ability to plan the result, calculate the drawing.
Drawing WITH A WET EFFECT.
(unconventional ways).
Here is another unconventional watercolor technique drawing. Here we put a watercolor diluted with water on a sheet of paper and blow on it from a tube. We get watery stains and colorful streams. For such a drawing, it is not necessary to use watercolor, the same can be done with gouache diluted with water.
Below we see how this technique can be used in art activities classes in kindergarten and at school. We give the child a drawing of a face (boy or girl) and the task of the child is to blow out the HAIR HAIR for these characters.

You can use a board on which we attach a sheet of paper with a clothespin. We put a large drop of paint on the edge of the sheet and lift this edge of the board up - so that the drop flows down like a hill.
If part of the sheet is temporarily sealed with a piece of masking tape, then we will have an empty, unpainted place on the sheet. And then in this place you can place the application of someone under an umbrella. Here's how it's done in the photo below.

In the younger group of kindergarten, children will really like to draw cool monsters. Krakozyabra can be inflated from the tube in any direction. And then, after drying, stick application elements on them.

Now I want to introduce you to another technique - SOAP + PAINT. Pour ordinary liquid soap into cups, or liquid for soap bubbles - add a little gouache to each cup. We get a multi-colored soap paint. We dip a cocktail tube or a round “blower” into it and blow bubbles directly onto the paper. We get gentle bubble CLOUDS. They can be arranged into an interesting picture.

Bubble clouds can be LUFFY PEONS (as in the photo below). Bubbly areas can be scalloped on sea waves, like curly lamb skins, etc.

You can simply blow bubbles on the surface of a sheet of paper with a straw, and then cut out a craft application from this multi-colored sheet. Interesting idea for kindergarten lessons.

You can also paint with splashes - just SPLASH on paper multi-colored paint. The best thing for this is a toothbrush.

unconventional drawing
WAX-GRAPHY method.
Here is another technique that can be called CANDLE GRAPHICS, or WAX GRAPHICS.
Suitable for this technique white candle wax (or paraffin). It can also be childish. wax crayon for drawing (but not any). Choose chalk that is more oily to the touch. Check in advance how the crayons work.
Now let's act. Draw a picture on a piece of white paper with white chalk. Then we take watercolor (not gouache !!!) and begin to apply watery (not thick !!!) paint over the lines drawn in chalk. That is, we simply paint over our sheet of paper with colored watery paints and an invisible white wax pattern begins to appear. The paint does not cling to the wax and these places on the paper remain white.

You can draw multi-colored round mandalas in this style (with streaks of different colors). Drawn looks nice autumn leaves: leaf contours and veins are waxy, and the filling of the sheet is multi-colored (red-yellow-orange).

Night rain over water looks beautiful. The slanting lines of rain, diverging circles on the water - it's all wax. And then we paint over with dark blue paint and get a beautiful picture of rain.
You can draw jellyfish and sea creatures with wax. And then apply dark (blue-violet-black) tones and the depths of the sea will come to life.

Children are delighted when you offer them such an activity. The educator or teacher himself draws jellyfish, turtles, small tadpoles and amoebas on each sheet in advance. And then the child must find out who is found in the depths of the seas. He paints a sheet of paper with paint and all these creatures appear under his brush.
Important rule. Before class, teach the children to IRON a sheet of paper with a wet brush, and NOT TO RUB THE SHEET WITH A BRUSH, LIKE A WASTE. Otherwise, the wax pattern may be damaged.
NIGHT pictures look beautiful in this technique. With wax we draw one line of the horizon, then waves, a wax moon path and a moon disk on the upper half of the sheet. Now we paint over it in the colors of the night and get the sea, the moon and the white moon path.
WINTER pictures look good too. white lines wax drawing as elements white snow, the outlines of snowdrifts, the silhouette of a snowman, snow-covered huts - we draw all this with wax. Then the child applies blue or blue paint and a winter landscape appears on the sheet.
But important- before giving these pictures to children, check for yourself whether the quality of the wax is suitable. Do the lines of the drawing appear? What layer of paint to put (what degree of paint dilution with water)?

unconventional drawing
In the PRINT technique.
All children love this drawing technique. Because it gives a quick and beautiful result for every child. Even the most inept artist makes beautiful paintings. Children perceive the whole process as magic, an exciting game with the magical effect of the appearance of a picture.
In kindergarten, it is most convenient to organize the imprint technique. Let's see what materials are suitable for implementing this technique when drawing with children.
OPTION 1 - a piece of crumpled paper.
Wrinkled paper gives a beautiful torn structure to the print. This is suitable for painting the crowns of spring (yellow-green or pink) and autumn (orange-crimson) trees. The paint is taken from jars or watercolors, dripped onto a bowl (jar lid). We dip a napkin into this drop, try the print on a draft sheet and, if you like, transfer it to paper.

OPTION 2 - corrugated cardboard.
Packing gray cardboard is great for painting a rose using the print technique. We cut cardboard box into strips across the shirring line. We twist the strips with a tube, fix with an elastic band or thread. We make a stamp for a green leaf from a toilet paper roll.
Also, this ROLL drawing method is suitable for the image of the SNAIL SPIRAL, You can also make the LAMB SKIN CURL.

OPTION 3 - fluffy pompoms.
In craft stores (or craft sites) you can buy a bag of these soft pompoms. If you attach a clothespin to each, we get a convenient holder for work. Using the pompom-graphy technique, you can create decor for painting flat parts of handicrafts. And also paint pictures of white airy dandelions in watercolor.

OPTION 4 - toilet paper sleeve.
There are a lot of options, because the tube-sleeve can be given different shape. You can cut the sleeve in half ALONG, and we get a half-ring stamp - an ideal stencil for drawing fish scales or tiers of coniferous legs of a Christmas tree.

A round roll can be flattened on both sides and you get a pointed oval - this is the shape of a flower petal, or bunny ears. Great idea for non-traditional drawing in kindergarten with younger children (bunny) or older children (flower).
A flower is more complicated than a bunny because you need to RADIALLY line up the petals around the middle of the flower.

You can also cut the EDGE of the ROLL into curly petals - and you will get ready-made petals for paintings. These stamps are just a godsend for quick drawing bouquets and flower beds for children of the younger group. And even for the smallest kids in the nursery.

OPTION 5 - bubble wrap.
Wrapping film with bubbles also gives an interesting print pattern that can be played with non-traditional drawing in kindergarten. For example, make an imprint of honeycombs (as in the figure below).

Or make a drawing of a spring or autumn tree.

OPTION 6 - potato stamps.
From potato halves, you can cut stamps of any shape. Cut the potatoes in half. We wipe the wet potato slice with a paper towel. On the cut with a marker, draw the outlines of the future stamp. Cut with a knife along the drawn contours.
It is better to choose oblong elongated potatoes for stamps. So that the child's hand can comfortably grasp the potatoes. Below in the photo we present only two themes for such unconventional drawing - owls and tulips. But you can come up with your own options. If PVA glue is added to the paint, then details (eyes, nose, pens) can be glued over the prints.

You can make an experimental double stamp. Cut out the halves of the champs from two potatoes and fasten the two potatoes together by piercing them through with a toothpick and wrapping them with electrical tape or tape. Take a swing at cool idea and experiment with creating stamps for it.
unconventional drawing
FLUSH paints.
And here is another cool material for non-traditional drawing, which is so loved by young children. This is a VOLUME PAINT for creating puffy drawings. This paint is made at home quickly and simply - in a bowl, mix PVA glue with gouache and add dad's shaving foam. We make several of these bowls (not necessarily large ones) under the idea that we will draw with children. For a watermelon, you need only two paints - that's where you start. Watermelon pits are a simple black gouache that we drip here and there.

A variety of ideas can be embodied in this drawing technique for children in kindergarten. The simplest is a waffle cone with ice cream. The horn is cut out of rough packaging cardboard, on it we draw a waffle grid with a marker. The child glues the horn on a sheet of paper (below) and lays out round balls of a three-dimensional pattern on it. You can give the child round templates, which he will first circle with a pencil over the edge of the horn, and then foamy paint will be placed in these round contours.

And you can also put a few spoons of different paint on the horn and then with the back end of the brush (or a wooden stick) mix the paint into multi-colored stains. You will get a beautiful mix ice cream. Great craft for kids in school or kindergarten in drawing class.

Methods of working with thick paint in children's classes.
You can mix the paint on a separate tray (or on a piece of oilcloth). It is better when each child makes a colored mixture himself - therefore we give each child his own oilcloth.
We put individual oilcloths for children on each table. In the center of the table we put bowls with 4 colors of paints. The child on his oilcloth mixes these colors into a common puddle - to the state of beautiful stains. Then he applies a paper outline of a character (for example, a seahorse) to the puddle. And then he lays it to dry (the contours of the skates must be signed in advance with the name of the child, and do not forget to remind the children to apply the unsigned side to the paint). Then the next day, when the foam paint dries on the silhouette of the skate, you can continue to work and make an application of the skate in sea waters, finish painting spikes, algae around it, stick shells, pour sand on the glue.

Like these ones interesting techniques drawing you can try in working with children, both at home and in the garden. At school, this non-traditional drawing can be carried out in the lessons of visual activity, leaving the whole process to the child for independent creativity.
On the pages of our site you will find many more different techniques For unusual drawing paints.
We already have detailed detailed articles on the topic:
Good luck with your creativity.
Olga Klishevskaya, specially for the site
Good websites are worth their weight in gold you can support the enthusiasm of those who work for you.
Even for many of us, an art exhibition sometimes causes yawns and is associated with something boring and uninteresting: well, a picture, well, drawn - so what? And it seems that the child, all the more, will not understand anything. But if you choose the right plot, discussing what you saw and sharing your impressions together, it will be fun for both the children and you. Therefore, so that there are no indifferent adults, it is better to learn to understand art and respect the work of the master with early years.
Natalya Ignatova, lecturer, shared her secrets on how to instill in children a love of beauty with Letidor educational project Level One and a certified art historian.
Natalya Ignatova
lecturer at the Level One educational project and a certified art historian
To interest children in an art exhibition is not as difficult as it seems at first glance. And for all parents. To make going to the museum a good family tradition, consider your age young viewer and learn art in a playful way. Knowing your child, you will be able to tell him the story of the picture in an unobtrusive and accessible way, which means that you will not overload with unnecessary information.
preschoolers
Kids from 4 to 6 years old are not very interested in who painted this or that painting and why. To begin with, they just need to explain what a museum and paintings in general are. Most children at this age are already familiar with photographs. They probably already tried to take pictures of dad and mom or their toys. Therefore, we can say that paintings are something like photographs. It's just that before there were no smartphones or cameras, and people could only draw - and not only reality, but also fairy tales.
At preschool age, first of all, you need to teach the child to carefully look at the pictures. At the same time, keep in mind that canvases depicting both nudity and scenes of violence hang in the galleries. Therefore, think over the route in advance. IN Tretyakov Gallery it is best to immediately go to the room with paintings by Viktor Vasnetsov (room number 26). The ideal work for the perception of kids is "Bogatyrs".
V. M. Vasnetsov "Bogatyrs" (1898)
Tell the plot of this picture, which the artist loved very much, in the form of a fairy tale: “Once upon a time there were three heroes. Their names were Ilya Muromets, Dobrynya Nikitich and Alyosha Popovich. And they protected their lands from the invasion of enemies. And one day they went out into the field and ... ". Here you can ask the child what he thinks: do they see enemies or not? Pay attention to the kid's attention to how the sword is extended, the arrow is prepared, how the characters in the picture look - in general, push him to the conclusion that the enemy is somewhere nearby. Imagine together what will happen next. Invite the child to think about how the epic heroes are similar and how they differ, what characters they have.
By the way, it was this painting that became the last in the collection of Pavel Mikhailovich Tretyakov, which he bought himself and hung with Vasnetsov in the place where the canvas hangs now.
Apart from fairy tales, children will be happy to study pictures of animals, domestic scenes and still lifes.
I. F. Khrutsky "Flowers and Fruits" (1839)
Go to Ivan Khrutsky's still life (room 14) and explain to your child that artists often paint everything they see. Ask him what fruits and vegetables are in the picture, where the insect hid, what paints the artist used, who likes what color. At the same time, it will be more interesting if parents also share their impressions.
WITH younger students it is no longer necessary to run to specific halls, fearing that they will see scenes of war or the tender embrace of lovers. You can start with portraits and explain what kind of genre it is.
After choosing pictures of different people, ask the child if they are different from us and how, and also play the game "Guess who it is?". A military man, a merchant, or, say, a king, with attributes of power - a power and a scepter. Tell us also about the fact that portraits differ in genre - there are ceremonial portraits, in full height, and there are chamber ones - to the waist, and offer to determine where which one is.
In addition, draw the child's attention to the emotions of the characters. To do this, consider, for example, the faces of men in the painting by Orest Kiprensky "Newspaper Readers in Naples" (room number 8).
O. A. Kiprensky "Readers of Newspapers in Naples" (1831)
One of them is reading a newspaper. One might ask: what are others doing? They are listening - this can be seen from the turn of the head of one and the thoughtful look of the other. Then it is worth asking the question: why does one read to all? And the parents themselves will help answer it, having prepared a little. All these people in the picture are foreigners, and only one of them knows the language in which the newspaper is written. And he translates. The least interesting reading is for a dog that looks at the viewer and does not understand at all what it is about. Try to show your child that you are also listening attentively to someone, and invite him to compare how your face is similar to the facial expressions of the characters in the picture.
I. I. Levitan "Golden Autumn" (1895)
Also at this age you can admire the landscapes, so clear and bright. Review with your child golden autumn» Isaac Levitan (hall number 37). Ask him: why is it autumn, what period does the landscape belong to, what colors did the artist use, what mood does the painting evoke.
Try to guess what season is in the picture wet meadow» Fyodor Vasiliev (hall number 18). Green trees are painted there, flowers grow and the sun breaks through the clouds.
Also introduce the child to the landscapes of Konstantin Korovin (room number 43). In his painting "Winter" you will see a yard covered with snow and a horse harnessed to a sleigh.
Walk to the painting by Alexei Savrasov, familiar to everyone since childhood, “The Rooks Have Arrived” (room No. 18). The artist depicted the middle of spring, when it becomes warm, so the birds return from the south, but the leaves have not yet blossomed and the snow has not melted.
I. I. Shishkin “Morning in pine forest» (1889)
Well, how can a little sweet tooth pass by such a familiar picture (hall number 25). Be sure to share a secret with your little one: furry animals on a broken pine tree were painted by another artist - Konstantin Savitsky. At one time, he told his relatives that the author sold the painting for 4,000 rubles, and therefore became a "participant in the 4th share." Savitsky first put his signature under the work, but then removed it.
Draw the child's attention to the fact that the tops of many trees seem to be cut off and do not even fit on the canvas - this is how the artist wanted to convey their power and majesty. And we, like bears, find ourselves inside a thick thicket.
Children aged 9 and over
Children aged 9-11 can already be told about the personality of the artist and his life. True, for this, adults will have to prepare or take an audio guide.
Psychology of children's creativity
(guidelines for beginner teachers)
teacher of special disciplines MBU DO "DKhSH No. 1", Ryazan Baukova I.P.
Description:
Art forms and develops a person in many ways, affects his inner world. It develops the eye and fingers, deepens and directs emotions, excites fantasy, makes thought work.
This article is part work program in the fine arts of the children's art studio, based on personal pedagogical experience. Provides useful information on the main artistic disciplines(drawing, painting, composition, DPI). Designed for preschool and toddlers school age.
Target: to develop a sense of beauty given to children by nature in the art classes.
The combination of the game and the alphabet will allow them to understand that the area visual arts This is both interesting and not easy. For the most complete disclosure of abilities in children, it is recommended to use the most various materials and technician in class.
Tasks:
1. Enrichment of artistic horizons through knowledge of the fine and decorative arts and their role in human life;
2. The need to develop children's knowledge, skills and abilities in the field of fine arts.
It's never too late to learn to draw
but we must agree that the basics
fine art is better
learned at an early age.
According to Dahl, to create is to give life, to create, to create, to produce, to give birth. This is an active property. They are generously endowed with humanity, and especially children. Getting into art school, the child already owns to some extent visual means expressions, but is not yet aware of their consistency. The use of these funds by the child is in the nature of the game.
V. Favorsky wrote: "It would be extremely joyful if children's creativity could be succeeded, without breaking or tearing it off, but not conserving it, but gradually complicating it, transferring it into the creativity of adults, without losing the wealth won by the child, and this, apparently, is possible ."
Untimely training in skill is a serious obstacle to creativity. The teacher should exercise the greatest restraint in influencing students. Because even a teacher who has taste and inclinations can fix a child in a spectacular, but primitive way of drawing, can instill in him a premature "academicism" of an adult. Rejecting himself from his own tasks, he thus loses the most valuable thing - independence.


"From play to knowledge" is the motto of the program for young children.
This is how a child works, he learns everything in the game, through the creation of a second reality - text, drawing, sculpture. In the game, a miracle opens up for him - whatever you think of, you can draw, glue, sculpt, etc.
Children constantly invent something, fantasize. Their ability to animate the inanimate world with their imagination dictates the teaching methods to the teacher. But we must remember that each child is a separate world. At the heart of children's consciousness is an image, complex, but very integral. The task of the teacher is to expand the child's understanding of the ways to achieve the goal, to reveal to him the variety of ways and means that are given to him gradually in the game.


Survive, realize, be able - three stages creative process. What is not experienced, not felt emotionally cannot be embodied. Therefore, the uniqueness of each child, his experience is the starting point for creative search. The independent choice of solving a creative problem makes the child bold, sincere, he develops fantasy and intellect, the gift of an observer; develops patience and taste. All this provides a path to beauty. Experienced beauty moves the child in search of the most expressive expressive means of its embodiment. Failure in this case is even useful.

On initial stage teaching children with equal interest perform all tasks in drawing, painting and composition. They are fascinated by new techniques and techniques; many things are new and unusual for them. The level of skill, thinking and artistic expression actually coincide. Hence the passion.
The composition carries a creative element and without active work in this area it is impossible to talk about the education of the artist. Therefore, it is the main subject in elementary school. The task of the teacher is to help the child express his attitude to the world around him and convey his plan.
The themes of elementary school compositions are often fabulously fantastic in nature. Thematic lessons are usually preceded by conversations with illustrations. Moreover, stories, reading, poetry, listening to music should not be long in time, but emotional. Sometimes children at this moment have to imagine something that they have never seen.
literary works, music and visuals organize the child's thinking, help to find the simplest and most expressive way of depicting. Thanks to this, over time, conciseness and rhythm appear in the works of children.


It is known from work experience that, listening to a fairy tale, children experience the events taking place in it, reflect the poetics of a magical atmosphere. This is expressed both in color and in line, plasticity, architectonics and compositional solution. Most often, children combine means of expression. The ability to "grab" what is heard and seen and convey it whole and directly is one of the main features of children's art. The task of the teacher at the same time is not to overload the children with their attention, presenting them with the possibility of self-expression.


Children's compositions can be cheerful and gloomy, joyful and strict, restless and calm, majestic and simple. This diversity depends not only on the theme and content, but also on the tonality of colors, combinations of light and dark spots, and many other points.


Children's works are filled with energy and pure emotions. Their work is bold and naive.
Rhythm - consistency of shapes and colors.
Composition, as the strongest means of expressing an idea, includes all the components of form: color, rhythm, pattern, movement, determines the position of figures and objects in space.
Method rhythmic exercises makes the artist himself inspired, and his hand flexible, gives impetus to further creativity - the children concentrate, tune in to further work, full of fun and fantasy.


Symmetry is one of the tricks compositional solution. It is more used in decorative arts. Symmetrical compositions create a state of calm, solemn majesty.


In graphics and painting, balance is of great importance. The distribution of the load on the right and left, top and bottom, which allows you to create a balanced composition.

Children are very fond of depicting birds and animals. Drawing their attention to the habits, grace, beauty and plasticity of animals, we educate in them, first of all, a kind and merciful person.
But every artist should be able to draw a horse, a cow, a dog, a cat. They are suitable for any genre. Only constant and purposeful study of animals with a pencil in hand will bring freedom in drawing, freedom in composition.


But we must remember that by acquiring knowledge and studying nature and animals, the child becomes more confident in creating his own idea, acquires patience and perseverance, gains freedom in drawing, freedom in composition. Over time, the work will become more elaborate, but also more "personal".


The artistic image of a children's work will help create whole system techniques and means of expression, which can be called its language. Great importance this is played by: line, silhouette, tonal gradations and color combinations.


Children need to be constantly reminded that the same motive can be solved in different ways and they themselves must take part in choosing the right technique for solving a particular problem.
Of great importance is the work of students in a group, where children are infected by ideas from each other, where there is a spirit of competition and the possibility of influencing each other.


At the initial stage of education, they use technically more quick methods images, without careful study. Children enjoy working with materials such as pastels and colored pencils.


Creating a lot of sketches, sketches, exercises give children the opportunity to make choices.


Drawing classes do not aim to make artists out of all children, but it is important to release and more fully use such sources of children's energy as creativity, independence, awaken imagination, strengthen nature's given abilities to observe and evaluate reality. After all, in order to create something good, one must be able to admire and be surprised by it. The teacher should be driven only by the desire to help and teach.
Drawing, children better remember visible forms, reproduce their ideas about the reality around us, develop and strengthen visual memory. A drawing can tell, show, explain this or that phenomenon, what makes it an important tool self-expression. The value of the materials is very great. Broad and thin lines, contour - this is the most flexible means when drawing, when placing objects in space, when determining scales, etc. The variety of shades in shading with a pencil and other materials give unique qualities of texture.


Children are visionaries and dreamers. They are always happy in creativity.

How sometimes you want to create! With the help of paints and brushes, you can create a real masterpiece. How joyful and easy! Feel like an artist. After all, there is nothing more beautiful in the world than creativity! Children are the most talented and most interesting artists in the world.
Zhanna panzina
Project "Visiting the paintings" (Conversation about the genres of painting)
Passport mini project.
Name project: "IN visiting the paintings» (A conversation about the genres of painting) .
Target: Introduce children to painting genres(portrait, landscape, still life, animalistic) using paintings by Levitan, Vasnetsov and teach to distinguish them.
.Tasks:
painting genre.
painting by artist.
"Creating a Still Life" genre. Intermediate results: As a result of one day project children preparatory group get acquainted with painting genres: portrait, landscape, still life. Children know how to lead conversation, substantiating their answers, answering questions correctly, creating compositions from the proposed material, playing a dramatization game. Have skills in drawing: know the technique of working with a brush and watercolor. Based on this project and planned activities that are aimed at the artistic and aesthetic development of the child, you can do the following conclusions:
The children's vocabulary has increased.
Leading skills develop conversation.
Increased intellectual development.
Cooperation experience is developing.
Interest and love for art is brought up.
Mini- project: one-day.
Members project: children of the preparatory group, teacher of the highest qualification category Panzina Zhanna Evgenievna Relevance: In the course of purposeful work on sections of the program "Birth to School" under the editorship of Veraksa, M. A. Vasilyeva, the artistic and aesthetic education of children develops an interest and need for art.
Hypothesis: according to which the use of reproductions of great artists, attributes, game situations, methods of visualization and literature contribute to comprehensive development child and create a positive emotional mood.
Problem: Help children through reproductions, music, games, art word develop an interest in art.
game situation: Visiting an art exhibition.
Target
Tasks:
Develop the ability to distinguish genres of painting from the total mass of paintings. -To reinforce in children the idea of painting as a form of fine art, to know the features of each genre.
To develop an aesthetic assessment, the ability to see with what means of expression is depicted painting by artist.
Cause in children an emotional response to the works of artists, that is, what they liked.
Cultivate the ability to work in a team during the game "Creating a Still Life". - Familiarity with animalistic genre.
Previous work: Examination of reproductions of the great Russian artists Shishkin, Levitan, Vasnetsov. landscape painting "Autumn has come", « Late fall» , "Winter forest" etc. Portraits of mom, dad, grandma, grandpa. still lifes: "A bowl of fruit", "Vegetables" etc.
Material: Presentation for the lesson, in the sequence studied genres, as well as playing the game "Find an extra genre» .Playing a game "Creating a Still Life" with lots of benefits: tea sets, vegetable and fruit replicas, ceramic dishes, baskets, artificial flowers. Attributes to the game-dramatization based on the poem by S. Ya. Marshak "Gloves". - hats for kittens and cats, gloves. Vocabulary Job: Landscape, still life, portrait, animalistic genre.
Deadline: February
Presentation mini project
Estimated result: Children will learn to name and distinguish painting genres, and draw them. Create still lifes.
Stages project:
Goal setting.
Search for a form of implementation project.
Development of the entire educational process based on topics project.
Collective implementation and presentation project.
Statement of a new problem.
Project progress:
1. Introduction to the game situation.
Visit to an art exhibition. (Definition painting genre) .
2. Problem Clarification
A game "Create a Still Life" (domestic and natural).
A game "Find an extra genre» .
3. Organization project:
Game - dramatization "Gloves".
Creative work.
4. Statement of the problem:
Summarizing. Children present their creative work.
5. Statement of a new problem
Introduction to Animalism genre.
Abstract
Target: Show the knowledge and skills of children in visual activity obtained in the learning process.
Tasks:
Develop the ability to distinguish genres of painting from the total mass of paintings. -To reinforce in children the idea of painting as a form of fine art, to know the features of each genre.
To develop an aesthetic assessment, the ability to see with what means of expression is depicted painting by artist.
Cause in children an emotional response to the works of artists, that is, what they liked.
Cultivate the ability to work in a team during the game "Creating a Still Life". - Familiarity with animalistic genre
The music room is divided into zones: chairs are arranged near the screen according to the number of children, in working area there are tables on which material for drawing is prepared, along the edge of the room there are tables where attributes for the game are laid out "Create a Still Life".
The teacher invites the children to the music room.
caregiver: Children, today I invite you to visit visiting the paintings. Where can you see paintings? (children's answers). For this we will go to art exhibition. Come in and sit on the chairs.
But to see paintings you need to answer question: "What's happened painting genre?» (children's answers).
You are great, you know what painting genre.
Listen to the exact definition used by artists.
Genre of painting- this is a type of works of art with certain plots, artistic images, transmitted by artists with the help of paints.
The teacher offers to listen to A. Kushner's poem, and for the correct addition of children to this poem, the screen will show a fragment on one or another genre: still life, landscape, portrait.
If you see on picture of a cup of coffee on the table
Or fruit drink in a large decanter, or a rose in crystal
Or a bronze vase, or a cake,
Or all the items at once, know that this is ... a still life.
(The screen shows reproductions famous artists Khrutsky "Flowers and fruits").
The teacher reminds that the still life is divided into domestic and natural. During the conversation, the children complement how it looks household still life but as natural. On screen in progress conversations Still life reproductions are shown.
After reviewing the still lifes, the teacher invites the children to consolidate knowledge about everyday and natural still lifes through the game "Creating a Still Life". Children are divided into three teams in order to collect still lifes: household, natural and natural household. Attributes for this game are located on three tables in a mixed mess. 5-7 minutes are given for the game. After the game, the teacher examines with the children the correctness of creating still lifes, thanks the children, the conversation about the genres of painting continues, the children are invited to sit in their seats in the auditorium.
If you see on picture, the river is drawn
Or spruce and white frost, or a garden and clouds,
Or a snowy plain, or a field and a hut,
Necessarily the picture is called ... landscape.
The screen shows reproductions of famous artists Levitan "March", Shishkin "Downed Tree".
In addition to this, in the process conversations, the educator suggests remembering that the landscape is simple and difficult: in a simple landscape, one or two plans, and in a complex one, from three to six.
If you see that with paintings one of us is watching
Or a prince in an old cloak, or even a climber,
A pilot or a ballerina, or Kolka is your neighbor,
Necessarily the picture is called ... a portrait.
The screen shows reproductions of portraits of famous artists. The teacher considers with the children three types portrait: front - straight view, turn 3\4, profile - side view.
The teacher asks the children to remember what painting genres were considered by children earlier, in the classroom for fine arts. The teacher asks leading questions.
In class, we considered a fabulous genre, let's look at the reproductions of the great storyteller artist Vasnetsov.
The screen shows the work of the artist Vasnetsov , "Heroes", "Alyonushka".
On picture Viktor Mikhailovich Vasnetsov Ivan Tsarevich gray wolf» the huge tree trunks of the dark impenetrable forest look like fantastic giants. Through the intertwined branches of monster trees, the disturbing light of the morning dawn barely breaks through. A marshy swamp with water lilies is fraught with danger. An atmosphere of anxiety and sadness surrounds heroes: misfortune and separation await the fugitives. And in the foreground is a wonderfully blooming apple tree - a symbol of all-conquering love that can work miracles, a sign of a happy ending to a fairy tale. And this picture of the epic-fairy genre"Heroes". The artist worked on it for over 20 years. On picture depicts three heroes Dobrynya Nikitich, Ilya Muromets, Alyosha Popovich (shows). The Russian heroes in the field notice whether there is a enemy somewhere, whether they offend anyone somewhere.
Thus, the favorite heroes of Russian epics appear in picture as defenders of their people.
Look at picture"Alyonushka", it belongs to a series of fairy tales about Alyonushka and brother Ivanushka. The artist wrote picture from a peasant girl. Color on the picture is thick, saturated, enhances the reigning on picture mood of sadness, thoughtfulness, silence, mystery.
Then the teacher introduces the children to the new genre-animalistic and in the process of the story shows on the screen fragments of the artist Khokhlov's works for the cartoon "Mowgli". Animal is animal, i.e. artists painted animals V human form, it was assumed that they could walk like people on their hind legs, etc.
animalistic genre is hard work , since the artist needs to draw this or that character so that this idea is clear to the viewer, because the artist, conveying the character of the characters, animals means people: good and evil, rich and poor, cunning, etc.
Children are invited to take attributes for the game.
Children conduct a dramatization game based on Marshak's poem "Gloves".
The teacher invites the children to relax and consolidate their knowledge of painting genres, play the game "Find an extra genre» .
On the fourth fragment genre superfluous. This game has 5 minutes.
After the game, the children are invited to go to the workshop and draw one of the genres today's lesson. Creative work is accompanied by Tchaikovsky's music "Seasons". On creative work 10 minutes are allotted. The teacher looks at the drawings with the children.
Lesson Analysis: Children today we are with you, spent great job, considered a new genre, in a playful way, consolidated knowledge about what has already been studied. We remembered the great, famous artists, as well as their names paintings. You did a very good job, I thank all the guys present here for their active participation and good behavior. This concludes our lesson.
For some reason talking about early development child, many have in mind only the mental, and not creative development children. But the development creative aspect personality of your child will only serve as an additional impetus to the development of his intellectual abilities. To do this, it is necessary to instill in the child an interest in art from an early age, in particular, in painting, but it is not too late to start this acquaintance at an older age. Find out further which pictures we recommend to take for review for children of different ages.
What to show children from 3 to 6 years old
Even at 3 years old, most modern children already know what photographs are, so it should not be difficult for them to draw an analogy with paintings. Just explain to your child: when before people could not use cameras and phone cameras, they had to draw to capture someone's portrait, landscape, object or scene from life. It took much longer than clicking a camera button, but the result was unique.
At this age, paintings for children do not represent artistic value, they are not particularly interested in the author of the canvas, his biography or the background to the creation of this painting. Therefore, for the time being, you can not delve into these "wilds", but simply accustom the child to attentiveness, teach you to look at pictures and notice details. The later the creative development of children begins, the more difficult it will be for your child to analyze art as a teenager and then as an adult.

What kind of paintings for children will be the most interesting and advantageous for the first acquaintance with painting? Here you can remember what things the kids pay attention to first of all when entering a toy store - as a rule, everything is bright, large, colorful, and also realistic, like a barbie house with furniture and utensils, or a detailed army of soldiers. Children's paintings should be the same: colorful landscapes, still lifes with large objects, large beautiful portraits.
At this age, suitable painting for children is the canvases of Claude Monet, who worked in the style of impressionism. His paintings are filled with bright colors, soft light and interesting stories on which the child himself will draw attention.
For example, show him the painting by the artist "Terasse at Sainte-Adresse":

Be sure to discuss the picture with the baby. At first, you won’t hear detailed feedback from him, so ask leading questions, for example: “What is shown in the picture?”, “What are people doing?”, “What did you like most?”, “What colors do you see?” and so on.
Wonderful paintings that are worth showing to children were also painted by Russian artist Viktor Vasnetsov. We recommend showing one of his most famous paintings, which may be of particular interest to children - "Bogatyrs":

It will be great if, when viewing the picture, you can tell the children some epics about these three heroes. Or perhaps the children have already seen the cartoon about these characters, and they themselves will be able to retell its plot to you. And of course, you can’t do without questions about the picture: “Where are the heroes?”, “Do they see the enemy or just look around the area?”, “Will anything happen next?”, And be sure to point out the details: the weapons of the characters, their views and so on.
Show the child and "Still Life with Fruit" by Paul Gauguin. Not all paintings by this artist are suitable for preschool children, but this still life looks quite attractive, large and colorful. Ask the child: “Do you like to eat apples?”, “What color are they in the picture?”, “Which one would you eat?”.

At the end of viewing pictures for children, do not forget to share with the crumbs and your own opinion on the basis of painting.
- If you want to introduce a child to painting at home by showing him paintings from the Internet or a printed encyclopedia, then you have the opportunity to independently control the content in the process. But if it is, for example, a visit to a museum or art gallery, then we advise you to think over the route in advance so as not to stumble upon classic canvases depicting historical scenes of violence, or paintings with nudity, which it is too early for a preschooler to see.
Painting for children from 7 to 9 years old
The creative development of children should be continued even when they enter school. And although younger students still like bright children's paintings, where there is something to catch the eye, they are now much less interested in static subjects like still lifes and landscapes. Children are still learning about the world, but not everything is new in it, so looking at nature and objects laid out on the table is not so interesting.

They begin to watch cartoons less often, and more often show curiosity about films - therefore, canvases with the image of various activities, historical subjects, or detailed portraits. Here you can also make pictures for children depicting mythology, culture different peoples, people from ancient times. By the way, the creative development of schoolchildren suggests that they should already know the concepts of “portrait”, “still life”, “landscape”, etc., and at least know the names of the artists of the paintings in question.

Is it worth avoiding at this age pictures with couples in love, scenes of war, etc. - it's up to you, just be ready to answer any questions from the child and explain the difference between "good" and "bad".
Interesting painting for children of primary school age is at Italian master Giovanni Battista Tiepolo, for example, The Marriage Agreement, Mercury and Aeneas, and especially Cleopatra's Feast:

The painting depicts Cleopatra's meal with those close to her - can a child say the same? Ask what he sees in the picture, what details he especially remembers. Can you tell him the story of this queen - will the child like her, what will she say about the canvas now?
A good way to get acquainted with painting for children from seven years old is famous painting Ivan Shishkin "In the pine forest":

Children, as the main lovers of sweets, may know him by the wrappers of the chocolate sweets "Mishka kosolapy", famous since the times of the USSR. It is good because it combines both landscape and elements of animalistic plot - children will obviously be interested in looking at cute fluffy cubs. Ask them: what do the cubs do? What impression does the forest make on them - a young edge or a dense thicket? Why does it seem so? Come up with your own questions.
What to watch for kids aged 10 and over
Starting from the age of ten, it is useful for children to get acquainted directly with the biographies of artists, the development of their creative activity. Schoolchildren are very reluctant to get acquainted with such information on their own, so they need a narrator: either you are well prepared, or find a suitable video.

In addition, we must not forget that now schoolchildren are entering puberty, so the circle of their interests is changing and expanding significantly. They are interested in emotions and experiences, love and friendship, high-profile events, charismatic people, secrets and riddles. Therefore, children's paintings for review should be selected with appropriate subjects.
ground for thought and interesting conversation will give a picture of Vasily Pukirev " Unequal marriage”, which depicts the process of the wedding of an elderly groom and a young bride:

Without disclosing the name of the picture, ask the child for thoughts about this work, will he notice the contrast depicted on the canvas? Tell him about what marriages were like in those days, point out how skillfully the artist conveyed the doom of the girl and the various emotions of the surrounding guests.
Show the children the paintings of Ilya Repin: “Cossacks”, “Barge haulers on the Volga”, “Ivan the Terrible and his son Ivan”.
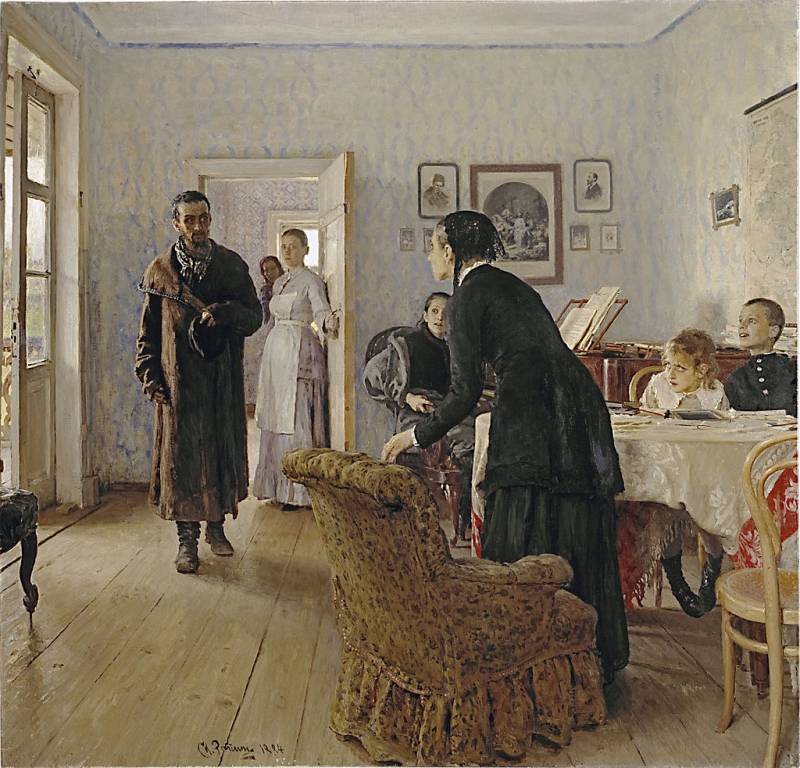
The second version of the painting “They Didn't Wait” will also be interesting for a teenager, which shows how a political exile returns home quite unexpectedly. Ask the child to describe how he sees the emotions of the characters in the picture who saw the returned man: joy, disbelief, shock, surprise.
With older children, you can also already discuss ways to convey the figurative and expressive means that painters use in their work, compare the work of different artists and search together Interesting Facts about the creation of a particular canvas.
For ideas on paintings to show to kids and teens, check out this video of the most famous paintings in the world:
Take it, tell your friends!
Read also on our website:
show more